advanced perspective techniques
The previous pages developed the methods of linear perspective using the cube (or other rectangular objects) as the primary form. This was convenient because the edges and right angles of these objects simplify perspective constructions.
When tackling the perspective of complex or irregular shapes, the basic strategy is to fit these shapes inside a regular geometric figure or solid, like a valentine inside an envelope or a vase inside a box, then use this rectangular solid to "mail" the form into perspective space. This page gives several examples of how to do this for plane figures and solid forms.
Next, I provide a tutorial on projecting a building, which is just another type of complex volume, from architectural elevations and plan. The same methods apply to any object for which elevations and plan are available.
The methods of paraline perspective, based on the geometry of parallel projection, were developed in the 18th century (at the rise of the Industrial Revolution) for a variety of engineering and manufacturing applications. I present a few of the common forms and discuss how they relate to the perspective of central projection.
I conclude with a brief discussion of curvilinear perspectives, a modern and dogmatic answer to the "distortions" in traditional linear perspective. I show how to make a basic curvilinear template and explain why the usual justifications for curvilinear perspective are fallacious.
perspective of complex plane figures
One of the most common perspective problems is rendering in perspective a curved or irregular figure that is not a composite of squares or rectangles. The most common example is a circle in perspective, as the rim or contour of a disk, drinking glass, bowl or cylinder.
The solution in each case is the same: to use the square (or a metric grid within a square) as the projection framework or projection square. The rationale is that it is that it is simple to project a square in perspective, and once this is done the square or grid can be used to transfer descriptive points from a plan or elevation view of the figure.
The general procedure is: (1) enclose the complex figure within a regular rectangular form (square or rectangle); (2) divide the rectangular area with a regular grid and/or a major diagonal; (3) identify the point intersections of the figure with the sides of the square, the grid or the diagonal; and (4) transfer these landmark points into the image plane, where they are used to reconstruct the figure image.
Projecting A Circle. Let's start with the simplest case, projecting a circle in perspective. I know of several different methods to do this, but provide here two that are among the easiest and most effective.
Circle Without a Plan. There is a very useful method to construct the circle entirely from the geometry of the square. No plan is required, because the points are defined entirely within the image plane; the diagram (below) shows a plan view only to clarify how the method works.

projecting a circle without a plan
Begin with any square established in perspective at the appropriate scale, location, and angle of view. The circle defines a plane, and the vanishing line for this plane must be available as the principal point (orthogonal vanishing point) and diagonal vanishing point, or the controlling vanishing point(s) and measure points. A diagonal vanishing point or measure point is only necessary to define the square in depth, but the principal point or primary vanishing point of recession is required. Then:
technique |
|
perspective of complex plane figures perspective of complex solid forms |
1. Construct the full diagonals, ab and matching.
2. From the full diagonal intersection (center of the square), construct the half transversal to c and the half orthogonal from the principal point through d. Mark the four intersections with the sides of the square, c and d and the points opposite (black).
3. Construct two quarter diagonals, c to d and matching on the opposite side. Construct the two quarter orthogonals from the principal point through the intersection e and its twin.
4. From the intersections of the quarter orthogonals with the full diagonals, such as e, construct the quarter transversals. The projection square is now divided into sixteen smaller squares.
5. Construct the two rectangular diagonals from each corner of the square to the intersection of the nearest quarter line with the opposite side of the square: that is, a to g opposite, h to f opposite, and similarly for the other six rectangular diagonals.
6. Near each corner, mark the intersection of the rectangular diagonals from that corner with the nearest quarter orthogonal or quarter transversal: that is, x and y for corner a, and similarly for the other three corners (black).
7. Finally, join the twelve points, freehand or with a French curve, to produce the circle.
This method is "nearly accurate", because points x and y stand slightly outside a perfect circle, as is visible in the diagram. However this is inconsequential when working small or with very foreshortened figures; or the circle can be drawn to miss slightly the pair of corner guide points.
Circle With a Plan. Using a plan results in a slightly more accurate set of guide points, and additionally requires fewer guidelines to define. The diagram below shows the procedure.
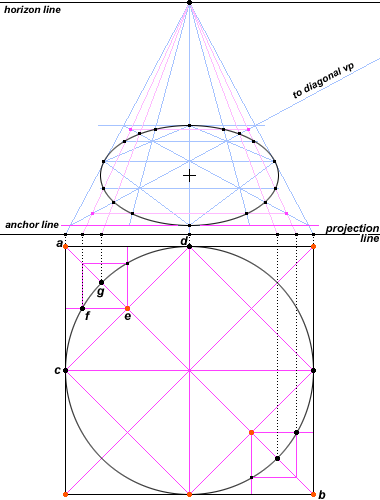
projecting a circle with a plan
Begin with any square established in perspective at the appropriate scale, location, and angle of view. The circle defines a plane, and the vanishing line for this plane must be available, either as the principal point and diagonal vanishing point or controlling vanishing point(s). A diagonal vanishing point is only necessary to define the square in depth. Then:
1. In the plan (projection square) and image square, define the full diagonals, ab and matching.
2. In the plan and image square, divide the square half by a perpendicular line (plan) or orthogonal to the principal point (image) through the intersection of the full diagonals. Divide again by a perpendicular horizontal line (plan) or transversal (image). Mark the four points where these lines intersect the square, c and d and the points opposite (black).
3. Construct two quarter diagonals, c to d and matching on the opposite side. Construct the two quarter orthogonals from the principal point through the intersection e and its twin.
4. From the intersection of quarter and full diagonals (e and matching on the opposite side), construct a horizontal line to the side of the square. This intersects the circle at f and matching on the opposite side.
5. Mark the intersection of the circle with the full diagonal, at g and on the opposite side.
6. With eight vertical lines, carry the eight points d, b, a, g, f, e and matching up to the projection line, then project to the principal point with orthogonals. Using the intersections of orthogonals with the image square diagonals, identify the points within the image circle; then use orthogonals and transversals to reproduce matching points at other corners.
7. Finally, join the twelve points, freehand or with a French curve, to produce the circle.
Note that a and b are already defined in the image square; d can be located with an orthogonal from the principal point throught the image diagonal intersection; and the projection line from e (and the matching point) can be found in the image square by a transversal from the diagonal intersection of the projection line from f, through the circle to the opposite diagonal. Consequently only four projection lines are necessary — from f and g and the matching points on the other side — as shown by the pink lines in the diagram.
Circle with Trigonometric Ratios. Finally, an even more accurate method for projecting a circle was first used by Paolo Uccello, as described below). It is based on a close partitioning of the circle's circumference into 32 equal segments, which however makes the projection task more efficient.
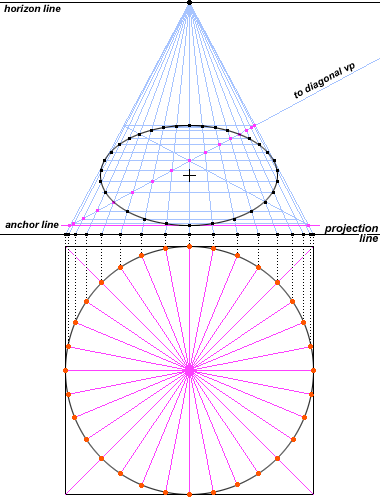
uccello's method of projecting the circle
1. Divide the circle plan with 16 equally spaced "spokes"; these are found by dividing the circle into quarters by a horizontal and vertical line intersecting at the circle center, then bisecting the two upper 90° angles 3 times.
2. Carry the 17 intersection points to the projection line, and project by orthogonals to the principal point.
3. Mark the intersection of each orthogonal with a major diagonal of the image square (magenta points). From these points construct 15 transversals across the image square.
4. Identify the point intersections of each transversal with the matching orthogonals on both sides of the square, and the two point intersections of the central orthogonal with the front and back of the square. Connect these 32 points to form the circle.
The elegance of the original plan bisection is that each projection point stands for both a horizontal and vertical location of the circumference points; the artist simply locates the intersection of the projection orthogonals with a major diagonal of the image square and the transversals duplicate these locations on opposite sides of the circle, creating the 32 points that define the circumference.
The location of these points along the width of a projection line, of unit length 1.0, is derived from the cosine of the angle of each "spoke" to the direction of view. The sequence is tabulated below for reference.
| |||||||||||||||||||||||||||||||||||||||||||||||||||||||||
To scale this series, just multiply by the unit length and measure from one end of the dimension. Thus, to project a circle from a projection line that is 20 cm wide, multiply by 20: then the -45° angle (spoke #5) is located 2.9 cm from the dimension end.
Ellipse Construction. Now an important constant in perspective construction is that:
A circle in physical space always appears as an ellipse on the image plane, except when it is viewed edge on.
This means we can circumvent the whole rigamarole of partitioning a plan and projecting it into perspective space: let's just construct the ellipse directly on the image!
Every ellipse can be described by its height and width dimensions, known as its major axis (widest dimension) and minor axis (perpendicular to the major axis). This leads to two simple methods for ellipse construction and also a calculation to estimate the foreshortening of a circle.
The diagram (right) shows how to construct an ellipse from fixed height and width dimensions. In the first method (A), the height and width define a rectangle, which is then divided into equal quadrants by two lines. Then one interior horizontal line segment and one exterior vertical line segment are divided into proportionately equal parts, creating proportionately spaced points. (The points do not have to be equally spaced, only equal in their proportional spacing on the two lines.) Lines are drawn from the two midline points, a and b, through the respective points, as shown. The intersection of matching lines defines a point on the ellipse in one quadrant. The landmark points are joined by a freehand curve or segments of a French curve, then traced or copied into the other three quadrants.
The alternative and more efficient trammel method (B) is to define the ellipse rectangle, then transfer the length of the major and minor axes, aligned at one end, to a strip of cardboard or heavy paper (diagram, right). Because the major and minor axes are unequal in length, there is an interval between their end points at the other end (magenta line). These end points are aligned with the minor and major axes of the ellipse rectangle, and the circumference of the ellipse marked off from the aligned end points at the other end of the card. This method is quick, although it becomes much less accurate as the major and minor axes become equal (the ellipse approaches a circular shape).
The third method (C) uses two concentric circles, centered on point a; the two circles are divided into quarters by perpendicular lines defining the major and minor axes of the ellipse. An arbitrary number of lines are drawn radially through both circles from point a, creating pairs of points at the intersection of the line with the inner and outer circles. Then lines are extended from these points, parallel with either the major or minor axes of the ellipse; their intersections define points on the ellipse in one quadrant. An advantage of this method is that, by extending the "spokes" and the horizontal and vertical construction lines completely across the larger circle, the entire circumference can be identified.
However, there is a problem. The circle construction diagrams above show that the center of the ellipse is not coincident with the center of the image square (the intersection of the image diagonals), because recession causes the back half of the square to appear somewhat smaller than the front half. Thus, the black cross identifying the center of the ellipse is not located at the diagonal but somewhat below (in front of) it.
This is the same difficulty that produces the visual discrepancy between the visible circumference of a sphere (equal to the image width of the major axis of the ellipse) and the visual angle of its diameter (equal to the image width of the perspective square across its center). This problem is examined in the section on projecting a sphere. Unfortunately, there is no simple way to scale the width of the ellipse, other than making a scale drawing in plan, as the major axis is not coincident with the midline transversal of the square, and the points where the ellipse touches the square envelope are typically not on the major axis of the ellipse. But for perspective circles within a 20° circle of view, the discrepancy is so tiny that it can be ignored.
This is a principal reason why architects traditionally used ellipse templates and now rely on computer drafting programs. The templates contain a very large number of ellipse cutouts, each slightly larger than the last, all scaled to a standard angle of view onto the plane surface containing the circle. The artist simply chooses the template angle that corresponds best to the proportions of the major and minor axes of the ellipse required, then chooses the cutout that is closest to the right image size.
The method for estimating the foreshortening of a circle (the ellipse template angle) derives from the trigonometric tangent within the circle of view geometry:
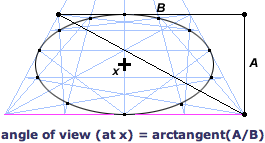
Given a perspective square located near the median line, draw the vertical line A from a front corner, and the horizontal line B from the opposite back corner; these lines intersect to form a right triangle. Using a ruler, measure the lengths of A and B and find the arctangent of their ratio. This is the angle of view onto the plane surface of the square at point x. This angle is used to identify the most suitable ellipse template.
In the illustration (counting in pixels), A = 101 and B = 187, so the angle at x is approximately the arctangent of 101/187, or 28.4°. The formulas quoted in the section on distance & size calculations allow you to use this angle to infer the radius of the circle of view that contains the square, and the object distance (X) of the center of the square from the viewpoint. For ellipses turned at an angle due to perspective distortion (see below), the ellipse should be enclosed by a rectangle tilted to the same angle; the tangent is found from the height to width ratio.
Architects do not bother with any of this: they just try one or another template until they visually discover the best match in angle and size.
Photoshop note: Because a circle is an ellipse whose major and minor axes are equal, any ellipse is just a circle image compressed along one dimension. The Ellipse Marquee Tool can be used to approximately define the ellipse outline, and once this is colored in it can be adjusted to an exact fit by horizontal and/or vertical compression with the Free Transform tool.
Perspective Distortions (Reprise). It should not be surprising, if perspective "distortions" are in fact accurate perspective images and the circle construction methods create accurate image circles, that constructed circles will display perspective distortions. So we have to reprise the issue of distortions and how to deal with them.
The example below is an extreme case, but if you compare it to the appearance of spherical forms similarly displaced from the direction of view, you will see it is no worse than expected.
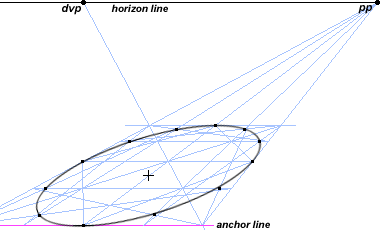
perspective distortion in a 1PP constructed circle
This is not just an artifact of the 1PP perspective: if we use a 2PP geometry the shape of the square containing the circle is improved noticeably, but the circle is still strongly tilted. (The reduction in elongation and size is due to the fact that the image square is closer to the principal point dvp and to the horizon line.)
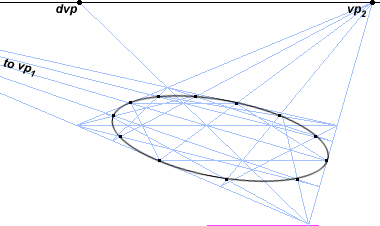
perspective distortion in a 2PP constructed circle
Some perspective tutorials advocate the radical solution of drawing an image circle in all situations as an ellipse with major axis parallel to the horizon line. Robert W. Gill, in an otherwise sensible perspective tutorial, claims that the normal perspective distortions of circles "are contrary to the laws of perspective" — which is flatly incorrect. The problem is that perspective distortions are sometimes contrary to a pleasing image.
"Pleasing" is a practical rather than geometrical issue, so the practical question is (for example) how an ellipse, with major axis parallel to the horizon line, can be fitted into the geometrically correct 2PP image square shown above. This is only possible if the ellipse does not touch the square on one or two sides at the same time that the ellipse is grossly flattened. Gill evades this difficulty by standing the columns in his illustrations flat on the ground plane: but most architectural columns rest on a square base or plinth, or are surrounded by square tiled floors, so the proportions and shape of the cylindrical column and square base must correspond. To accommodate an acceptably rounded ellipse shape that touches the four sides of an image square base, the perspective shape of the square base must also be "adjusted" by reducing its visual width. But now the column and base are no longer in scale to the architectural elements around or behind them, so these too must be adjusted ...
In effect, all these adjustments are incremental steps toward shifting the diagonal vanishing points, and with them the 2PP vanishing points, farther apart. So the appropriate solution for this problem is the classical remedy for perspective distortions: reduce the circle of view contained within the image format or (equivalently) increase the distance between the principal point and diagonal vanishing points, or (equivalently) increase the object distance in perspective space.
If you are using an ellipse template, the major axis of the ellipse should be aligned either with a line to the opposite diagonal vanishing point (in 1PP) or at a slightly less tilted angle than a line to the opposite vanishing point (in 2PP). I find an arc drawn from the opposite vanishing point, from the center of the ellipse to the horizon line, reasonably locates the direction in which the minor axis should be oriented.
Projecting Complex Plane Figures. A wide range of more complex plane figures can be handled by the square or rectangular projection, and the method of distance point projection is the foundation method in these cases.
However, the distance point procedure of drawing arcs to identify the diagonal projections for every point in the figure quickly becomes cluttered, or requires a large working area. The more compact solution is to use the diagonal contained within the projection square as the depth projection mechanism, and project everything from the plan using only orthogonals to the principal point (or, for 2PP or 3PP drawings, the appropriate two measure points).
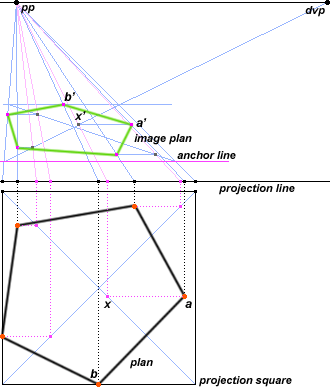
projecting a pentagonal plan into perspective space
The method of diagonal depth projection or rabattement is elegant and simple: draw a square around the form you want to project; draw a diagonal across this boundary; establish the diagonal twin for all key points; carry each point and its diagonal twin forward to the measure bar; project the points from the measure bar into a square in perspective space with a diagonal carried to the diagonal vanishing point (dvp); establish the key points in perspective by construction.
In the example above, we want to project the plan of an irregular pentagon into perspective. We first scale and rotate the plan, as described below, to the correct orientation and dimensions. Then we enclose it in a square, and draw a diagonal through the square. (Note that we don't have to exactly center the form within the square, and in fact it is the diagonal, and not the enclosing square, is the essential component of the method. However, it is handy to put required points on the sides of the square, if possible, to eliminate one or more of the projecting orthogonals.)
For each key point needed to construct the form, we first carry a horizontal line over to the diagonal, then two vertical lines, from (1) the original point and (2) its intersection with the diagonal line, up to the projection line. Thus, starting with point a, we carry a horizontal to the diagonal at x, then verticals from a and x to the projection line.
From the projection line, we project all the points back to the principal point (pp). We also project to pp the width of the square. Then, using the diagonal vanishing point, we construct the image square and, within the square its major diagonal.
Finally, for every point intersection with the plan diagonal, we construct a transversal from its intersection with the image diagonal. Thus the orthogonal for the plan diagonal point x intersects the image diagonal at point x', which gives us the recession. A transversal from x' intersects the orthogonal from a at the perspective location of point a'. The same is be repeated for each key point, except that orthogonals from points on the front or back of the square (such as b) require no transversal, and points on the sides of the square (such as c) require no separate orthogonal.
Provided that the vanishing points have been accurately rotated in relation to the 90° circle of view (the principal point and dvp's), these procedures work exactly the same in 2PP, and the 2PP vanishing points are not at all required to project the figure in perspective. In fact, any number of forms can be projected into the same perspective space using the same diagonal depth method of projection, and their vanishing lines relative to each other will harmonize exactly.
Finally, and most usefully, once a plane figure has been projected into perspective space, a line extended from any of its sides to the vanishing line for the plane that contains it (e.g., the horizon line for figures in the ground plane) identifies the vanishing point for that side and all physical lines parallel to it (diagram, above).
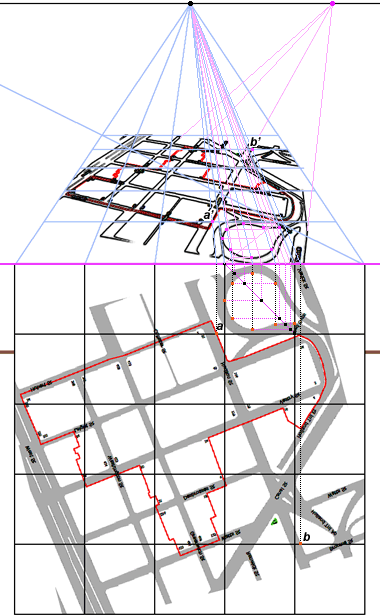
projecting a street map into perspective space
North Tribeca historic district, from New York Historical Society map
For example, in the irregular street alignments typical of many premodern city plans, a detailed street map of the area can be projected onto the ground plan, and this image street layout used to define the 2PP vanishing points for the horizontals of the various buildings (pink lines, above).
Alternately, a metric grid can be projected onto the image plane at the appropriate spacing and perspective depth (blue lines, above), and the map copied into the grid square by square, with diagonal depth projection used to trace out the contours or locations of difficult problems, such as the traffic loop in the right foreground.
perspective of complex solid forms
The strategy for projecting complex solids is essentially the three dimensional extension of the strategy for projecting two dimensional figures. The complex form is enclosed in or reduced to cubes or rectangles, and/or the grids or diagonals they define, and the object is reconstructed from the landmark points defined.
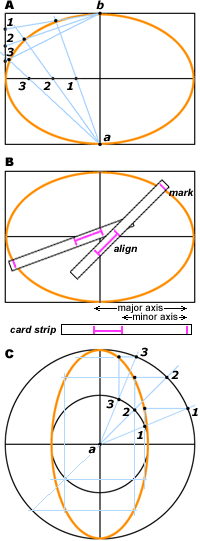
three methods for constructing an ellipse of fixed height and width
I think most artists remember their astonishment on first encountering the "wire frame" perspective drawing of a chalice by Paolo Uccello (right). In this case the complex construction was achieved by the painstaking accumulation of simple perspective tasks, and in tribute I summarize them here:
1. The plan of a square for the base of the cup was constructed in perspective space. From the ellipse ratios evident at the top and bottom of the chalice, I find that Uccello used a distance point (viewing distance) of approximately 8 times the height of the cup (e.g., the chalice is contained within a 7.2° circle of view). Thus, if the drawing is actual size (29 cm high), the viewing distance would be about 2.3 meters; and the base of the cup about 58 cm below eye level.
2. Separately, the plan of a circle was bisected, then quartered, and then each segment bisected again three times, resulting in 32 equal divisions of a circle.
3. The intersection points were brought by vertical lines to the projection line, then projected by orthogonals into the plan of a square in perspective space. Note that the bisection method has produced intersection points that are mirror symmetrical both horizontally and vertically, so all that is required to reconstruct the square is the intersection of each orthogonal with the diagonals of the square (see diagram, above).
4. This square projection was repeated over sixty times, each time at a slightly different scale and vertical location, to form the principal circumferences of the cup. The vertical spacing of the squares was accomplished with an elevation drawing of the cup, or equivalently by physical measurement; and the horizontal spacing by measurement.
5. The landmark points were connected horizontally to define the circumference edges, and vertically to the matching points in the circles above and below to define the cup surface.
Small misalignments and changes in line weight suggest the finished cup drawing was assembled from two or three component drawings; this implies that the drawing we have was transferred, by pin pricks, from other drawings, or is a scaled down version of drawings done in a larger format for accuracy. The whole project must have taken weeks to complete.
In that context, it is interesting to hear Giorgio Vasari's comments on Uccello's consuming perspective studies:
"Paolo Uccello would have been the most gracious and fanciful genius that was ever devoted to the art of painting, from Giotto's day to our own, if he had labored as much at figures and animals as he labored and lost time over the details of perspective; for although these are ingenious and beautiful, yet if a man pursues them beyond measure he does nothing but waste his time, exhausts his powers, fills his mind with difficulties, and often transforms its fertility and readiness into sterility and constraint, and renders his manner, by attending more to these details than to figures, dry and angular, which all comes from a wish to examine things too minutely; not to mention that he very often becomes solitary, eccentric, melancholy and poor, as did Paolo Uccello. This man, endowed by nature with a penetrating and subtle mind, knew no other delight than to investigate certain difficult, nay impossible problems of perspective, which, although they were fanciful and beautiful, yet hindered him so greatly in the painting of figures, that the older he grew the worse he did them. ... For the sake of these investigations he kept himself in seclusion and almost a hermit, having little intercourse with anyone, and staying weeks and months in his house without showing himself." [Lives of the Painters, Sculptors and Architects, 1550; "Paolo Uccello, Painter of Florence"]
A cautionary word across the centures for the many modern perspective dabblers, including digital rendering engineers, who spend days or weeks on a single texture map or illumination model. (Those solitary melancholics who spend months porting it all onto an obscure web site, well ... they are exempt from caution.)
Projecting a Sphere. The sphere and its related geometrical forms the cone and cylinder present a subtle difficulty. On the one hand, they are all circular in cross section and therefore, in most cases, can be represented by an elliptical outline along the front edge or circumference. On the other hand, they are solids rather than plane figures, which produces specific problems of image scale and foreshortening.
Sphere Image Scale. The scaling problem is that a sphere relatively close to the viewpoint presents a visual angle that is larger than the visual angle of its physical diameter. That is, using a measure bar or unit distance to project the diameter of a sphere in perspective space will underestimate its actual apparent size. The diagram shows why: the angle of view to the limb of the sphere is in front of the diameter, at its visible circumference.
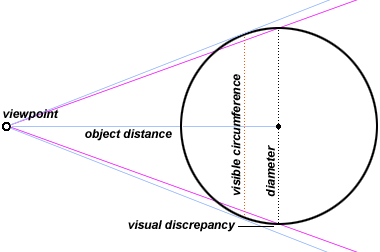
discrepancy between the visible circumference and angular diameter of a sphere
sphere shown at an object distance 1.4 times its diameter
It's odd that this problem gets extensive treatment in some perspective handbooks without asking the question: does the discrepancy matter? For a sphere at an object distance (ground plane distance) from its center to the viewpoint that is 2.5 times its diameter, the angular diameter of the sphere is 22.6° but its visible circumference is 23.07°. This is a discrepancy of about 0.5° or the visual width of the full moon (1 centimeter at 1.15 meters). That probably matters.
For a sphere at an object distance 5 times its diameter, the visible discrepancy is about 0.05°, or 1 centimeter at 10 meters; for a sphere at 10 times its diameter, the object distance recommended by Leonardo to reduce perspective distortions, the discrepancy is 0.007°, which is equivalent to 1 centimeter at 80 meters and is below the optical resolution of the human eye or an equivalent camera. Thus, I'd suggest that the problem can be ignored for a sphere, cylinder or cone at an object distance more than 5 times its diameter: the visual discrepancy is then less than 0.5% (e.g., 1/2 mm in 10 cm), which is smaller than the random variations introduced by drawing inaccuracy.
For anything closer, the scaling problem can be handled by (1) constructing the measure bar for the diameter of the sphere from a plan drawing (such as the drawing above) that reproduces the sphere diameter/object distance proportions; or (2) rescaling a measure bar that is based on the image size of the sphere to reflect the visible circumference, using the proportions in the table below.
| |||||||||||||||||||||||||||||||||||||||
Sphere Image Foreshortening. The second problem is the foreshortening of the circle/ellipse used to represent the sphere. Because the sphere is visible in depth, its apparent diameter undergoes rotation foreshortening, which causes its circular outline to appear elliptical when the sphere lies to one side of the direction of view. The axis of maximum elongation is always approximately radial from the principal point, so the sphere may be vertically, horizontally or diagonally elongated, depending on its position in relation to the direction of view.
Yet there is nearly universal consent that spheres should be represented as circles in a perspective drawing; Robert W. Gill provides the most detailed defense of this solution but it is common practice. In fact, I have never found a perspective text that explains the correct way to draw the true central projection of a sphere.
Reasoning from the basic rules of perspective lets us develop a correct procedure. Start with the fact that a sphere can always be enclosed by a cube, whose width is equal to the diameter of the sphere, so that the sphere is touching the center of each face of the cube. This perspective cube can be viewed from any angle or orientation in physical space; the sides of the corresponding image cube will recede to their 1PP, 2PP or 3PP vanishing points as the angle of view toward the cube may require.
As a demonstration example, the 2PP circle will be used as the plan of the sphere we want to construct. It is necessary first to construct the perspective cube, as diagonals across the interior of this cube locate the center of the sphere we want to construct, and diagonals across the base locate the point where the sphere touches the ground plane, the perspective image of its object distance. The measure bar for the front face of this cube is also the diameter of the sphere we want to construct.
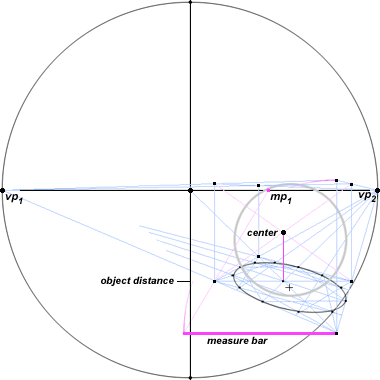
perspective drawing of a sphere
construction of the perspective cube used to locate the sphere center and ground plane distance; also shown is a guesstimate of the circular profile of the sphere it contains
Now the sphere inside the perspective cube, in physical space, appears to have an unchanging circular profile regardless of the angle of view to the perspective cube. To justify this unchanging appearance, imagine a projection plane that (1) passes through the center of the sphere and (2) is always perpendicular to the line of sight from the viewpoint to the center of the sphere. On this plane, the outline of the sphere will always appear as a perfect circle, and will always be enclosed in a projection square whose bottom edge can (arbitrarily) be made parallel to the ground plane.

perspective drawing of a chalice
Piero Uccello (c.1450)
However this projection square is not a cross section through the perspective cube, because that might be a rectangle, trapezoid or irregular hexagon, depending on the orientation of the perspective cube to the viewpoint. Instead, the projection square is the central cross section of a projection cube that has the same dimensions as the perspective cube but is oriented so that its front face is perpendicular to the line of sight to the center of the sphere and its horizontal edges are parallel to the ground plane (diagram, right). This projection cube and its cross section, the projection square, will have vanishing points different from the perspective cube and its plan.
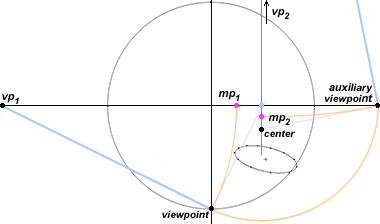
true perspective drawing of a sphere
locating the vanishing points for the projection cube
The vanishing points of the projection cube (and the projection square) are found with the 3PP methods for exact rotation of vanishing points, and by deduction from the given orientation of the projection cube (diagram, above):
• The vanishing point for the horizontal top and bottom edges is found by rotating a visual ray from the viewpoint, folded to a vertical diagonal vanishing point, to the horizontal (left or right) displacement of the center of the sphere from the principal point; this is the intersection of a vertical line (perspective rule 8) from the center of the sphere to the horizon line. Then the vanishing point we want (vp1) is on the horizon line, 90° to this visual ray.
• The receding side edges of the cube are parallel to the line of sight to the center of the cube (because the front face of the cube is perpendicular to the line of sight), so their vanishing point is the center of the sphere (perspective rule 5).
• The upright sides of the projection cube are parallel to a plane that contains the line of sight and is perpendicular to the ground plane. Therefore their vanishing point is in the vanishing line for this plane, which is the vertical line from the center of the sphere. The vanishing point is located as described here, and a visual ray is rotated to the vertical (up or down) displacement of the center of the sphere from the horizon line; the vanishing point (vp2) is on the sphere centerline 90° to this visual ray.
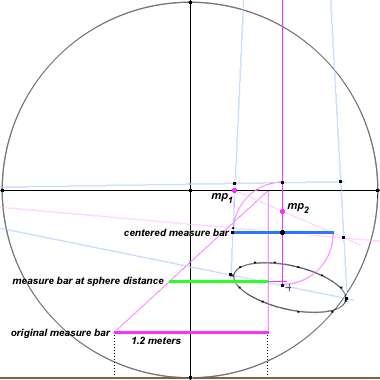
true perspective drawing of a sphere
scaling the measure bar for the sphere diameter, and projecting to measure points
The dimensions of the projection cube are found from the measure bar used to define the sides of the perspective cube (diagram, above):
• Orthogonals are used to project the original measure bar (magenta line) to the image depth of the center of the sphere (green line).
• The measure bar is centered on the center of the sphere (blue line).
• The length of the measure bar is rotated to parallel with the front face of the projection cube by vanishing lines to the measure point for the horizontal vanishing point. The measure bar is projected onto a line from this vanishing point through the center of the sphere. Note that the projection is backward and forward in perspective space, depending on the horizontal tilt of the projection cube to the image plane.
• The measure bar is rotated 90°, and its vertical dimensions are projected to the measure point for the vertical vanishing point, to correct for the vertical tilt of the projection cube to the image plane.
• The measure bar has defined four points: these are the four sides of the projection square that are tangent to the enclosed circumference of the sphere. These dimensions can be rescaled, if necessary, to account for the larger visible circumference of the sphere. The measure bar (the diameter of the sphere) in the example problem is 1.2 meters long, and (based on the image height of the point where the sphere rests on the ground plane) the center of the sphere is 3 meters from the viewpoint. So, using the table above, the dimensions can be increased by 3%.
• Vanishing lines from the two vanishing points, through the four side points, are used to complete this square. This is the perspective image of the projection square.
• Vanishing lines are used to perform the "planless" square construction method or another more exact method if necessary.
• The projected points are connected as an ellipse to form the visible circumference (or visual diameter) of the perspective sphere. The diagram (below) shows the finished drawing.
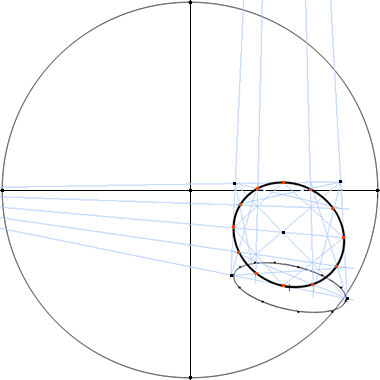
true perspective drawing of a sphere
constructing the sphere profile from the "planless" square projection method
I've pursued this digression for four reasons. First, I've verified by example that the correct perspective image of a sphere is not an ellipse.
However, the amount of elliptical distortion, even for a very large, closely placed sphere far to the side of the direction of view, appears much smaller than it does in a ground plane circle at the same location. This (and the complexity of drawing a sphere the "right" way) provides justification for the practice of using a circular outline to represent a sphere, as has been customary and wholly acceptable perspective solution since the Renaissance.
Third, my perspective solution suggests why it is that circles can be acceptable images of spheres in perspective images. In effect, spheres define no vanishing points in visual experience: they only reflect the viewer's central recession in their image size. We artificially introduce vanishing points by constructing a projection cube around the sphere, and this cube is always in 3PP, whatever may be the vanishing points of the perspective cube.
Many attributes of the sphere — the lack of linear elements on the sphere's surface, the unvaryingly equal dimensions of width and depth from every point of view, the typically small size of physical spheres in everyday experience, and the optical equality of the paired images in binocular vision — are quite unlike the linear edges, large physical extent and binocular disparity that define many "linear" perspective examples. As a result, our habitual visual concept of spheres is different from the recession and depth convergence we associate with railroad tracks, fences, streets, buildings and other typical perspective themes. The point is that perspective involves drawing what we know (or what we think we see) rather than what is a geometrically correct projection onto an image plane: this problem is at the heart of all perspective "distortions".
Finally, I've demonstrated the power of the the basic rules of perspective, combined with the 90° circle of view and the explicit rotation of vanishing points and measure points, to solve novel and complex perspective problems.
Projecting a Cylinder. In most perspective constructions, cylinders are columns, and columns do not present unusual foreshortening problems because the circular base of the column is defined by the enclosing square, and the column is perpendicular to the ground plane.
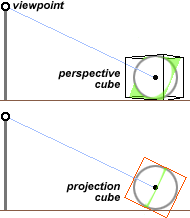
sphere inside a perspective cube
and a projection cube
But if the column tips over, or seems about to — like the Tower of Pisa (right) — then we have to find the angle of its base to direction of view, and from that construct the circle foreshortening, in this case to find the circumference of each level of the tower.
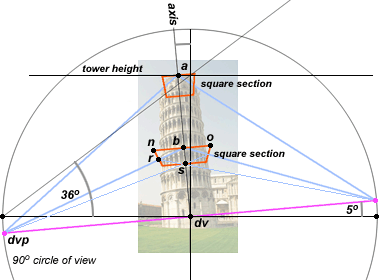
perspective drawing of the tower of pisa
showing rotations for image scale and vertical angle, and two circular constructions
This drawing is made by first establishing, from a photograph or accurate plan and elevation, the necessary measurements. If the angle of the tilt is perpendicular to the direction of view, then the tilt is at an angle of 5.5° from vertical. Assuming an object distance of about 75 meters, the 56 meter high tower would span a vertical visual angle of 36°. (Other tower dimensions, such as diameter, are not considered here.)
To model the tilt, the median line and horizon line are rotated around the principal point by a 5.5° angle, to produce a new horizon line (magenta) and a new median line, which is now the axis of the tower cylinder.
Next, a 36° angle is rotated from one of the side diagonal vanishing points to locate the vertical dimension of the tower image. I have done this from the original horizon line to the original median line, assuming that the tower height measurement was true vertical. If the measurement were along the axis of the tower, the rotation would be done from the "tilted" dvp to the tower axis.
A measure bar is used to find the vertical location of each tower level along the axis; two examples are shown for the top platform (a) and a middle level (b). If the points are scaled at the distance of the front side of the tower, they will be on the front face of the perspective square; if they are scaled to the distance of the center of the tower, they will lie on the tower axis and be at the diagonal center of the perspective square.
In either case, the perspective square is constructed from the height point, using diagonals to the tilted dvp's (blue lines). Thus, diagonals from b define the front half diagonals of a perspective square. A measure bar for the tower width (tilted perpendicular to the tower axis and centered on b) defines the front corners of the perspective square (n and o); orthogonals from these points to the principal point (dv) define the square sides. A second diagonal from the intersection of these orthogonals with the original diagonals to b define side midpoints (e.g., at r); diagonals from these points intersect at the back side of the square (at s). (Alternately, diagonals from n and o intersect the orthogonals at the back corners of the square.) A line through s and parallel to no defines a perspective square section. Finally, the front circumference of a circle is projected into this square using any of the methods described above; given the number of diagonals already constructed, the circle without a plan method might be most efficient.
Projecting a Spiral Staircase. The Tower of Pisa example tackles the tilt of a cylinder but left out the vertical scaling of the tower levles, which is done with a measure bar or elevation (side view) of the tower. Spiral staircases, although they almost never appear in a drawing, are hoary perspective clichés and a good example of how elevation and plan are combined to project a complex object in three dimensions.
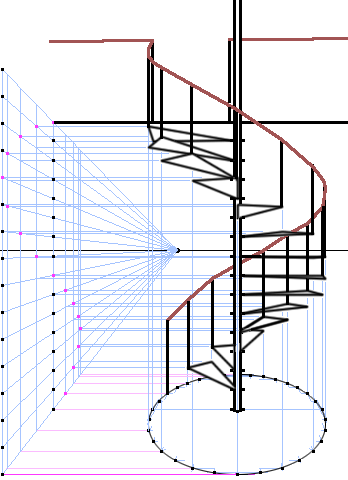
perspective drawing of a spiral staircase
using the Uccello method of circle projection, and transversals to locate the stairs in depth on an elevation
There is really little to explain. The plan view is simply the Uccello format for projecting a circle, which represents the outer edge of the stairs. The elevation is constructed by carrying the stair locations at each level to the side with transversals, then projecting these in depth with orthogonals to the principal point (or, in 2PP, to the controlling vanishing point).
Projecting a Cone. Finally, I demonstrate the procedure with a cone, whose axis can equivalently be the axis of a cylinder.
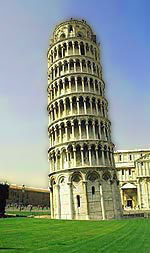
the tower of pisa
The easy problem is when the cone stands with its base on or parallel to the ground plane (diagram, right). In architecture this occurs, for example, in the roof of a circular tower, silo or minaret. Then the base is defined by the square parallel to the ground plane enclosing its circle; the apex is on the perpendicular axis drawn from the diagonal center of the square.
The most complex case is when the axis of the cone is at an angle both to the ground plane and the direction of view. In the example, the cone has a base diameter of 1 meter and a height of 3 meters, is lying on its side in the ground plane, with the axis at a 30° angle to the direction of view, at an object distance of 4 meters. The completed construction is shown below.
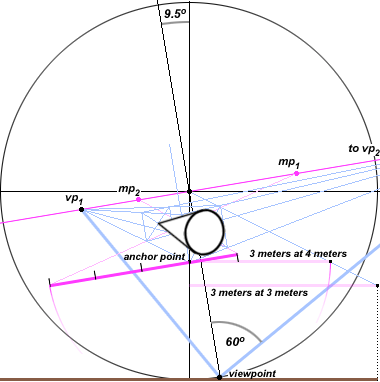
perspective drawing of a reclining cone
using the method of vanishing point rotation, horizon line rotation and measure points
The first step is to establish the vanishing point framework, since this is necessary to scale the image size.
Two angles are involved. If the base of the cone were exactly parallel to the direction of view while its axis were parallel to the ground plane, the base of the cone would be perpendicular to the ground plane. If the cone is lying on its side, the base would define a visual tilt of 9.5° (1/2 the interior angle at the apex of the cone). This would simply require a corresponding tilt in the horizon line and median line around the principal point (as for the tower example, above). However, the base is actually at a 60° angle to the direction of view, so the 9.5° angle is foreshortened by this angle.
This is solved in two steps: (1) rotate the vanishing points around the viewpoint (a vertical dvp) to obtain the 2PP framework for the base, and then (2) rotate the vp's around the principal point, to obtain the tilt caused by the cone lying on its side. (The steps can be performed in reverse order if desired.)
Alternately, the 9.5° angle can be marked from the base to the top of a rectangular solid, and the cube projected into 2PP perspective space with the required vanishing point rotation (see next section).
Next, the measure points are defined in the usual way, as arcs drawn around the two vanishing points to the rotated horizon line.
Third, the measure bars for the cone height and base width are defined using the procedures for scaling the drawing described earlier.
Using the measure points, a rectangular solid that is 3 unit dimensions high and 1 unit dimension square is projected into the perspective space.
Diagonal lines are used to find the center of the far square face, which is the apex of the cone.
Finally, the "planless" method is used to construct the elliptical base of the cone within the square base of the rectangle at the opposite end. If an ellipse template is used, the major axis of the ellipse is usually aligned perpendicular to the axis of the cone.
The same method is used to construct a cylinder at an oblique or acute angle to the image plane, ground plane and/or direction of view. The only difference is that a circular or elliptical circumference is constructed at both ends of the rectangular solid.
Projecting Complex Solids at a Compound Angle. I use as my examples two of the Platonic solids, which were among the first perspective challenges taken on by Renaissance draftsmen.
We've already been working with one of the Platonic solids — the hexahedron or cube — and the cube (or a rectangular solid) can be used to project complex solid forms in the same way a square is used to project complex plane figures.
Octahedron and Diagonal Centering. The octahedron is a regular polygon with eight faces and six vertices (corners). The eight faces are equilateral triangles joined at an angle of 109.5°, which is inconvenient to measure through multiple vanishing point rotations. In all these situations, the projection cube/rectangle comes to the rescue.
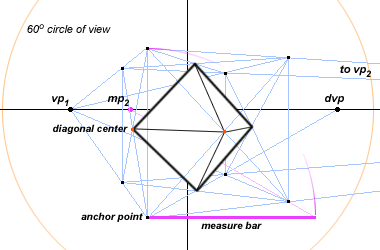
perspective drawing of an octahedron
using the method of diagonal centering, in the 60° circle of view
The example is straightforward. A cube is projected into 2PP space, using a measure bar taken at full length for the height of the cube and projected to the appropriate measure point to define the foreshortened faces of the cube.
Diagonal lines are used to define the perspective center of the image squares. These locate the vertices of the octahedron; the points are simply joined for all front faces of the form.
Dodecahedron and Layered Projection. The dodecahedron is a regular polygon with 20 vertices and 12 pentagonal faces, each at an angle of about 116.5° to the five adjacent faces. Althougth the vertices all intersect the surface of a sphere, they do not have any simple connection to the geometry of a cube. Nevertheless, a projection cube can be used to construct the perspective image; although for very complex forms and drawings at modest scale, the method requires professional drafting equipment to be reliable.
The cube functions in two parts, a series of (in this case) horizontal layers through the cube, each showing a section of the form in plan at specific intervals, and a vertical measure bar that defines the separation between layers. The cube can just as easily be divided into a series of sections or elevations, registered with a horizontal measure bar; the best strategy depends on the characteristics of the primary form.
The plan is constructed first, as separate layers, and the layers must be inspected to ensure they define all the necessary significant points. If possible, the primary form should be tightly enclosed by the projection cube so that faces or corners of the form are coincident with faces and/or corners of the cube; this reduces the projection work. When several layers or plans are used, each layer must be enclosed by the same registration marks or cube outline, so that layers will aligned exactly with each other during the projection steps.
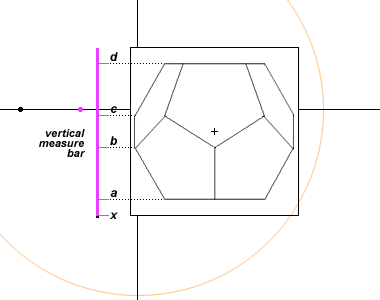
perspective drawing of a dodecahedron
constructing the vertical measure bar from the dodecahedron elevation
The vertical measure bar is constructed from an elevation of the primary form, which is cut through at the levels containing the significant points necessary to reconstruct the outlines, corners, edges etc. of the form.
In this case, just as we have been doing with perspective cubes, the significant points are the vertices (corners), which define all the edges and, with the edges, the faces of the form.
The vertices divide the cube into four layers, a, b, c, d (diagram, above), with an added interval x to indicate the distance between the base of the dodecahedron and the base of the cube.
Note that the dodecahedron is oriented symmetrically or regularly with the sides of the cube; this should always be done, if convenient, with any complex form, so that its orientation can be manipulated entirely through the vanishing points for the projection cube.
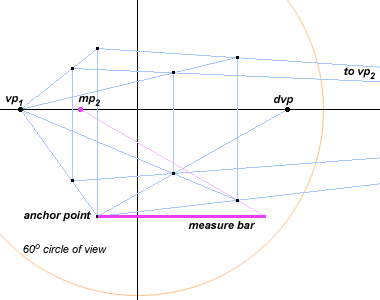
perspective drawing of a dodecahedron
constructing the projection cube, with measure points and diagonal vanishing point in the 60° circle of view
Next, the projection cube is constructed in perspective space in the location, orientation and scale desired for the dodecahedron object (diagram, above). The procedure for constructing a 2PP image cube is described here.
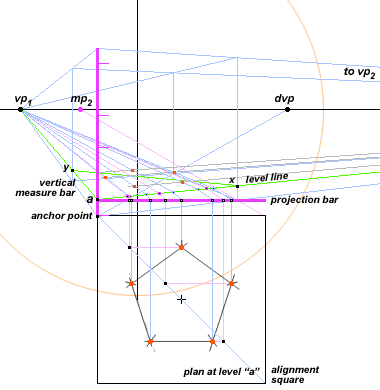
perspective drawing of a dodecahedron
projecting the vertices in layer "a"
Now the projection of the separate plan layers begins (diagram, above). The following steps are used for each layer:
• The vertical measure bar is aligned with the anchor point, and the level location (a in the diagram) is marked off. Usually the best procedure is to work from the layer closest to the viewpoint to the layer farthest away, so that significant points that are occluded or hidden by the front part of the form can be omitted as work progresses.
• The level lines (green) are drawn from this point to the vanishing points; these define the edges, along the faces of the cube, of the layer to be projected. The layer diagonals are drawn from opposite edges of the cube where they are intersected by the level lines.
• The projection bar is aligned level with the location level (a).
• The appropriate plan level is aligned with the projection bar (in the example, a square outline and a centering "+" are used for the registration), and the points to be projected — five vertices and three diagonal depth points — are carried up to it with vertical lines, where they define the projection points. The accurate location and alignment of the level location, level lines, projection bar and plan outline are critical; in particular, the top face of the plan square must be exactly parallel with the projection bar, and the projection bar must be level (for horizontal layers).
• The projection points (intersections of the vertical lines with the projection bar) are projected onto the level line (green) by lines to the appropriate measure point (as the projection is onto the cube face whose recession is defined by vp2, the correct measure point is mp2). These lines intersect the level line at the image points for their edge locations.
• The edge locations of the image points are regressed to the appropriate vanishing point (vp1 in the example) by vanishing lines (blue for vertices, pink for diagonal depth points).
• Where the diagonal depth vanishing lines intersect the level diagonal, those intersections are regressed to the opposite vanishing point (vp2) by vanishing lines.
• The corresponding intersections of vanishing lines are used to locate the image vertices (orange points).
It is evident from the diagram that each layer of a complex form may require dozens of vanishing lines. To eliminate erasure and clutter, it is useful to draw each plan layer on a large sheet of drafting vellum or tracing paper, oriented so that the projection cube area is also covered. Then the entire sheet is laid over the work area and taped taut in place; then the level lines, projection lines and vanishing lines are drawn upon it. When the significant points for that layer are located they are marked with a pin prick through the paper onto the drawing paper below.
The location of the points is confirmed with small pencil points before the layer sheet is removed; then the sheet is taken off and the additions to the drawing are cleaned up, connected as edges, etc. before proceeding to the next layer.
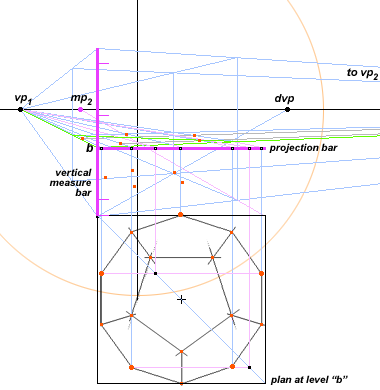
perspective drawing of a dodecahedron
projecting the vertices in layer "b"
The vertical measure bar is used to locate the next layer position (b) and the projection bar is moved up to be exactly level with it. Then the plan is aligned below it and the projection steps described above are repeated.
A significant drawing problem arises when the projection layer is oriented in perspective space so that it is seen nearly edge on: in the example, level c is nearly on the horizon line. In those situations the location of the points is defined by vanishing lines that intersect at a very small angle, introducing potentially large inaccuracies.
The solution is to create a second projection layer at a distance far on either side — in the example, in the base of the projection cube or even below it — and locate the points horizontally by vertical lines from their perspective location in this second projection layer. These replace the vanishing lines to one of the two vanishing points, and the diagonal depth points and their vanishing lines can now be omitted, which substantially reduces clutter. The vanishing lines to one vanishing point and the vertical lines from the second projection layer intersect at nearly right angles, so that both the horizontal and vertical locations of the points are accurately and clearly defined.
This technique requires the image points to be constructed twice, once in the second projection layer and then again in the final image layer, and this repeated projection is also a source of inaccuracy.
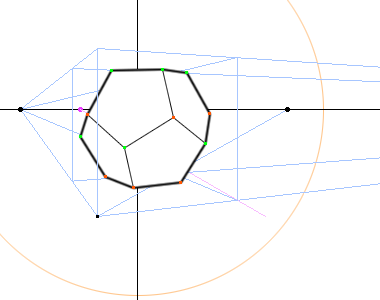
perspective drawing of a dodecahedron
the finished drawing in the 60° circle of view
After all the layers have been projected into the image, any remaining construction lines are erased, the points are connected, and the drawing finished off. The image shows the projection cube in place, to facilitate comparison with the octahedron drawing above.
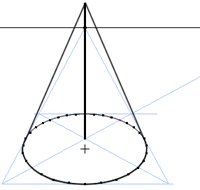
a cone with base parallel to the ground plane
Projecting the Human Figure. Hands down, the most difficult perspective problem artists have tackled has been the human figure. It was also one of the first to be tackled. A complex but precise method is illustrated in Piero della Francesca's De Prospectiva pingendi (c.1474), and rather crude but efficient methods are explained in Albrecht Dürer's Vier Bücher von menschlicher Proportion (1528). Things really heated up during the 16th century, when all those ceiling frescos of saints and angels soaring to Heaven required careful analysis of human foreshortening (and the soles of human feet). By the 17th century this stuff was school study trailing in the wake of Tintoretto's career.
The simplest method for transferring the figure into perspective is to make a drawing from life, or trace a photograph, that shows the figure in the correct pose and from the correct point of view to match its orientation in the master drawing. This figure study is then scaled to the appropriate size and traced into location.
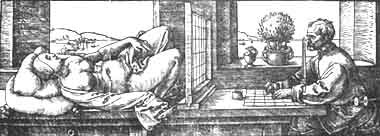
perspective drawing using a viewing grid
the figure is copied square by square from the viewing grid to a smaller grid on the paper, and this drawing is then scaled to fit the master painting; from Dürer's Vier Bücher (1528)
The more anal, rigorous method is to recreate the figure by the three dimensional mapping of points into perspective space. To my knowledge there are basically three approaches in this tradition: (1) sectional projection, (2) volumetric projection, and (3) armature projection.
Piero used a sectional projection: he divided the human head into parallel sagittal planes, projected the key points for each section much as we've projected the octagonal plan above, but spaced each square vertically to match the anatomical separation of the sections in space. This creates a "cage" of points and the face is reconstructed simply by translating the points back into facial features.
The second method, volumetric projection, first analyzes the human figure into so many interconnected eggs, cylinders, boxes or pyramids, then projects the major corners or axes of these simple forms in perspective, then reconstructs the figure around them. This approach was popular in the Baroque and even dribbles like a late party guest into 20th century figure drawing and perspective texts. I dislike it very much because it completely destroys the tensile, articulated and rounded strength of the human form. I feel an active schedule of live figure drawing is a better solution to learning the shape and heft of the body from various points of view.
If you do have this basic understanding, then armature projection is a very efficient method to get the human proportions in perspective projection. All you really need is one of those wooden anatomical manikins sold in every art store.
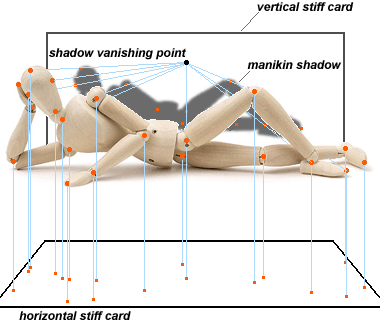
projecting the human figure from an art school mannekin
the 12 inch long Dick Blick hardwood manikin
The illustration shows the basics of the approach. Arrange the manikin in the desired anatomical position, then set it on a glass table top or projection stand. Cast a shadow from the manikin onto a stiff white card below the figure, using a ceiling light or spot light placed as far above the set up as possible. Mark the major joints on the card, using the shadow as a guide.
Now place a spot light or desk lamp to one side of the figure, at the same height as the figure, at right angles to the major axis of the figure, and at the same distance from the figure as the ceiling or overhead spot. Firmy support a second stiff white card behind the figure, at the same distance as the previous card was below it. Mark the joints in the same way.
Choose the card with the better spacing of the joints as your primary face, and either trace the points onto a sheet of graph paper or take measurements directly from the card, from each point to one long edge and to one end edge. Take a single set of measurements from the second card to one long edge. These measurements can be scaled, rotated and transfered to a measure bar using the methods described above, and from there projected into perspective space. The foreshortened figure is then reconstructed freehand around the joints.
I've explained this approach with a manikin, but it really excels if you can take two perpendicular views of a figure pose from exactly the same distance. Measurements can be taken directly from the photographs, using each one as the "card" on which the image is projected. With computer image processing software, such as Adobe Photoshop, you can even distort and scale the images to match the outlines of a predrawn rectangular solid in perspective, then connect matching features in the two photographs directly, without any measurement.
This armature approach is implicit in the series of photographs of human and animal movement created by Eadwaerd Muybridge. In many motion series there is a side and front view, or two complementary front and back diagonal views, taken with exactly right angled directions of view. These permit the two dimensional measurement from the photograph of major joints and body dimensions along the two sides of a square or rectangle (the third dimension of vertical distances are the same in both photographs, or can be scaled so). These points can be projected into space within a rectilinear solid, either using Piero's sagittal sectional method or the armature method, and the body then can even be viewed from any angle simply by rotating the vanishing and measure points for the enclosing rectilinear solid.
Of course, this whole discussion is moot. Artists now can use software such as Poser to create male or female "digital mannekins" in any pose, clothed or unclothed, and render drawings or art from that foundation; and a whole series of VirtualPose discs are available that rotate static figure poses in two dimensions. Programs for major animals are sure to follow.
buildings from blueprints or plans
The most common application of linear perspective starts with the elevation and plan of a building or object, and transforms these into a three dimensional perspective view.
Depending on the shape of the object or building, one, two or sometimes three separate views are necessary to construct it. Sometimes the plan view (view from above) is necessary; a single side view by itself is sufficient. If more than one view is used, the views must be taken at right angles to each other.
I will use the blueprints for a detached commercial greenhouse (shown below). I render this building in two point perspective, which is both the most common architectural convention and a relatively straightforward method to use.
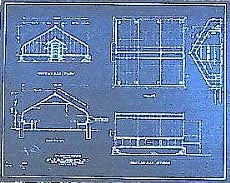
blueprint used for perspective plan
The first steps are always to establish the scale and fundamental proportions of the drawing. As described in previous sections, this means (1) choosing the image format or dimensions of the drawing to best display the important shapes in the image; (2) choosing the best viewing angle (frontal, oblique) to show the important features and proportions of the building; (3) adjusting the apparent distance to the building along the angle of view to create pleasing shape proportions within the circle of view and format; (4) moving the viewpoint up or down to establish an effective anchor point and horizon line; and finally (5) locating the necessary vanishing points and measure points to start the perspective construction.
Image Format and Viewing Distance. I decide for presentation purposes that I want a moderate scale for the drawing or painting, and therefore choose to work within a quarter sheet (11" x 15"). Given the size of the sheet, we're assuming the viewing distance to the drawing will be about two feet (24"), which is slightly more than the normal distance for reading a book (18") but much less than the normal distance for viewing a painting (60"). That is, we intend the drawing for close inspection rather than grand effect. Other format sizes and proportions would be more appropriate for other presentation aims, display settings, media, etc.
Scale and Viewing Angle. From the blueprints, I determine that the finished greenhouse will be built to be 27 feet long, 25 feet wide and 14 feet high. From these specifications I can define a scaling form — a rectangle in the same proportions as the plan outlines of the building (in fact, it can be a tracing or full size photocopy of the blueprint plan itself), approximately as large as the image format with a diagonal line included.
The plan proportions are 27/25 or 1:1.08, and the image format is 11" high (in landscape orientation), so the scaling form is drawn to be 11.9" x 11" with a diagonal included. This represents the plan proportions of the building, and is shown as the magenta rectangle in the diagram.
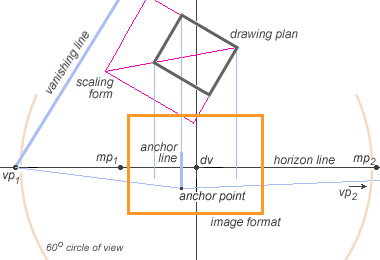
constructing from a plan: dimensions and layout
shown in a 60° circle of view
Next I turn or rotate this scaling form until the angle of the sides in relation to the median line matches the angle of view on the building that you want. In other words, I twist the magenta rectangle left or right until I get the desired visual proportions in the front face and side of the structure.
Once I have the angle of view to my satisfaction, I choose a point on the diagonal of the scaling form that defines the visual width for the structure that best fits into the format proportions. In the figure, I've chosen a point exactly 66% of the original diagonal length of the scaling form. This width provides room to include a rendering of the setting around the greenhouse — paths, trees, sky, etc. Now, by extending two new sides parallel with the sides of the scaling form from this diagonal point, I have a scaled plan (gray rectangle in the figure) at the exact proportions to fit the format.
I move this scaled plan left or right until its horizontal position in the format is where I want it, then drop two vertical lines from the opposite corners of the scaled plan to define the visual width of the building. I drop a third line from the corner of the scaled plan that represents the closest corner of the building as it will be viewed in the final drawing.
As a check, I now determine the scale of the drawing. I do this by measuring any side of the scaled plan, then dividing that length by the actual length of the building to be constructed. In this example, the width (short side) of the scaled plan turns out to be 7.26". The basic size and distance proportions dictate that this drawing size divided by the viewing distance to the drawing (18") equals the actual width of the greenhouse (300") divided by the viewing distance to the greenhouse. Doing the math shows the greenhouse will be drawn as it would appear from a distance of roughly 62 feet, in a reduction of roughly 2.4% from actual size.
It is also useful to establish the scale of the drawing in relation to the scale of the blueprints, so that any measurements taken from the blueprints can be directly converted into drawing measurements. (If you just use a full size photocopy of the blueprint plan as your scaling form, you've already done this step when you created the scaled plan.) In this case the blueprints are in the scale 1/2" = 1 foot, so the width of greenhouse in the blueprint plan is 12.5". The corresponding width of the scaled plan is 7.26", which is a reduction of 58%. Now, for example, if I measure a window width in the plan of 1", I can immediately transfer this to the drawing as a window width in reduced scale of 0.58".
Finally, I can establish the length of the anchor line: it's 2.4% of the building height of 14 feet, or 58% of the blueprint elevation height of 7", or roughly 4.0" high. I then determine the point where the horizon will intercept the anchor line based on the implied height of the point of view. For example, if the greenhouse is viewed as it would appear to an adult standing on level ground, this height (the height of the observer, or 68") is equal to a drawing size of 1.63" (2.4% of 68"), so the horizon line would intersect the anchor line 1.63" from its bottom end. Instead, I decide to take a slightly higher vantage of about 8 feet (96"), as if the greenhouse were viewed from a raised patio or shallow slope. That puts the anchor point (the bottom end of the anchor line) about 2.3" (2.4% of 96") below the horizon line.
The last step is to locate the horizon line in relation to the top or bottom of the format. Start with the horizon line through the middle of the format, and diverge from that location for visual effect. Normally an upward view (viewpoint close to the ground plane) implies a low horizon line, as the direction of view is toward the sky; a raised viewpoint implies a high horizon line, as the direction of view is downward.
In this case, even though I've chosen a slightly elevated viewpoint, I also choose a horizon line that is slightly below the horizontal midline of the image format, to provide a view of the setting behind the greenhouse and off into the distance, which gives a feeling of open space and the outdoors. The point where this horizon intersects the median line — placed down the center of the format — is the direction of view.
Circle of View and Drawing Impact. Because the viewing distance to the drawing is 18", I have started with the assuumption that 18" is also the radius of the 90° circle of view at the image plane (the plane of the drawing): so the circle of view is 36" or 3 feet wide. As I have already established the median and horizon lines, anchor point and anchor line, I could proceed from here to draw the circle of view around the principal point, use the scaled plan to rotate the vanishing points around the intersection of the circle of view and median line, and from these vanishing points establish the measure points, and start the drawing.
What kind of visual impact does that circle of view create? To find out, I divide the 62' object distance by the 27' object size to get the ratio 2.3. Reference to the circle of view table indicates that this distance/size ratio roughly a 25° minimum circle of view for that object size at that distance. This is well within the 40° maximum circle of view that keeps extreme perspective distortions out of the drawing.
However, simply by enlarging or reducing the circle of view from its appropriate 18" radius, I can increase or decrease the visual impact created by perspective distortion effects.
A smaller circle of view increases perspective distortions, which will make the building or principal object appear more dynamic, will enhance perspective space and the volume of the object, and will emphasize the front surfaces or vertical dimensions of the form.
A larger circle of view minimizes these effects, which will make the form appear less dynamic and more "abstract" or idealized, will flatten the perspective space, will make the object appear less three dimensional (as in a telescopic view), and will tend to emphasize all parts of the object equally.
In this case, I know the owner of the greenhouse values her peace and tranquillity ... no looming or soaring shapes for her. I also judge that the basic design of the greenhouse balances height and floor plan well, so there is nothing to gain by emphasizing the vertical dimension. And I also know that the greenhouse is designed to merge well with its setting. With these considerations in mind, I expand the drawing circle of view by 25% (from 36" to 45"), to produce a flatter, more idealized conception of the finished building, and to push the building visually into its background setting by flattening the perspective space, much as it would appear within an 18° circle of view.
Now all the layout considerations — format, viewing distance, object orientation, drawing size, scale of view, anchor point, anchor line, horizon line, median line, direction of view, object circle of view and drawing circle of view — have all been carefully thought through and specified in relation to each other and to the design goals of the image. Now I can inscribe the drawing circle of view, rotate the vanishing points and establish the measure points, as shown in the figure above.
Measuring the Front Projections. With the important design and layout decisions established, the next steps are straightforward and mechanical. The front plan is taken first, and scaled to the same size as the drawing. The actual blueprint or object elevation can be enlarged or reduced using a zoom photocopying machine, or the dimensions can be measured off the original and scaled with a hand calculator, or the dimensions can be scaled by construction.
Either way, the amount of reduction required depends on the scale of the orignal. If the blueprint is in a standard architect's scale of 1/4" = 1 foot, for example, then it is already at a 2.1% reduction in relation to the actual structure. In this case, I've already determined that my drawing is at a 56% reduction of the blueprint scale, so I can use a zoom photocopier to produce plan and elevation at that scale, or rescale the key measurements from construction.
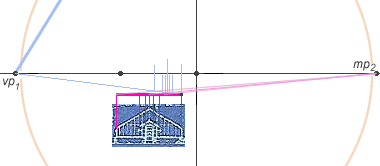
constructing from a plan: front projections
shown in a 60° circle of view
As shown in the figure, I place the scaled front elevation below the anchor point, with the right edge of the building exactly underneath the anchor point. I extend a horizontal line to the left of the anchor point as the measure bar (thick magenta line). (If I am working directly on the drawing, I find it is clean and convenient to create the measure by with a single piece of drafting tape; when I'm finished these measure points and the measure bar can be removed by simply peeling the tape away.)
Next, connect the anchor point to the lefthand vanishing point (vp1), drawing the line with a light graphite or eraseable blue pencil.
Now I carry the important horizontal intervals in the elevation — the sides of the door, the width of the entryway, the peak of the roof, the width of the building — straight up to the measure bar. I mark these as precisely as I can.
Finally, I use a long straight edge to connect each mark on the measure bar with the appropriate measure point (mp2). The intervals in the front elevation in perspective recession are located where these measure lines intersect the vanishing line to vp1.
I mark each intersection point carefully, then a draw vertical line upward from each point using either very light graphite pencil or an eraseable blue pencil. Finally, I remove the front elevation and erase or peel away the measure bar.

constructing from a plan: side projections
shown in a 60° circle of view
Measuring the Side Projections. Next I repeat these procedures with the side elevation, this time drawing the vanishing line from the anchor point to vp2, placing the measure bar on the right of the anchor point, taking the measure marks from the righthand measure bar to mp1, and drawing the verticals at the point where each line intersects the vanishing line from the anchor point to vp2.

constructing from a plan: vertical projections
shown in a 60° circle of view
Measuring the Vertical Projections. The side and front projections will share a common vertical line, the anchor line, extending upward from the anchor point. This line also serves as the measure bar for vertical projections — the top and bottom of the door and entry steps, the covered entry way, and the eaves and peak of the roof.
If there are distinctly different features on the front and side of the building — as there are, for example, in the facade and sides of a Gothic cathedral — then you must take the vertical measurements separately for the two sides. Again, masking tape makes an excellent removable measure bar.
For this greenhouse drawing, the major features along the side are defined by the roof eave, which appears on the front elevation. So only that elevation is used. First I have to align the base or foundation of the building so that it lies exactly on a horizontal line from the anchor point. Then I carry the important elevation heights to the measure bar with horizontal lines.
Finishing the Drawing. The vertical projections are carried back to both vanishing points (vp1 and vp2), and the vertical lines marking the important horizontal intervals on the front and side are trimmed off at the appropriate heights.
This drawing has a peaked roof, which requires a little finesse, as shown in the figure below. The peak of the roof in recession is indicated by the line extending upward from b, which was specified from the front elevation. However its height is indicated on the front measure bar at a, on a vanishing line carried back to vp1. The front peak of the roof is located where this line and b intersect, at point x.
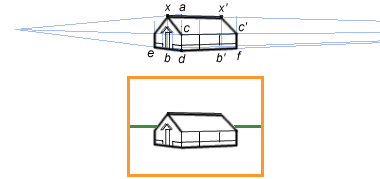
constructing from a plan: finishing the drawing
shown in a 60° circle of view
The eaves are located where their elevation (indicated by the vanishing line from point c on the vertical measure bar) crosses the vertical lines marking the front and left corners of the greenhouse, the lines extending upward from d and e. Connecting these eave elevations to x defines the front and back pitch of the roof in perspective.
Connecting x to vp2 defines the peak of the roof along the length of the greenhouse. But how to find the peak at the back of the greenhouse? I connect a to vp2, and locate the point where this line intersects the line extending upwards from the back corner of the greenhouse (f). Then I find the line from this point to vp1: then the point x' is located at the intersection of this line with the roof peak. Finally, I locate c' by connecting c to to vp2, and finish the back pitch of the roof with a line from x' to c'.
Now I can close up the exterior surfaces, erase guidelines and hidden lines, and finish the drawing with as much detail, shading and backdrop as I want. The approximate layout of the finished drawing within the 11"x15" format is shown in the figure.
paraline perspectives
In the introduction to these perspective materials I stated that the point of view, not objects in space, is the fundamental perspective theme. One consequence of this is that the objects in space are not always clearly defined. The side of a building may recede along the direction of view, obscuring its length, openings or surface details of the side, or the building may extend outside the 60° circle of view, causing the form to appear distorted.
As commerical manufacture, military surveying and industrial engineering extended their scope in the 18th century, technical drawing methods were developed for civilian and military applications that showed the three dimensional form of objects or sites while accurately recording their physical dimensions. These techniques were first published by Christian Rieger and Johann Heinrich Lambert in the 1750's and were extended by the Rev. William Farish in 1820.
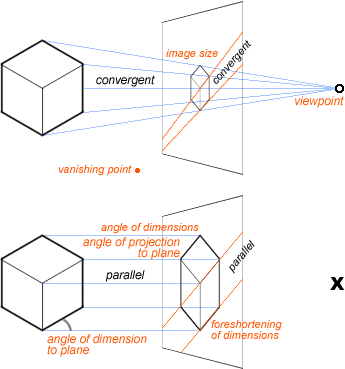
difference between central and parallel projections
The innovation common to these nonconvergent, paraline projections (a contraction of parallel line projections) is that the physical form is projected onto to image plane by means of parallel projection lines. This gives paraline images three unique features (diagram, above):
• there is no viewpoint or convergence point for the projection lines (technical sources state this as "there is infinite distance between the image plane and viewpoint")
• as a consequence of this projection method, all parallel lines in space are parallel in the image (in other words, there are no vanishing points in any direction) — so the name "parallel projection" is apt in a second sense
• the image size is independent of projection distance; paraline projections cannot represent recession in space.
In contrast, central projections or perspectives project the physical form onto the image plane with convergent projection lines to the viewpoint. This may cause parallel lines in space to appear convergent, depending whether the projection is 1PP, 2PP or 3PP and whether the lines are horizontal or vertical; in any case, the focus is on the relative location of the vanishing points. The image size is now dependent on the object distance from the image plane or viewpoint and its orientation to the image plane; depth dimensions are foreshortened and recession is represented.
Types of Paraline Projection. The differences among paraline images can be defined using one of two conventions (diagram above):
• analytical: definitions are in terms of (1) the projection angles between the edges or faces of a cube and the image plane, and (2) the projection angle between the parallel projection lines and the image plane
• graphical: definitions are in terms of the (1) relative scale of the three dimensions of a cube in the image, and (2) the three arbitrary image angles between the edges of a cube in the image.
The analytical definition derives from projective geometry, has a mathematical basis, and defines images in terms of the projection angles, which typically produce irrational numbers for the dimension foreshortening or face angles of a cube; there is no explicit reference to the image attributes. At the end of the 20th century this tradition was adapted to the computational methods of computer graphics, especially game programming.
The graphical tradition derives from technical drawing methods and drawing conventions: only standardized (template) angles and dimension scales are used, one dimension is always vertical in the drawing, and the scale of any foreshortened dimension is usually a simple fraction (e.g., 1/2) of the other dimension(s); there is no explicit reference to the projection geometry.
Mischief occurs when these traditions are confused or interbred. It is pointless to define projection angles for noncomputational, graphical applications. Many online sources to the contrary, the graphical definition of paraline projections must state both relative scale of the horizontal, vertical and depth dimensions and the graphical angles between them. Relative scale is defined as isometric (all three sides of a cube are drawn in equal scale), dimetric (two sides of a cube, usually the horizontal and vertical, are drawn in equal scale), and trimetric (all sides of the cube are drawn in different scales).
The diagram (below) presents five illustrative paraline projections using the same "barracks, wall and watchtower" example: multiview orthographic, 30°/30° isometric, 60°/30° isometric, 42°/7° dimetric, and military (45°/45° isometric).
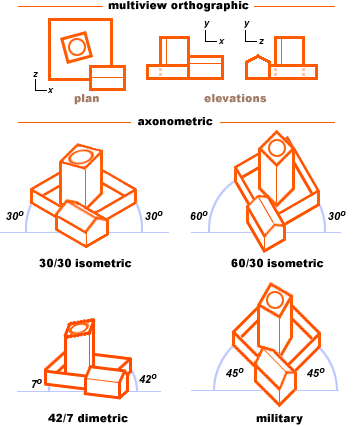
paraline or parallel projections
Multiview Orthographic Projections. The first parallel projections were the elevation and plan of a building. In the analytical literature these are termed orthogonal projections because the projection rays are at right angles to the image plane, and in the graphical literature are termed orthographic views because right angles in a cube appear as right angles in the image.
To achieve this, two dimensions of the primary form are oriented parallel to the image plane. The third dimension is not simply foreshortened — it is eliminated from view.
This is the chief disadvantage of orthographic renderings: each two dimensional projection entirely suppresses the third dimension, which forces the reader mentally to combine two or more different drawings to understand a three dimensional conception. In the example, it is not possible to identify the shape of the barracks or tower roof from the plan, and only the y/z elevation shows that the barracks roof has a gable. Hence, multiple orthographic views are necessary to completely understand the physical shape of the form.
Axonometric Projection. In axonometric projections, all three dimensions are represented as a two dimensional image; the third or depth dimension is brought into the image by drawing all three dimensions at an explicit relative scale and interior angle.
The generic method for developing an axonometric drawing is as follows: (1) start with the plan drawn to scale, oriented to produce the optimal paraline image; the horizontal dimension is denoted x and the vertical dimension z; then select the corresponding elevation at the same scale and with the same horizontal dimension x and the vertical dimension y; (2) construct all verticals y as parallel vertical lines in the drawing, at either 1:1 scale or a reduced scale to the scale of the elevation; (3) draw all x dimensions at a constant angle to horizontal, either to the left or right of the end points of verticals, at either 1:1 scale or a reduced scale to the scale of the elevation; and (4) draw all z dimensions at a constant angle and scale to horizontal, on the opposite side of verticals from the x dimensions.
Within this generic mapping recipe, the only graphical variations in paraline projections are the relative scale of the three dimensions and the angles of the two other dimensions to the horizontal.
30°/30° Isometric Projection. This is among the most common paraline projections used today, so much so that "isometric" has become synonymous with a paraline projection. Analytically, this projection is produced when all three front edges of a cube are at an equal (~35.3°) angle to the image plane. Graphically all three corner angles are represented by equal (120°) interior angles (e.g., the two nonvertical dimensions are at 30° to a horizontal line), and all three dimensions are drawn in equal scale (1:1:1).
Graphically, a 30°/30° isometric drawing is defined as follows: (1) vertical (y) dimensions are drawn vertical; (2) the x and z dimensions are drawn at a 30° angle to the horizontal, and (3) all dimensions are drawn to the same scale. As a result, both horizontal and vertical circles are shown as ellipses.
Standard isometric paraline drawings are facilitated by the use of a preprinted isometric grid (which consists of parallel vertical lines cut by parallel lines at 60° and 30° angles to vertical) laid under the working surface, or similarly preruled sheets of architect's vellum, or the standard 30°/60°/90° drafting triangles. In computational graphics (for example, in Sim City), because of the limitations of pixel representation, the graphical angles are actually 26.6°, so that oblique lines can be represented in ascending or descending two pixel segments.
60°/30° Isometric Projection. Although it is visually pleasing and approximates very well a similarly oriented 2PP perspective drawing, there are two problems with the standard isometric format: (1) the plan is not reproduced, but appears compressed in a lozenge form, and (2) this compression affects the appearance of many irregular forms (such as circles and spheres, or rectangular forms at odd angles to the three primary dimensions; cf. the "tower" in the example drawing).
Both these problems are remedied by raising one of the oblique dimensions to a 60° angle to the horizontal; now the drawing is planometric (the plan is reproduced exactly in the image), and as a result irregular forms are easier to interpret.
However, this introduces a new problem: the vertical dimension now appears exaggerated or elongated. This can be partly remedied by drawing the vertical dimension at 3/4 or 2/3 scale.
45°/45° (Military) Isometric Projection. This is also an isometric projection because all three sides are in the same scale. This is sometimes called a plan oblique projection or planometric projection in the graphical literature because the plan angles and dimensions are reproduced exactly. (Note that the military "projection" is not orthogonal but is not oblique either: analytically, it is not possible to produce the same image through parallel lines at an oblique angle to the image plane.)
The primary objection to military projection, as with the 60°/30° isometric, is that it appears to exaggerate the "depth" of the drawing. As a result the z axis (for sideways views) or the y axis (for downward views, as in the example) is sometimes shortened by 1/2, creating a true dimetric drawing: this is called a cabinet projection.
42°/7° Dimetric Projection. Several proposals have been made for paraline projections that more closely approximate central perspective; these appear on casual inspection to be perspective drawings (at "telephoto" or very large object distances) although each dimension is in an exact, constant scale to the corresponding elevations or plan. One proposal orients the two oblique dimensions at 7° and 42° to the horizontal; the length of the dimension at 42° is also reduced to a 1/2 scale.
Although these formats perform very well for cubic or rectangular forms, they are less successful for irregular forms, as appears in the "tower" of the 42°/7° dimetric drawing.
Artistic Importance of Paraline Projections. Why should artists bother with the rigid methods of technical drafting? Because perspective in all its aspects is a remarkably clear "laboratory" in which we can study many of the deep or complex problems of artistic representation.
In terms of art history, paraline projections characterize classical Chinese and Japanese scroll paintings. In Europe, paraline representations became an important style feature of early 20th century painting; Cubist paintings abound with examples of essentially planometric or isometric designs, and Charles Sheeler produced a delightful painting (image, right) that combines planometric, isometric and dimetric images of rectagular or square forms to suggest spatial volume while contradicting spatial recession; note the precise way that the table legs intersect the square rug pattern behind. Sheeler was obviously familiar with the conventions of technical drawing, and could deploy them to good artistic effect.
At a deeper level, both the orthographic and paraline projections represent different solutions to two fundamental and related artistic problems: simplification and schematization. All artists, whatever their style or artistic goals, grapple continually with these two problems.
Simplification is the decision to throw away information — details, complexities, dimensions or features — in a way that makes other information clearer. In orthographic projection the third dimension is eliminated. In both the orthographic and isometric projections, the object appears as if viewed from infinitely far away, which discards information about the physical location of the viewpoint in relation to the objects in the image; the viewpoint is genuinely imaginary.
Yet all projection drawings, paraline and perspective alike, retain the direction of view as the average or parallel direction of the projection lines. The back side of the object is not represented and all angles are shown in a specific and consistent relationship, either to each other or to a vanishing point. This leads us to the insight that simplification can quite often be paradoxical — how can there be a direction of view if there is no viewpoint?! — and that by throwing away information we actually create contradictions or puzzles, in that sense making the image or visual idea more complex conceptually if less complex perceptually. Try looking for similar paradoxes in other kinds of artistic simplification (cubism, fauvism, expressionism, abstract expressionism).
Schematization involves smoothing out these conceptual paradoxes by making them consistent or equivalent wherever they appear, or by creating a hierarchy or system of dominance among them. Although schematic choices are often arbitrary, and may depend on subjective esthetic criteria such as clarity, harmony, emphasis, or contrast, the schematic criteria can be chosen because there is a primary external audience or purpose for the drawing which the schematic is adapted to serve. Thus, the objection to some paraline drawings is that they appear to exaggerate one dimension over another; the paraline schematization must be made more complex (for example, by using a dimetric or trimetric format instead of a "simple" isometric format) in order for the resulting image to be easier (simpler) to interpret.
In general, "artistic style" refers to the strategies used to simplify and complicate an image in ways that produce a visually or esthetically more desirable artifact. The beauty of paraline projections, and fine paintings, lies in the way they use simplification and schematization to create a more legible and impactful image of the world.
curvilinear perspectives
One of the most elusive but apparently inspiring goals of perspective studies since the 19th century has been curvilinear perspective, which involves the representation of space using vanishing curves rather than vanishing lines. As these curves seem to converge at both ends, the horizontal and vertical transversals create two vanishing points each with a fifth created by the orthogonals parallel to the direction of view. Hence the name five point perspective or spherical perspective for some of these projection systems.

Charles Sheeler's Interior (1926)
The appearance differences between linear and curvilinear perspective are shown in the exaggerated example at right. The linear projection seems to push distant objects farther away, and to make nearby objects loom too close, appear out of scale and exhibit gross distortions at the extreme ends. Curvilinear perspective crowds the side views toward the center of the image yet implicitly strengthens the sense of personal presence through the rapidly increasing divergence in the approaching orthogonals (lines in the floor).
Curvilinear perspective has often been justified as part of a critique of linear perspective. Many objections arise from the well known perspective "distortions". The standard (and completely effective) remedy for these representational conflicts was to take a view of the subject from a large distance, so that it fits within a reduced circle of view, or to take an oblique view so that the tapering of the horizontal or vertical elements was consistent with the effect of one of the vanishing points. However these evasions are impractical in particular for the representation of architectural interiors, such as the nave of a cathedral, where a restricted circle of view excludes an adequate view of the architecture.
I present here a simplified method for making your own curvilinear drawings, and a longer review of the historical justification for curvilinear methods, with citations to books where you can find more information. Unfortunately, the best of these are either out of print or untranslated, but a good university library may help you find them.
Constructing Curvilinear Drawings. The perspective framework for making curvilinear projections is tedious to set up but not difficult to work out. Your goal is to make a template that represents a rectilinear (right angled) grid of infinite height and width, parallel to the picture plane, as imaged in the curvilinear perspective system of your choice. You then draw this curvilinear grid within a circle of view, as shown for the spherical template below.
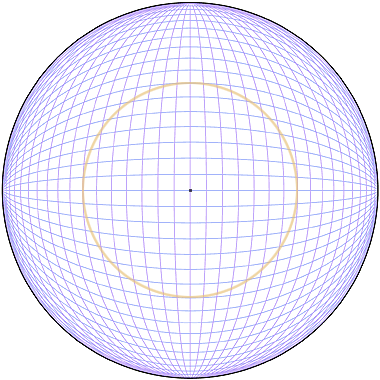
template for curvilinear transversals in central (1PP) perspective
shown with 5° transversals and the normal 60° circle of view, which equals a 70° circle of view in the spherical projection
To use the grid to map a normal (linear) perspective drawing or photographic image into the new perspective space, you must first square the drawing in the normal way. However, you must be careful to make the angular size of the squaring in the linear image equal to the angular interval of the transversals in the curvilinear grid, or the image will appear in exaggerated distortion. (The template above uses a 5° interval, which according to the distance/size table is roughly the same as a 1 foot width seen from 11 feet away.) The final step is to copy the image into the curvilinear grid, square by square, then clean up any inaccuracies as you progress to the final state of the drawing or painting.
Constructing a similar grid in two point perspective is much more complex, as the vanishing lines are foreshortened front to back. But good results are possible by constructing the 2PP drawing in the normal way, squaring the drawing, and then projecting the drawing onto the curvilinear surface using the grid above. (If you know of a more explicit method for constructing a 2PP template to any random rotation of the 2PP vanishing points, please email me.)
Historical Uses of Curvilinear Perspective. From the 16th to the 20th centuries, perspective theorists explored the problem of anamorphic or geometrically distorted images, which can be rectified back to a normal perspective image when viewed using an appropriately curved mirror. These studies often overlapped with the problems of projective distortions in two dimensional images, specifically the difference in perspective view straight ahead and the view obliquely to either side.
Curvilinear perspective was proposed at least as early as 1624, in a pamphlet on meteors by the Tübigen mathematician Wilhelm Schickhardt (as quoted in Erwin Panofsky's Perspective as Symbolic Form, 1924):
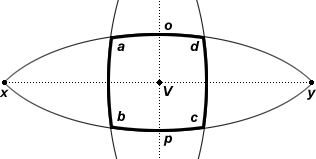
Schickhardt's "proof" of optical curves (1624)
"I say that all lines, even the straightest, which do not stand directly in front of the eye, or go through its axis, necessarily appear somewhat bent." Schickhardt's argument is that the lines ab or cd appear large when close to the viewer (at V) but necessarily and visibly grow smaller as they recede toward x or y; therefore "the sides become narrower and necessarily curved; not like a roof, to be sure, so as to produce a sharp angle at points o and p, but rather gently and gradually, indeed unnoticeably, something like a belly, as is appropriate for such an arc."
Thus, if we stand at the base of a large tower, the masonry at eye level appears in central perspective; if we look up, we see the sides near the top in converging three point perspective. The same occurs in horizontal lines when we stand facing a long wall, then look toward its end on either side.
However, the argument here is flawed, as was pointed out by Schickhardt's contemporary, the German astronomer Johannes Kepler. This becomes obvious if we express the "proof" as it appears in linear perspective:
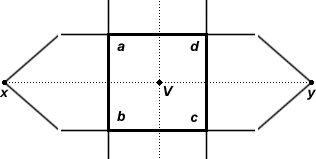
the logical fallacy in optical curves
In this diagram, the break in the vanishing lines indicates that we are physically unable to see the image of the vanishing points x and y while directing our vision straight ahead; to see them we must alter the direction of view, and thereby completely change the perspective geometry. If we turn our heads to one side while looking at an infinitely long wall, then the convergence to x or y is produced by foreshortening of the image surface, now viewed at an angle, and this convergence steadily increases as the direction of view becomes parallel to the surface of the wall.
These changes in our perspective view must be accounted for in the diagram by "broken" vanishing lines, to indicate that different directions of view apply between x and y. Schickhardt's curves are the average of an unaccounted number of different perspective projections produced as the head and/or the image plane is slowly turned from one direction of view to another. In fact, his argument originated in the observation of a bolide, which traversed a large part of the night sky and carried observers' rapt eyes along with it.
But why stop there? One can also create a panoramaic photograph with a 360° view, which is optically impossible because the eye would then have to be lens in all directions at the same time that it would be retina on all sides. At some point, we accept that composite images do not make valid perceptual or perspective arguments and we part company with Schickhardt.
Another 17th century argument was that the eye is an internally convex surface, and this must cause the curvature in lines projected onto it, an argument refuted empirically by M.H. Pirenne in his Optics, Painting and Photography (1970). A more contemporary argument is based on the appearance of wide angle or fisheye photographs, which show curved lines projected into a flat photograph and therefore seem to validate the curviness of visual space. But in these photographs the distance points in the image are compressed in the field of view, which shifts the virtual center of projection in front of the viewpoint.
In any case, it wasn't until the 19th century that curved vanishing lines were offered as better representations of extended horizontal or vertical recessions. The eccentric painter Arthur Parsey (in 1836) and the amateur artist and astronomer William Herdman (in 1853) published systems of perspective that replaced parallel transversals in central or two point perspective with slanting or curved lines. These systems culminated in the subjective perspective developed by the German mathematician Guido Hauck in 1879. Long, lofty church interiors were especially popular set pieces for early curvilinear perspective representations, as in this drawing by Herdman, which is surely intended as a contrast to the many 18th century Dutch paintings of church interiors in perfect linear perspective.
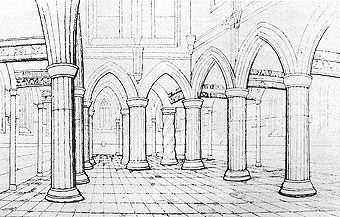
architectural drawing in curvilinear perspective
Interior of Rosslyn Chapel by William Herdman (c.1850)
Curvilinear perspectives had a fitful history after the late 19th century, then saw a resurgence late in the 20th century. Seminal in this context were Erwin Panofsky's Perspective as Symbolic Form (1924), based on Hauck's mathematics; La perspective curviligne (1967, published in English as Curvilinear Perspective in 1987) by the French theorists Albert Flocon and André Barre, the "hyperbolic" system proposed by the artist Robert Hansen in 1973, and the "fisheye" or wide angle perspective developed by artist Michael Moose in 1986.
Several cultural or technological factors have been used to explain the development of these new systems, including 19th century advances in nonlinear geometries and compound (wide angle) optics, perceptual experiments in subjective curvature by Hermann Helmholtz (in particular, the demonstration that a row of widely spaced point lights, moved perpendicularly away from a viewer in complete darkness, appear to follow a curved rather than straight line convergence), the discovery of subtle curvatures in ancient Greek architecture, renewed interest in linear perspective distortions, the study of new types of mapmaking projections, the unparalleled "wide angle" vistas made possible by modern iron towers, skyscrapers and air travel ... the list is a long one.
I think the primary issue is much simpler. One of the founding ideas of the Renaissance, advocated by artists and scientists alike, was the fundamental unity between seeing and knowing. In this tradition, linear perspective was not so much a representation of seeing as an area where seeing and knowing overlapped. Throughout the 16th century, mathematics and projective geometry, the procedures of perspective drawing, and the tools and methods of surveying, navigation and astronomy were treated as different aspects of the same fundamental discipline, and several of these topics were often discussed together in a single book.
At the same time, artists from Leonardo to Turner were well aware of, and troubled by, the many ways linear perspective did not seem to accurately record all of visual experience. By the 18th century, European culture began to grapple seriously with problems of color perception and visual illusion that demonstrated seeing was a psychological and subjective process, very different from knowing and with its own quirks and powers. This realization created a fundamental divide that has expanded and ramified in artistic practice ever since the late 19th century.
Some artists pursued the representation of visual experience or "visual facts" separate from the "knowing" that comes from perception. This was the point of departure for many 19th century "seeing" artists (from Constable to Monet to Bonnard), who described their work as copying whatever was available on their retinas; and for artists such as Manet, Seurat or J.S. Sargent, who analyzed the process of vision by creating images from painterly visual deceptions, showing that what we see (or how we see) does not represent what is "actually there" on close inspection.
In reaction, other artists rejected the visual facts in favor of the insight or "knowing" that seems to be the experiential fruit of perception. That is, they found ways to represent "higher realities" as a kind of visual experience that has no explicit referent in optical or static images — in particular, representations of spirituality and emotion. This highly diverse tradition emerges in "spiritual," "constructivist", "cubist", "antiretinal," "conceptual", "nonrepresentational" or "expressionist" artists as diverse as Matisse, Kandinsky, Duchamp, Picasso, Pollock, Riley, Rosenquist and Martin.
Against that background, curvilinear perspective seems to be a conservative reaction, an attempt to recreate the union between seeing and knowing by altering rules of seeing to correspond to the intuitions of three dimensional knowing. Certainly, altering the rules is explicit in the "argument for optical curves" advanced centuries ago.
The consensus after more than a century of debate is that Panofsky and other critics of linear perspective are factually wrong: no other two dimensional projection is superior to standard methods of linear perspective when the perspective drawing is viewed with a single eye from the perspective viewpoint (center of projection). Under those conditions, a perspective drawing really does capture exactly the visual angles of the original scene — as demonstrated by M.H. Pirenne. Apparent perspective distortions arise because the image is not viewed from the correct center of projection and direction of view, or the perspective geometry is changed, or different geometries are fused into a single image.
For me, that's the point: curvilinear perspective represents the state of looking at the same time in many directions. In contrast, I have repeatedly stressed that linear perspective is the image of a specific viewpoint and direction of view, and once that restriction is relaxed or abandoned, images can easily bend, flow or warp into unpredictable and highly expressive new geometries.
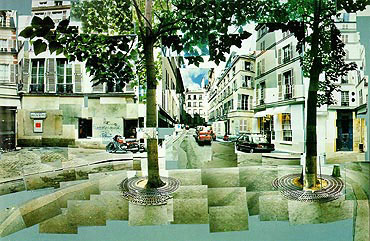
place furstenberg, Paris, August 7,8,9
by david hockney
Curvilinear perspective in effect averages or summarizes the many possible views from a single viewpoint, much as David Hockney assembles an image from dozens or hundreds of localized, narrowly cropped photographs. In that context, curvilinear methods can be justified as visually syncretic and philosophically "postmodern".
Leonardo and many others after him identified "flaws" in linear perspective only because they considered the same perspective situation from two or more directions of view. Culturally we are no longer predisposed to see multiple perspectives or multiple points of view as disruptive affronts to orthodoxy.
N E X T : Shadows, Reflections & Atmosphere
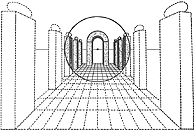
square columns and tile floor drawn in linear perspective
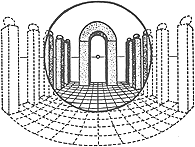
same setting as drawn in curvilinear perspective
(from Ulrich Graf, 1940)