perspective in the world
Linear perspective originates in the common appearance of the real world, yet it seems to follow the abstract constraints of geometry. It can visualize the infinite reach of three dimensional space by organizing everything around a single, precisely located viewpoint. These foundation topics are presented in this page.
If you already have some perspective training, then my approach will be unfamiliar. Most perspective tutorials are focused on the object you want to draw. My emphasis is on the viewer: linear perspective is the two dimensional image of a unique viewpoint and direction of view. I introduce linear perspective as embedded in our natural view of the physical world and as connected to basic facts of vision, then present a geometrical summary of the perspective method, the assumptions behind its presentation in pictorial art, and the ways its limitations can be used in effective artistic design.
I postpone the "how to" drawing tutorial because awareness of the foundation themes can cure a student's hackneyed or mechanical application of perspective construction. To get a feel for what perspective is really about, one must realize that it is visible everywhere and in everything — even when architectural edges and corners are nowhere to be seen.
the texture of space
Vision creates an image of the physical world from the weave of light around us. How does it do this? One way to address that question is to answer a more specific one: how do we "see" that an object is near or far from us?
Anything that helps us see the relative distance of objects in space is called a distance cue. Fundamentally, all distance cues are made possible by the geometrical regularity of three dimensional space, and it is this regularity that linear perspective attempts to simulate.
First, vision takes advantage of the fixed characteristics of our two eyes to make sense of what we see. The most powerful distance cue, binocular parallax, is the disparity between the images created by the two eyes that arises because they are located about 5cm to 7cm apart. This causes near objects to shift back and forth against a distant background as we close first one eye and then the other. The mind uses this parallax to infer the distance of objects in the field of view: the larger the left to right shift, the closer the object. We also use motion parallax, which occurs when we move our head, stoop or turn, walk or run through the environment. Parallax is a very powerful and accurate distance cue, and it is effective across an enormous range of distances — binocular parallax from the tip of our nose out to about 20 meters, and motion parallax (depending on the speed of movement) out to several kilometers.
Parallax cues depend so heavily on the fixed attributes of space and the location of our eyes that it takes infants only about four months to learn how to use parallax to guide reaching and grasping. Other cues related to eye position, such as lens focusing (accommodation) and crossing the eyes to see close objects (convergence), are comparatively weak — they are only useful within a few feet.
However, in the two dimensional, fixed surface of a painting, all the cues from parallax, convergence and accommodation disappear. So the artist must rely on other distance cues to create the illusion of three dimensional space.
Some cues appear in the optical properties of monocular (single eye) retinal images. In three dimensional space, objects close to us appear larger than those far away, so retinal image size is an important distance cue, especially for objects we recognize. Objects at our feet or just overhead appear much lower or higher in relation to the horizon than objects far away, so the vertical position of objects in our visual field — compared to each other or to the horizon — also serves as a distance cue in natural environments.
All these distance cues seem related to our view of detached objects. However, equally powerful depth cues arise in the visual appearance of surfaces, especially the textures and colors of the natural world.

distance cues in changing textures
The American photographer Ansel Adams had a superb eye for perspective facts in visual design. His photograph of an arid landscape contains not one straight edge anywhere, and confronts the world head on, making the landscape appear flat. Yet the sense of depth in space is powerful and pervasive.
In the foreground, within our physical range of motion, we usually distinguish separate objects, in part by using the occlusion of one object outline by another. The simple rule is, whatever covers is closer, and this rule applies across any distance (even when the sun sets behind a far mountain).
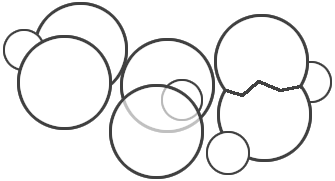
distance cues in overlapping forms
This collection of circles illustrates that a complete break in the outline of one form by another indicates the unbroken form is closer (in front), opaque and probably solid. If the covered outline is partly visible (like the mountains through the shafts of light), we infer the closer form is partly transparent. If two objects meet in an outline that is irregular to both (large circles at right), then the distance relationship between them is ambiguous.
However, the main distance cue in the Adams photo is the change in visual textures across space, called a perspective gradient. The foreground rocks appear large and extremely rough; with distance they grow smoother, the spacing between them becomes smaller, and the rocky surface appears flatter, less irregular. Beyond the rocks, the mountains and clouds have irregular outlines but appear smoother than the rocky plain. And beyond everything is the sky — the only perfectly textureless "surface" in nature.
If the object or surface is far enough away, it is "behind" a considerable distance of atmosphere, which can obscure the object with suspended particles of dust, smoke or molecules of water vapor. The cumulative effect of these obscuring particles creates aerial perspective in large objects visible from a great distance, especially mountains, buildings and desert or ocean horizons. Depending on the time of day and strength of light, aerial perspective can make distant objects appear less distinct, less saturated and darker or lighter in value. Smoke or dust shifts the hue of distant objects warmer (toward red, yellow or yellowish white), while water vapor shifts landscape hues toward blue.
We have to use the recognizable continuity of an object's outline, or its "completeness of form," to see occlusion, which is more difficult if objects are far away or very small, dimly illuminated, or unfamiliar to us. Look again at the Adams picture, and you'll see that one rock clearly covers another at the bottom of the image, but in the middle distance these overlaps become harder to see. Instead, everything merges into the average spacing or spatial frequency of the rocks — that is, the rocks do not separate themselves from the texture as distinct forms. Wherever objects become too small or complex to show occlusion clearly, texture takes over.
This transition from form to texture means that visual experience is a combination of objects filled in by visual textures. Increasing distance in space transforms the appearance of objects into structurally or visually related textures. And at extreme distances, texture itself dissolves into pure color. So we have the following sequence that applies to large vs. small or near vs. far visual elements:
pattern —> texture —> color
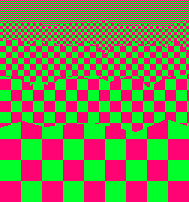
perspective transforms pattern into texture and color
In this illustration, the band at the top of the image is made of the same green and red squares as the band at the bottom, but the squares are too small to see individually: instead they mix visually to make yellow or gray. There is a fusion threshhold for every texture, beyond which it is blended by the eye (in visual fusion) into a single homogenous color. Color TV screens, a distant mountain slope and a sandy beach are all composed of tiny discrete forms beyond the visual mixing threshhold.
Occlusion works because we can compare the outlines we see with our idea of the objects we look at: anything partly covered is a "broken" or "altered" form of itself. So our knowledge and expectations of the world are essential to create effective distance cues. However, the boundary between what we "see" with our eyes and what we "know" with our memory and mind is not at all clear. In fact, we can create the illusion of a recognizable form entirely through the visual completion induced by forms around it.
Finally, these transitions from occluding objects to patterns to textures to colors as distance increases do not happen in the same way for all objects — unlike the effect of aerial perspective or fog, which causes all forms to fade equally from view. Increasing distance creates characteristic visual transitions in different objects, especially in natural forms where there is a distinctive structure at different scales of view. Trees are the classical example, much studied by 19th century artists, because different species of trees express a different branching pattern that is recognizable from twigs up to large branches; the tree's branching pattern, in turn, determines the tree's overall form and the clumped appearance of the trees in copses or forests.

the unique sequence of patterns created by perspective changes in oak trees
Many kinds of vegetation, rock formations, clouds and water flows show similar interrelated patterns across large changes in viewing distance. The point is that the painting brushstrokes, color mixtures and shading that artists use to represent the objects must change with the object's distance: a distant tree is not a miniature image of a tree nearby, as crude perspective thinking might suggest. It has a completely different visual character. The artist's challenge is to find the right representation for the object's appearance at the appropriate distance, not just to paint larger or smaller versions of the same thing. This can be done by understanding the fundamental structure of the object, and how this structure changes in apparent form, texture and color across perspective space.
Linear perspective is space drawn as the geometrical idea of itself. But we do not see the idea of space: we see a world of light, colors, textures, objects and opportunities for action. As we explore the artistic uses of perspective, we will repeatedly grapple with the fact that our visual experience of the world is much richer and more complex than our idea of the geometrical space in which it appears.
four perspective facts
Linear perspective simplifies the world in order to create a coherent visual representation of the world. It includes some facts that determine our view of the world (three dimensional space, light, surfaces) but excludes others (movement, atmosphere, texture). It includes some features of visual experience (recession in space, convergence of parallel lines) but not others (color, optical fusion, binocular parallax). All these restrictions arise from the four key facts on which perspective methods are based (diagram, right).
technique |
1. Light travels in a straight line between any two points in space. This is the foundation of linear perspective: the behavior of light can be described through traditional Euclidean geometry.
When light encounters the naturally dull and rough surfaces of the physical world, it is reflected or scattered in all directions. This means light is always abundantly radiating in all directions on all sides. But then the question arises: how can this dense tangle of light create a perceptible image?
2. An image is formed by light passing through a single point. This is the viewpoint. The viewpoint exactly matches the properties of a pinhole camera, which creates images by passing light through a tiny hole in a screen. Because this pinhole forms images, it can geometrically represent the images formed by a lens, such as the artist's eye or camera.
All light rays that intersect the viewpoint (pass through the pinhole camera), and equivalently all lines of sight emanating from the viewpoint, are called visual rays. The only visual rays that matter to our view of the world are those that converge on the viewpoint: all other light rays are excluded. The dense tangle of light becomes an image.
The eye is really a small sphere, and we normally see with two eyes, so we have to simplify the facts of sight somewhat, depending on what we mean by looking at the world. If we mean a camera or single immobile eye, the viewpoint is the nodal point of the optics, which in the eye is located slightly behind the center of the lens (because light has already been refracted by the cornea). If we use one eye but look in different directions, the viewpoint shifts to the rotational center of the eye. If we use both eyes, the binocular viewpoint is approximately located between the two eyes.
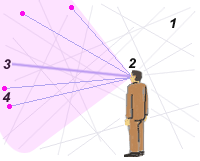
the four perspective facts
(1) light travels in a straight line or "light ray"; (2) an image is formed by light rays passing through a single viewpoint; (3) the viewpoint defines a visual cone centered on a direction of view; (4) all visual rays appear "end view" as points on an image plane
3. Visual rays through the viewpoint define a visual cone centered on a direction of view. We can't see light through the back of our head, and light does not enter a camera through both sides of the pinhole screen. In nearly all optical systems, images are created by light arriving from the "front half" of the surrounding space (diagram, right).
The visual rays from the "front half" of space form a cone, known as a visual cone or visual pyramid, with the viewpoint at its point or apex. This cone has a central axis, known as the optical axis, which defines the center of a camera image or our visual field. In linear perspective this optical axis is called the direction of view (or sometimes the central ray or principal visual ray).
The human visual field actually has a very complex structure — crisp central vision and fuzzy peripheral vision — but linear perspective assumes that any visual ray inside the visual cone contributes equally to an image. This is a specific example of how linear perspective does not represent what we actually see with our eyes, but rather what we know about optics and the geometry of the physical world.
4. Every image is a cross section through a visual cone. An image is not formed at the viewpoint, because a point has no dimension. Instead the image is formed by making a slice through the visual cone at some point other than the viewpoint, either in front of or behind it.
This slice cuts across all the visual rays, so that we only see visual rays "end on" within the visual cone. As a result, all visual rays appear as points on an image plane. The image is really a surface of compacted points, each point signifying a visual ray that has reached the viewpoint from a specific location in physical space.
This description of light rays as straight lines, arriving from objects in space to a viewpoint with a specific direction of view, allows us to use a geometrical method for describing the visible world on a two dimensional surface from a single point in space. This is called a central projection. Geometry in turn gives us the procedures necessary to construct these central projections using the simplest tools: a pencil, a straight edge and a compass.
creating the perspective view
Now let's apply the four perspective facts to create a standard perspective setup, which will be the mechanism that the the artist can use to construct representational drawings. My explanation proceeds in small steps so that you can see how the mechanism actually works and understand the assumptions that it is based on.
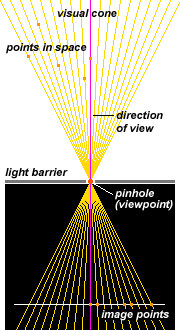
the visual cone and visual rays as points on an image plane
The Light Environment. We start with the light environment as a viewer would experience it naturally. The space around the viewer is filled with a dense, rich scattering of light, coming at him from all directions and distances, reflected from every surface and even scattered by the atmosphere.
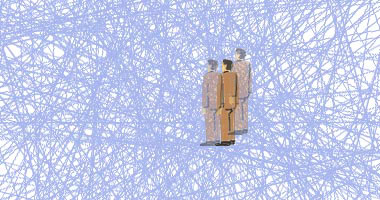
the light environment
The viewer is also alive and continually moving — shifting his gaze, turning his head, leaning to one side or another, stepping forward or backward, walking or sitting or lying down. Before motion picture cameras, there was no way to capture this dynamic complexity.
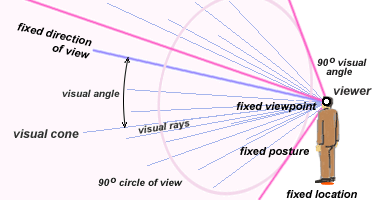
The Stationary Viewer. The first step in perspective is to exclude all the dynamic aspects of visual experience and limit the problem to a stationary viewer. The viewer takes in visual rays only from a fixed location in space, in a fixed posture (including both body position and orientation of the head), and facing in a fixed direction (with a fixed position of the eye or eyes). To my knowledge this is not explicitly characterized in perspective texts, but a stationary viewer is the fundamental premise of a perspective drawing.
the stationary viewer
Once we freeze the viewer's location, posture and gaze, we necessarily fix the viewer's visual cone (what we would call the visual field in other contexts). The light comprised by this fixed visual cone represents a single place, a single view of the world, experienced uniquely by a single viewer: no one else can experience exactly the same stationary view at the same time.
The fixed visual cone is defined by a fixed apex, the viewpoint, and a fixed direction of view (also called the central ray, axis of sight or principal visual ray), which represents foveal ("in focus") vision at the center of the visual field.
The third and final dimension is the width of the visual cone. Any two visual rays within the visual cone define a visual angle measured at the viewpoint, which corresponds to the visual distance between two points in the visual field. So what is the visual angle of the visual cone? This was determined by medieval optics to be 90° (one quarter of a full circle), and later perspective practice adopted this 90° limit as a convenient standard (for reasons explained below). This creates a circular diameter to the visual cone, centered on the direction of view, know as the 90° circle of view.
We know from our own visual experience that we see clearly only in foveal vision, at the center of view: we can't read unless we look directly at the words. However this central clarity is not acknowledged in linear perspective. Because of the fixed position and viewpoint, motion parallax and binocular parallax are excluded as well. We also cannot decide whether the image represents a glance or a steady gaze, the view of a moment or of eternity. These omissions give the images created by linear perspective their surreal clarity and static perfection. Clarity and perfection are really cognitive, not perceptual, attributes: perspective commits us to draw what we know, not what we actually see.
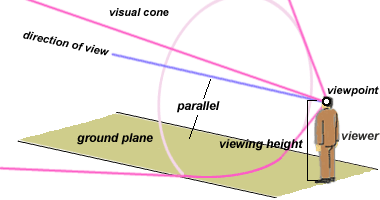
The Ground Plane. The perspective act — the fixed visual cone, viewpoint and direction of view — looks out on abstract space. We have a point of view, but nothing to look at. So the next step is to establish a physical space that creates the visual rays converging on the viewpoint. The simplest and most elegant way to do this is simply to provide the viewer with someplace to stand: the ground plane.
the ground plane
The ground plane is essentially the representation of spatial extent: it goes off into the distance. By convention, the ground plane is made as abstract as possible: flat and perfectly level. In terms of visual experience, it represents the spatially largest or dominant level surface below the viewpoint. In this location it symbolizes all architectural surfaces and the great flat layers of geology — tilled fields, alluvial meadows, dried lake beds, and large bodies of water. By convention, the viewer is normally standing or sitting, spine upright and head erect to balance the downward pull of gravity, with eyes facing forward. This puts the viewpoint at a fixed distance above the ground plane: the viewing height.
As it extends outward in all directions, the ground plane cuts the visual cone almost in half, blocking the range of vision downward. This naturally orients the direction of view straight ahead, which is fixed by a second convention: the direction of view is parallel to the ground plane. The viewer stands or sits upright and perpendicular to the ground plane, head upright, balanced against the downward pull of gravity.
Although it is abstract, the ground plane is extraordinarily rich with significance. It is the here and now of the perspective act, and signifies that this place is important to experience. It also characterizes the perspective stance of the viewer — his location, posture and focus of attention within a specific physical setting.
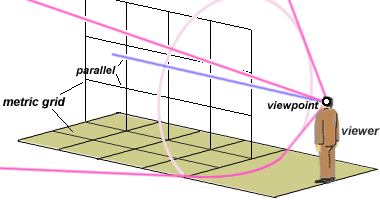
Distance Measurement. The ground plane is our reference for location in space, and therefore the distance from the viewer to any objects in space. To specify these concepts of location and distance, the next perspective step is to define a metric grid on the ground plane.
dividing the ground plane with a metric grid
The most convenient approach is to partition the ground plane by a grid of squares 1 meter on a side. We can if desired create a second grid in a plane perpendicular to the ground plane, so that we can measure distance in three dimensions.
By convention, all lines in the grid are defined either parallel or perpendicular to each other and to the direction of view. This allows us to measure distances in any direction in relation to the viewpoint — 10 squares ahead, 2 squares to the left — in the same way we would locate points on a sheet of graph paper. The vertical grid allows us to measure distances in height above (or below) the ground plane or the direction of view. This metric space allows us to extend or verify the facts of linear perspective by means of geometrical proof.
This grid on the ground plane is one of the most primitive conventional elements of linear perspective. Early Renaissance artists actually included the measurement grid in their finished paintings and frescos, as a pavement of square tiles, often in a strongly contrasted checkerboard pattern.
The Physical Geometry. The visual cone is filled with an infinite number of visual rays, arriving to the viewer from every visible object and surface in physical space. However, thanks to the metric grid, we can define the spatial location from which visual rays originate. For example, we can limit our attention to visual rays from intersections in the metric grid, and ignore the rest. We assume (correctly) that any insights we obtain from these few visual rays will apply to any other visual rays in the visual cone.
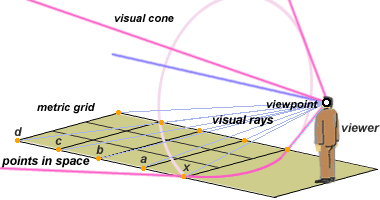
visual rays in physical space
In the figure, five of these points are shown in orange, and labeled d, c, b, a and x along one side of the direction of view; a matching row of unlabeled orange points is shown along the opposite side. Each row of points lies on a single straight line, and the two lines are parallel to the direction of view. At the same time, the matching pairs of points define the sideways or transverse lines in the metric grid, perpendicular to the direction of view.
The visual rays from these points define the geometry of visual rays in physical space. And they allow us to address two fundamental questions about recession, or changes in object appearance with object distance:
• What happens visually at different distances to objects arranged along a straight line parallel to the direction of view (as defined by the line dx and the matching line on the opposite side)?
• What happens visually at different distances to objects arranged in equally spaced rows perpendicular to the direction of view (represented by the transverse lines ending at each labeled point)?
The next perspective steps clarify the answers to these questions.
The Perspective Geometry. By limiting the perspective view to a handful of visual rays from the intersections of the metric grid, we have started to simplify or abstract the viewing situation, reducing it to its geometric essentials. Let's complete that process.
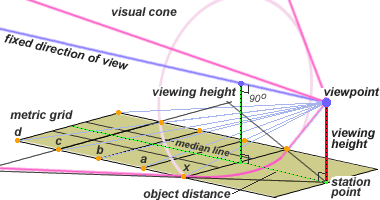
the basic perspective geometry
First, we excuse the human viewer and retain only the fixed location of his viewpoint.
The viewpoint has a specific location in relation to the ground plane directly underneath it. This is called the station point. A line between the station point and viewpoint is perpendicular or "square" to the ground plane, signified by the small square at the base of the line.
(Traditional perspective tutorials refer to the viewpoint as the station point, but I feel it is very useful to have a separate term for the viewpoint and its ground plane location.)
The distance between the viewpoint and station point is the viewing height above the ground plane. As we've seen, this depends on the viewer's physical height and location in relation to the ground plane (sitting, standing on the ground, or standing at the top of a tower).
The viewpoint is at the tip or apex of the visual cone, and the origin of the direction of view. We have already conventionally decided that the direction of view is parallel to the ground plane. So we can define a median line on the ground plane, extending from the station point and parallel to the direction of view, which divides the ground plane into symmetrical left and right halves.
Finally, we can specify a object distance between the viewpoint (or station point) and any object within the visual cone.
At this point linear perspective becomes a precise measurement system. All the distance measurements within the metric grid, and the visual angles of visual rays from the grid to the fixed viewpoint and direction of view are defined by basic trigonometry. In fact, as linear perspective developed during the Renaissance, it was closely associated with developments in surveying, mapmaking, navigation and astronomical observation. The tools and procedures for measuring the physical world and for making perspective images were often explained in the same book.
Making the viewing situation geometrically abstract imparts a similar abstraction to the identity of the viewer of the image. Paintings that create an identity or presence for the viewer as an individual recognized by persons in the painting, as in Velázquez's Las Meninas, are rare in the perspective tradition, especially in academic or history paintings. More often the perspective viewpoint implies a timeless or universal witness, an abstract vantage that can be filled equally well by any anonymous passerby.
The Image Plane. Next we turn to making a perspective image. To do this, we insert an image plane through the visual cone. This corresponds to the fourth perspective fact described above: an image is a cross section through the visual cone. It is the "window" of perspective imagery.
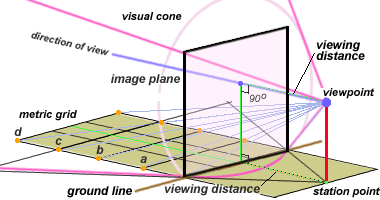
an image plane in the basic perspective geometry
To keep the geometry simple, and to mimic the vertical viewing position of a vertically hung painting or wall fresco, the image plane is conventionally a flat surface perpendicular to the direction of view and to the ground plane. (Linear perspective works just as well if there are no right angles in the setup, or if the image plane is curved rather than flat, but these situations are geometrically more complex and were not clearly analyzed until the early 18th century.)
The image plane does not have fixed dimensions — its limits are only determined by the size of the visual cone or by the size of the support that we make the image on.
However, the image plane does have a fixed location: the ground line directly underneath it. This is equivalent to the base of a vertical wall on which the painting or fresco is displayed.
Finally, the ground line is at a fixed distance from the station point: this is the viewing distance.
The Perspective Image. The image plane is commonly described as a window looking onto the world. This means all visual rays pass through the image plane on their way to the viewpoint.
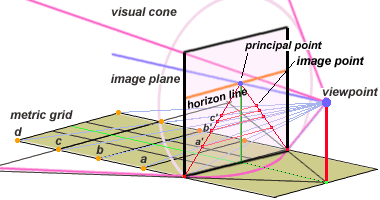
perspective image on the image plane
The final step is to identify where each visual ray passes through the window — the point where it intersects with the image plane. This point is its perspective image. In the figure, point a' is the intersection between the image plane and the visual ray from point a on the ground plane to the viewpoint; that is, a' is the image in perspective space of the point a in physical space. Point b' is the image of real world point b, c' is the image of c ... and so on for all the points on those two parallel lines of points we decided to study.
Physical lines — edges, tracks, borders, wires — can also be projected onto the image plane. The collection of all projected image points and image lines is the perspective image of the corresponding points and lines in physical space.
We have defined a way to map three dimensional space onto a two dimensional surface, by locating the image points for every detail of the visual cone. For an optical image, these points are plotted for us by rays of light. In artistic practice, perspective constructions are typically made by plotting visual rays point by point. To simplfiy this task, the emphasis is on significant points, especially vanishing points and corners or edges that can be connected by straight lines or freehand curved lines. Perspective drawing does not proceed by mechanically connecting dots with lines, but by choosing the dots that locate all essential elements in the perspective image.
The image plane is conventionally divided by two representations of the viewer's perspective stance. The horizon line corresponds to the visual limit of the ground plane if it extended infinitely far. This divides the image plane horizontally. The median line corresponds to the median line on the ground; it extends vertically upward from the ground line and is perpendicular to the horizon line. The two lines intersect at the principal point, which locates the direction of view as it passes through the image plane.
Because we have defined all the relevant elements as parallel or perpendicular to one another, the principal point anchors two basic dimensions of the perspective image. The distance between the principal point and the ground line is viewing height to the image plane; the distance between the principal point and the circumference formed where the 90° circle of view intersects the image plane is the viewing distance.
Two important details: the horizon line is not necessarily defined by the visible horizon on the surface of the earth; we conventionally assume this. As we'll see later, it can alternately be defined as the pupil line (visual horizontal) of the artist's head. (There would be a horizon line in outer space.) Similarly, the image plane does not have to be perpendicular to the ground plane, or even to the direction of view, but defining it that way makes it easier to work out practical perspective problems.
The Viewing Geometry. Once the artist has used these principles to transfer the three dimensional world onto a two dimensional canvas, and from the significant points and lines developed a completed perspective painting, a second situation arises that must be governed by perspective principles: the cultural encounter between the perspective image and a human viewer.
If we whittle this encounter down to its essentials, we are left with the vertical (wall hanging) orientation of a faceless museum or gallery painting, and the ghostly center of projection, perpendicular to a line from the center of the painting, which is the viewpoint implied by the perspective facts in the image.
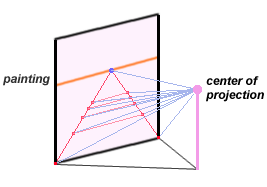
the visitor and the artwork
If the museum visitor stands so that his viewpoint from one eye (or through a peephole) exactly coincides with the center of projection of a perfectly consistent perspective painting, all the visual rays from the surface of the painting will recreate the visual rays from the original scene, within the limits of accuracy of the painter's representation.
This is the illusionistic use of perspective, and it is only effective when (1) the drawing is in strict perspective, (2) the drawing contains the kinds of receding lines and planes that make the strict perspective construction visible, and (3) the drawing is viewed through a peephole or eyepiece at the center of projection. (Most photographs, excluding most wide angle photographs and including all telescopic photographs, are also in linear perspective.)
It should be said that most paintings from most historical periods contain perspective inconsistencies, such that they define several similar centers of projection; and indeed most images (the Adams landscape photograph above, or a photograph of the Museo Guggenheim in Bilbao; photo, right) do not clearly define a center of projection because they lack the edges, corners and distance cues that identify clear vanishing points or vanishing lines. In these cases, viewers by default assume a viewing position that centers the image in their field of vision, perpendicular to their direction of view, at a distance that brings the whole image into a comfortable circle of view. This intuitive "center of projection" is simply eye level, facing, and comfortably far away.
Imagination does the rest. Because the viewers of paintings and frescos rarely choose (or are able) to stand at exactly the center of projection, the symbolic or informal use of perspective — to convey the idea of being in a certain place at a certain time — plays a much greater role in the stance viewers typically take toward a painting or photograph. Paradoxically, the linear perspective in the image must be reasonably consistent and accurate to be acceptable, but the linear perspective of the painting in the viewer's eyes does not. We see the painting surface as an object, not a window.
Even when a painting is viewed from exactly the center of projection, a perfect perspective drawing may create apparent perspective distortions that become intrusive or objectionable when the painting is viewed with both eyes or from different points of view. As this is how people normally look at paintings, artists spent three centuries attempting to understand and minimize these effects. Eventually, in the process, they learned to use the distortions for expressive purposes.
the perspective setup
We have progressed by logical steps from the four perspective facts to a basic geometrical framework for mapping objects in space onto a two dimensional image plane. Now it is time to step into the viewpoint and examine this framework as the viewer sees it.
To do this, I will create the perspective image of my running example, the point intersections in a metric grid. The most primitive and explicit way to do this, which was the standard method in early Renaissance paintings, was to define the perspective geometry in paired horizontal and vertical diagrams of the entire viewing situation — the viewpoint, image plane and every object to be drawn on the image plane.
These diagrams are known as the elevation and plan, as shown in the figures below and at right.

most images do not define a distinct center of projection
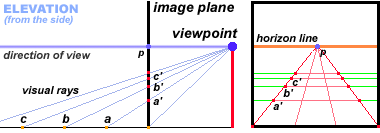
the perspective framework in elevation (above) and plan (right)
The plan (view from above) is based on an image plane parallel to the ground plane, with all points in physical space projected onto it by parallel vertical lines perpendicular to its surface. The elevation (view from the side) is always perpendicular to the plan and ground plane (like a wall), again with points behind it projected onto its surface by parallel horizontal lines. (There is no convergence to a viewpoint in a plan or elevation.) Conventionally the elevation is parallel to the sides of the architectural form it portrays, but for our purposes it is parallel to the direction of view.
If we make a plan and elevation at actual size, and very accurately specify the locations of the viewpoint and the image plane, then we can draw visual rays from objects to the viewpoint, measure where they intersect the image plane in these views, then transfer these horizontal and vertical measurements to the painting format.
The figures (above) show this done twice: horizontal green lines for measurements done on the elevation (which gives the distance of the points above the ground line), and vertical green lines for measurements from the plan (which gives the distance of the points to the left or right of the median line).
If we make and measure these schematic drawings carefully, then connect the dots to construct the perspective image of our metric grid on the image plane, we discover that the receding rows of points appear as converging lines of image points, as shown below.
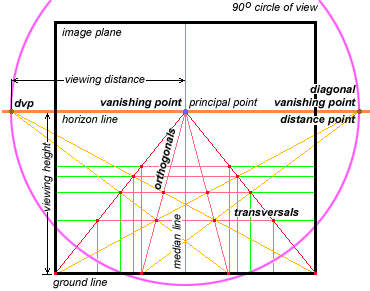
perspective image of the metric grid on the ground plane
Terms introduced in the discussions of perspective geometry, the image plane and the perspective image are shown in plain italics; if any are unfamiliar or unclear, please review those sections carefully.
Now we see that the image plane roughly fills the visual field; it slices through the visual cone to create the 90° circle of view (or any other size circle of view we want to define), centered on the principal point — the intersection of the direction of view with the image plane. The principal point and horizon line also show the viewing height.
Now let's examine the perspective image of the metric grid. First of all, we find that it still consists of straight lines (in red). Connecting pairs of metric points parallel to the direction of view has created the image orthogonals (the mathematical term for "perpendicular," which reminds us that the orthogonals are perpendicular to the image plane).
Now we immediately see that image lines parallel to the direction of view converge at the principal point, which is therefore their vanishing point (abbreviated vp) — the term coined by the English mathematician Brook Taylor in 1715. Because this vanishing point is identical to the principal point (the direction of view), it controls recession in space toward the focus of attention. (Perspective drawings based only on the principal point are in central perspective, as discussed on the next page.)
Despite what we see, we know the lines in the metric grid on the ground plane are constructed parallel to the direction of view and are equally spaced (we can confirm this in the plan view, above). So we can conclude that the orthogonals define an interval of constant width in perspective space.
Connecting pairs of metric points parallel to the image plane creates the image transversals, which are parallel to the ground line. Again we immediately see that transversals become more closely spaced as they approach the horizon line. Yet because we know they represent equally spaced lines in physical space, we can conclude that the transversals define intervals of equal depth in perspective space, from the ground line toward the horizon.
We can hardly appreciate today the extraordinary sense of discovery that early Renaissance artists experienced as the first perspective drawings took shape under their hands, and the paradoxical relationship between see and know came into view. We sense their delight and awe in their manuscript attempts to solve more and more intricate perspective problems, and in the reverent accuracy with which they transformed these drawings into finished works of art.
A basic principle was recognized early: the spacing between transversals narrows more quickly with distance than the spacing between orthogonals (the vertically elongated squares of the metric grid at the ground line become horizontally elongated rectangles in perspective distance). Artists had unlocked the fundamental proportions of foreshortening, which is the compression of the visual angle of a dimension or distance as the dimension becomes more parallel to the direction of view. Indeed, the earliest illustrations of artists studying perspective problems usually show them studying the effects of foreshortening — for example, in Dürer's illustrations that show how to draw, point by point, a foreshortened lute or a human figure.
Several decades later, artists also realized that that the two diagonals within the squares created by the orthogonals and transversals must also be parallel lines (like the parallel diagonals of a chessboard) and therefore must also converge to vanishing points on the horizon line on either side the principal point. These are the diagonal vanishing points (abbreviated dvp), first described by the French cleric and diplomat Jean Pélerin in 1505.
Pélerin described how contemporary artists used the dvp's to find equal intervals of depth (the transversals) from orthogonals of equal width measured along the ground line. For this reason the dvp's were traditionally called distance points, because in central perspective they are used to transform a measure of physical distance along the ground line into an image recession in perspective space. (They are also called distance points because the distance on the image plane between a dvp and the principal point is exactly equal to the viewing distance from the viewpoint to the image plane. This means the diagonals can be used to reconstruct the center of projection implicit in a perspective painting.)
The Circle of View Framework. The final step is to standardize or abstract the insights we have drawn from the perspective image of the metric grid, and formulate them as a perspective machine. This is the circle of view framework.
The key element is that the viewing distance (x, the distance of the viewpoint from the image plane), the viewing height (the distance of the viewpoint from the ground plane or plane of orthogonals) and the radius of the circle of view are all equal. We also require, as a simplification of the perspective problems we want to analyze, that the direction of view is parallel to the ground plane and the image plane is perpendicular to both the ground plane and the direction of view. This creates the physical arrangement illustrated and labeled in the diagram (below).
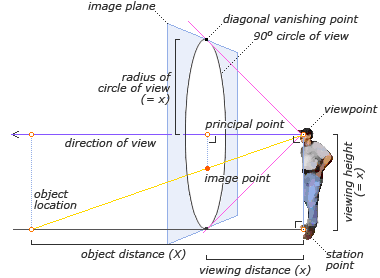
the circle of view framework: basic terms
the 90° visual cone with viewing distance set equal to viewing height
We choose the 90° circle of view as the framework for perspective operations because this circle has a radius of 45° visual angle around the principal point, so it contains all possible diagonal vanishing points. In addition, 90° is the visual angle accepted since the Renaissance as the outer limit of images projected onto a plane, so we have no use for a larger visual span.
To create the 90° circle of view, we simply define the viewing distance as equal to the viewing height, which aligns the ground line with the base of the circle of view. Then the framework proportions integrate the diagonal vanishing points, the viewpoint, the viewing distance to the image plane, the viewing height and the ground line around the powerful central recession toward the principal point that is created by the direction of view.
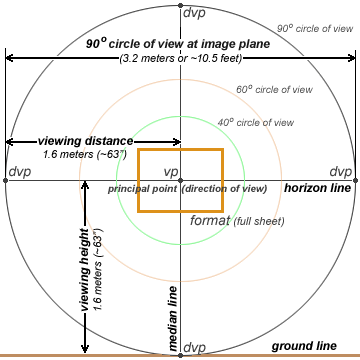
the circle of view framework
the 90° circle of view as it appears from the viewpoint
The central vanishing point (vp) defines recession along all lines parallel to the direction of view — the convergence of all orthogonals. The horizon line and median line intersect at the principal point, dividing the circle of view into quadrants. Two pairs of diagonal vanishing points lie on the horizon and median lines on opposite sides of the circle of view. And because the viewing distance is equal to the viewing height, the ground line, median line and circle of view all intersect at a single point, the bottom dvp.
If we need to be precise in how the perspective view is implemented, then the specific measurements depend on the stature or vantage of the viewer. However, as a general rule, an average size adult has a viewing height of about 1.6 meters (63 inches), so the circle of view at the image plane will be about 3.2 meters (10.5 feet) wide. (Note that the viewing height is always measured from a viewer's eye level, not the top of her head.)
The 90° circle of view is a very convenient framework for working out perspective problems, but drawings that completely fill the circle are subject to perspective distortions that most artists find objectionable. For that reason, the actual image area typically is fitted into a much smaller circle of view, such as the 60° or 40° circles shown in the diagram. For example, a watercolor full sheet (22"x30") would appear as shown in the diagram — nicely contained within a 30° circle of view. Even the massive emperor sheet (40"x60") only fills a 50° circle of view at a 3.2 meter viewing distance.
Because the 90° circle of view framework explicitly links together the principal point, viewing distance, viewing height, ground line and all diagonal vanishing points, it can be applied to solve any perspective problem. It does not just provide a system for copying nature point by point in order to make a painting. We've actually invented a system of perspective construction which can be used to create new images at our pleasure and imagined worlds from any viewpoint.
basic rules of perspective
At this point you should have a clear understanding of how linear perspective connects the three dimensional physical world to a two dimensional perspective image. So this is the appropriate point to review some of the basic and always trustworthy perspective rules that can guide you in making a perspective drawing. The rules can be pounded out by geometrical deduction, but I will simply state them in a logical order.
A Perspective Glossary. First, a summary of the key terms. (1) Physical space refers to the three dimensional, real world; (2) the ground plane is an idealized flat, level surface representing the pedestrian surface of architectural forms (lawn, pavement, floor), or the average of flat natural terrain (desert, salt flat, surface of a lake or ocean); (3) the viewpoint is the unique location in physical space of the nodal point of the observing eye or camera, the convergence point or center of projection for light; (4) the station point is the point on the ground plane directly underneath the viewpoint; (5) the direction of view is the optical axis of a camera or the line of sight of a viewer located at the viewpoint, typically aligned so that it is parallel to the ground plane; (6) the image plane is a two dimensional, flat surface, aligned so that it is perpendicular both to the ground plane and to the direction of view, on which the perspective image is projected; (7) a visual ray is any line that intersects (passes through) both the viewpoint and the image plane; (8) the visual cone is a cone, with apex at the viewpoint, axis along the direction of view, and a base diameter on the image plane just large enough to comprise all the visual rays contributing to an image.
(9) An image point is the intersection of a visual ray with the image plane; an image line is a line drawn on the image plane between two image points, or the line formed by the intersection with the image plane of a plane in physical space; (10) the principal point is the intersection (image) of the direction of view with the image plane; (11) the ground line is the intersection of the ground plane with the image plane; (12) the median line is a line on the ground plane directly underneath the direction of view, and also the image of this line as a line perpendicular to the ground line and through the principal point; (13) the horizon line is an image line through the principal point, parallel to the ground line and coincident with the horizon in physical space of a "flat" surface such as the ocean.
For an image plane perpendicular to the ground plane and to the direction of view, (14) the viewing distance is the distance between the viewpoint and image plane and/or between the station point and ground line; and (15) the viewing height is the distance between the viewpoint and the station point (in physical space) and/or between the ground line and the principal point (on the image plane); (16) the circle of view is the intersection of the visual cone with the image plane, measured as a visual angle from the viewpoint or as a radius from the principal point on the image plane.
(17) A perspective image is the projection of physical space onto the image plane by visual rays converging at a viewpoint; (18) a plan is the projection of physical space onto a horizontal image plane (e.g., the ground plane) by parallel vertical lines; and (19) an elevation is the projection of physical space onto a vertical image plane by parallel horizontal lines.
Again, as simplifying assumptions, (a) the image plane is perpendicular to the direction of view; (b) the image plane is perpendicular to the ground plane; (c) the direction of view is parallel to the ground plane; (d) the viewer is standing or sitting upright on the ground plane; and (e) the viewing distance and viewing height are equal. These assumptions define the 90° circle of view framework and make the perspective rules easier to understand and apply.
The Basic Rules of Perspective
1. The image of a visual ray is a point on the image plane. A visual ray is any line that intersects the viewpoint and passes through the image plane. The intersection of a line and a plane defines a point. This corresponds to the fact that when we look straight down any line or edge in physical space, its image is only a point in our visual field. Thus, the direction of view only appears as the principal point, the origin of any visual ray appears as a point, and any number of separate points on a visual ray all appear as a single point on the image plane.
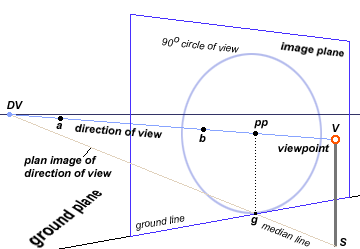
figure 1
In figure 1, the visual ray (the line from the viewpoint V) intersects the image plane at a single point; in this case, because the visual ray is the direction of view, this point is the principal point (pp). Points a and b are located on the same visual ray, therefore their point images are identical with pp.
Figure 1 also shows that any feature of physical space can be projected downward as a plan in the ground plane. The point g is the image of the principal point projected into the ground plan (as shown by the dotted line); the station point (S) is the image of the viewpoint in the ground plan, and the median line is the image of the direction of view.
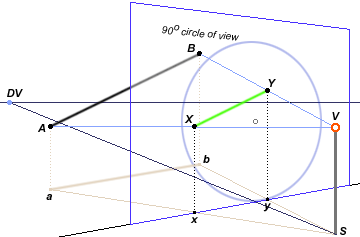
figure 2
2. Any straight line in physical space that is not contained in a visual ray projects a straight line on the image plane. That is, a straight line or edge in physical space always appears as a straight line in the perspective image, no matter which way the line is turned to the direction of view. (The sole exception is when the physical line is contained in a visual ray, when according to rule 1 it appears as a point.)
In figure 2, the line AB in physical space does not intersect the viewpoint V, and therefore it is not a visual ray. The visual rays AV and BV do intersect the viewpoint, and therefore they also intersect the image plane at X and Y. All the points between A and B can be projected in the same way, and these create the image line XY (green line) on the image plane.
The image of line AB in the plan is the line ab. Note that when the points a and b are connected to the station point S by lines in the plan, they intersect the ground line at x and y, the plan image of the points X and Y. Note than the plan image is constructed by parallel lines perpendicular to the ground plane (as shown by the dotted lines).
3. Any two points on a straight line, projected onto the image plane, define that line on the image plane. Thus, a straight line drawn between the two points X and Y creates the image line XY in figure 2.
Note that if the line has infinite length, then any two distant points will serve; but if the line has a fixed length (a line segment), then the two end points are necessary to define its length. This leads to the most economical method of perspective construction: we project only the end points of a line onto the image plane, then connect them by a straight line. For example, we can define the edges of a cube by projecting only its significant points or defining elements — the six corner points — onto the image plane, and then connecting the appropriate corner points with straight lines to construct the edges.
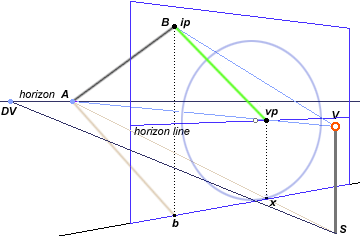
figure 3
4. The image of an extended line must end in two points: its intersection with the image plane and its vanishing point. If we have drawn a cube in perspective, what would happen if we extended an edge of the cube to make an infinitely long line in physical space? Would that make the image line infinitely long as well? The answer is no: the image line must end in two points: its intersection with the image plane and its vanishing point.
The only exceptions to this rule are lines parallel to the image plane (they never intersect the image plane, and they do not converge to a vanishing point), and visual rays, for which the intersection and vanishing point are the same (see rule 1).
In figure 3, the infinitely long line AB in physical space intersects the image plane at B and recedes toward the virtual point A, which is not a physical point (and therefore is shown in blue) because vanishing points are only points on the image plane, not points in physical space. The vanishing point is also the intersection of visual ray AV with the image plane. The vanishing point projects into the plan as x, and x lies on the line AS, the plan image of the visual ray AV.
This rule, which the English perspective theorist Brook Taylor called "the principal foundation of all the practice of perspective," has important consequences that we will explore in the next page.
5. The vanishing point of a line is the intersection of the parallel visual ray with the image plane. If our direction of view is exactly parallel to any line, then we are looking directly at the vanishing point for that line; and given a fixed viewpoint, there is only one vanishing point for any physical line and therefore only one visual ray parallel to that line. (These fundamental principles of recession were first proved geometrically by the Italian mathematician and astronomer Guidobaldo del Monte in 1600.)
In the metric grid perspective example used above, the elevation and plan show that the direction of view is parallel to the gridline of points abc, so those two lines never actually meet in the real world. Even so, the visual angle between the direction of view and any point on the gridline becomes smaller as the point moves farther away from the viewer — the visual angle between point d and the principal point p is much smaller than the visual angle between p and a. When the points are very distant from the viewpoint, the visual angle between the points and p becomes imperceptibly small and the points merge with the principal point, as we see in the converging orthogonals of the metric grid.
In figure 3 (above), the visual ray AV passes through the vanishing point for image line AB, as does its image AS in the ground plan; therefore AB, AV and AS are parallel.
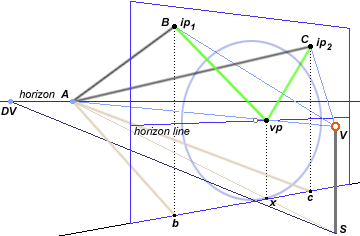
figure 4
6. All parallel lines in physical space converge to the same (single) vanishing point. If any two lines are parallel to a third line, then they are parallel to each other, which generalizes rule 5 to any number of lines. Note again that vanishing points only exist on the image plane, they have no location in physical space.
An important corollary: any visual ray defines the vanishing point for all physical lines parallel to that ray. This allows us to work backwards, from the perspective image to physical space. Thus, in figure 4, if we pick any arbitrary point C on the image plane, and draw the image line Cvp (green line), then this is the image of the line AC in physical space, and we can deduce that lines AB, AC, AV, AS, Ab and Ac are all parallel.
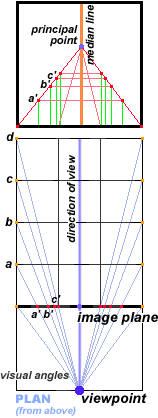
7. Lines parallel to the direction of view appear to converge at the principal point. This is only a specific case of rule 6, but it is very useful. We concluded in the previous section that orthogonals define a constant width across the receding transversals in an image. The principal point, and its associated orthogonal lines, define the primary dimension of depth or recession in any perspective image.
This is a fact of everyday vision as well. Straight railroad tracks on level ground (right) are the most striking example. (Here a camera lens, rather than the eye, creates the perspective viewpoint.) Sunlight provides another case — the sun is so far away that its light "rays" are essentially parallel at the earth's surface, and therefore seem to converge when broken into shafts.
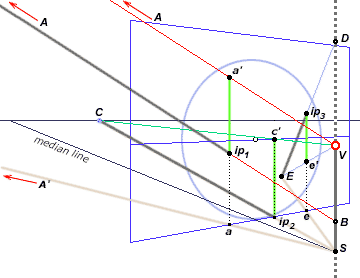
figure 5
8. Lines through the image plane that intersect the line containing the line segment VS create image lines perpendicular to the horizon line. The exceptions are visual rays, which pass through the viewpoint V and therefore appear as image points on the image plane (perspective rule 1).
The key is that line segment VS, the viewing height from the station point S to the viewpoint V, is by definition perpendicular to the ground plane. Extended without limit (through point D and below point S, dotted in the figure), this line SD is equivalent to the head midline of a standing viewer and is also perpendicular to the ground plane. Therefore any plane that contains the line SD will also be perpendicular to the ground plane.
Any line in space that intersects this extended line SD must also lie in a plane with VS, and all planes containing VS are perpendicular to the ground plane. Therefore the line formed by the intersection of this plane with the image plane (perspective rule 10) will also be perpendicular to the ground plane, the vanishing line of the ground plane (horizon line) and ground line (the intersection of the image plane with the ground plane).
Three examples in figure 5 demonstrate that the direction of the line, or the location of its intersection with SD, do not affect the vertical orientation of the image line:
• Line AB from any arbitrary point A above the ground plane intersects the image plane at ip1 and intersects the segment VS at B, which creates the plane ABS containing ip1. This plane intersects the ground line at a along the line A'S, where A' is the plan projection of point A onto the ground plane. The visual ray AV intersects the image plane at a', which must also lie in the same plane ABS perpendicular to the ground plane; therefore the image line from ip1 to a' must be vertical and perpendicular to the ground plane and the ground line.
• The line CS from the point C contained in the ground plane at infinity is its own plan line, which intersects the image plane at ip2 in the ground line. This forms the triangle CVS with the visual ray CV. Because side VS of the triangle is perpendicular to the ground plane, the intersection of this triangle with the image plane forms the image line from ip2 to c', also perpendicular to the ground plane.
• Finally line DE from the nearby point E intersects the image plane at ip3 and forms the plan line ES intersecting the image plane (ground line) at point e. This forms the triangle EDS perpendicular to the ground plane, and this triangle must contain the image line from ip3 to the image point e'.

parallel railroad tracks converge toward the horizon

parallel sunbeams converge toward the sun
In each case, the triangles (ABS, VCS and DES) contain some part of the line DS, which is perpendicular to the ground plane, so the plane figures and their intersections with the image plane are also perpendicular to the ground plane.
Although I don't provide a proof, Rule 8 explains why reflections from standing bodies of water always form a vertical smear directly under the light source (image, right). The light source, regardless of its height, defines a point projected onto the ground plane. The visual ray from the light source to the viewpoint will lie in the same plane as a line from the projected point to the station point. The ground plane will be parallel to the level surface of the water, and the projected point will define a ground line to the station point. All reflections of the source will lie somewhere along this line, and therefore will form a vertical line on the image plane.
What about surfaces that are not level, such as a vertical plane wall or a sloping but plane pavement? We generalize the example of reflections in a lake with two refinements, which are geometrically equivalent to the observer tilting his head forward or back, or to the left or right. We define the projected point of the source at the intersection of a line through the source that is perpendicular to the surface of the reflecting plane, and a second point at the intersection of a line through the viewpoint that is perpendicular to the surface of the reflecting plane. We then have a "ground line" defined between these two points, and all possible reflections will lie along this line.
•
The rules developed for lines can also be applied to planes. By knowing the location and orientation of a plane, we also partially define the location and orientation of any lines it contains. In a perspective construction, points are used to define line edges, and edges define the planes that contain their lines.
9. A plane that contains a visual ray intersects the image plane as a line. This matches rule 1 for lines. If a plane contains a visual ray then its surface disappears, like a playing card viewed edge on, and all we see is its straight line intersection with the image plane.
A useful corollary: any straight line through a point in perspective space is the intersection with the image plane of the plane that contains the visual ray passing through that point.
10. The perspective image of any two lines, that either are parallel or intersect in physical space, defines the image of the plane containing those lines. This is the matching principle to rule 3 for lines.
In figure 4 (above), the two image lines Avp and Bvp are parallel because they intersect at a common vanishing point vp. Therefore these lines define lines of recession in the image of the plane that contains the parallel lines; the line AB will lie in the intersection of the plane with the image plane, and this line will be parallel with the vanishing line of the plane. If vp is a point at a finite distance, then any two lines intersecting this point in physical space also define a plane. The separate intersections of these two lines with the image plane define the ends of a line segment describing the intersection of the plane with the image plane, and the separate vanishing points of the two lines will define a second line segment that describes the vanishing line of the plane.
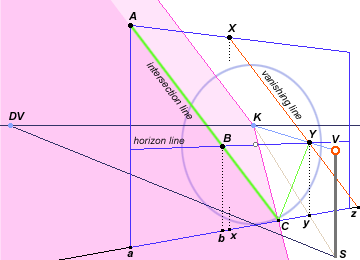
figure 6
11. The image of an extended plane must end in two lines: its intersection with the image plane and its vanishing line. This is the matching principle to rule 4 for lines, and similarly the only exceptions are planes parallel to the image plane and planes that contain a visual ray — for these the intersection line and vanishing line are the same.

reflections appear vertical in all directions
In figure 6, a plane (magenta area) intersects the image plane at ABC (green line). All lines in this plane that are not parallel to the image plane recede to its vanishing line XYz. I have drawn this plane so that it is tilted to intersect the ground plane also; this intersection is the line CK in physical space. The vanishing point for CK is Y, the point where the image vanishing line intersects the image horizon line; and the line YC is the perspective image of the line CK. Note as before that y lies on the plan line KS.
As a important corollary, the intersection line and vanishing line of a plane are always parallel on the image plane. Thus, in the figure above, the lines ABC and XYz are parallel. In figure 4 (above), the parallel lines AB and AC define the image of the plane ABC as the image lines Bvp and Cvp; the intersection of this plane with the image plane is the straight line passing through B and C (rule 3); and the vanishing line for the plane is the line that passes through vp parallel to BC (rule 9). Similarly, the ground plane defines the ground line (its intersection with the image plane) and the horizon line (its vanishing line), and these two lines are always parallel to each other in a perspective image.
12. The vanishing line for any plane is the parallel plane containing a visual ray, or the line connecting the vanishing points for any two lines parallel to the plane. A plane that contains a visual ray intersects the viewpoint V, which means the plane is seen "edge on" as a line on the image plane (rule 9). This matches rule 5 for lines.
13. All parallel planes converge to the same (single) vanishing line. This matches rule 6 for lines. In the standard perspective setup, the horizon line is the vanishing line for the ground plane and all planes parallel to it, such as floors, ceilings, water surfaces and cloud layers.
14. The vanishing line of a plane contains the vanishing points for all lines in the plane and all lines parallel to the plane. This is an extremely powerful rule, because it makes the vanishing line of an important plane the "attractor" for all lines parallel to it. Thus, the horizon line, which is the vanishing line for the ground plane, contains the vanishing points for all lines constructed level to the ground — that is, the horizontal edges found in nearly all buildings and their diagonals — even when the building walls are not parallel to the image plane.
15. The vanishing line for any plane parallel to the direction of view intersects the principal point. This matches rule 7 for lines.
All planes parallel to the ground plane any distance above or below it must converge to the vanishing line for the ground plane, which is the horizon line (rule 13). In the vertical dimension, all vertical planes parallel to the direction of view on either side of it must converge to the vanishing line for the median plane, which is the median line. Finally, any plane tilted at an angle to the ground plane but parallel to the direction of view will create a similarly tilted vanishing line, which again will pass through the principal point on the image plane.
16. Any plane that contains both a line and the plan image of the line is perpendicular to the ground plane, and defines a perpendicular intersection line and vanishing line on the image plane. This matches rule 8 for lines. Reciprocally, if the vanishing line of a plane is not perpendicular to the horizon line, then none of the lines contained in that plane will be perpendicular to the ground plane. Rule 16 is useful for the construction of inclined lines, and for defining the light plane of shadows.
•
17. Finally, although they are not rules per se, it is important to memorize the criteria for the four different types of perspective drawings (discussed in later pages):
• in one point perspective (or central perspective) there is only one vanishing point, which is identical to the principal point located on the horizon line and the median line. Central perspective or 1PP requires all six faces of all square solids to be either parallel or perpendicular to the image plane and direction of view.
• in two point perspective (2PP) there are two vanishing points, neither of which is the principal point, that define a single vanishing line, usually (but not necessarily) the horizon line. 2PP requires that two faces of all square solids must be perpendicular (not parallel) to the image plane and parallel (not perpendicular) to the direction of view.
• in three point perspective (3PP) there are three vanishing points, none of them the principal point, that define three vanishing lines, none or any one of which may be coincident with the median line, the horizon line or any other line on the image plane. 3PP requires that no face of any square solid is perpendicular or parallel to the image plane or to the direction of view.
The most common type of drawing requries mixed perspective, in which some objects appear in one type of perspective and some objects in another. In this case each object or group of similarly arranged objects must be treated as a separate perspective problem; they are combined as a single image because they share a common circle of view.
image plane, viewpoint & direction of view
Now it's appropriate to come back to the specific viewpoint and direction of view that are the core of any perspective image, and consider how these relate to the image plane and to the features of the scene or landscape.
Image Plane Orientation. First, let's revisit the point mentioned earlier that the image plane is not necessarily perpendicular to the ground plane (for example, in a 3PP image), but is always considered to be a flat surface, perpendicular to and centered on the direction of view.
In terms of projective geometry, we can just as easily and accurately record the optical facts of the world on an image plane that is not perpendicular to the direction of view (or to anything else). And we can use a curved surface just as effectively as a flat one, as was commonly done with the ceiling frescos created for the domes and barrel vaults of European Baroque churches and palaces and, more recently, is used as the image plane in curvilinear perspective.
In other words, the flatness and perpendicular orientation of the image plane are essentially conventional. The convention arises from the way we typically (conventionally) make and show art. We assume the image plane is perpendicular to the ground plane because we expect the finished image will be hung for viewing on a vertical gallery or museum wall. We assume the image plane is flat because stretched canvas and drawing paper are flat. We might think of these as display conventions contained in the perspective geometry.
We display images the way we conventially do because that makes them easy to view for people who adopt a convenient posture and position: that is, standing in front of the image surface. We might call these the viewing conventions contained in the idea of the image plane, because "the right way to hang the painting" depends on our assumptions about "the right way to look at the painting." We can specify these in terms of the the orientation of the viewer's head in relation to the image plane, as shown below.
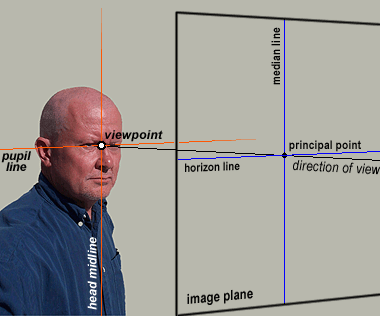
viewing conventions toward the image plane
The human sense of visual orientation ("up" and "down") depends on the head, not the body. The head orientation is defined in three dimensions: a pupil line drawn through the pupils of both eyes, a direction of view perpendicular to the pupil line, and a head midline perpendicular to both the pupil line and the direction of view and usually parallel to the erect spine. (This is the posture for binocular vision. If the image plane represents a "peep show" view from one eye, then the direction of view is the optical axis of that eye.)
By convention the standard rectangular format of the painting or photograph are aligned so that (1) the direction of view is roughly through the center of the format and perpendicular to its surface; (2) the pupil line is parallel to the top and bottom edges of the format or the horizon line within the image; and (3) the head midline is perpendicular to the floor and parallel to the image plane. All these conditions are met if the viewer is standing squarely in front of the painting with head erect, and the painting is hung at eye height and level to the floor — display and viewing conventions that are summarized as eye level, facing, and comfortably far away. Note that despite these ideal viewing conventions, paintings are routinely displayed at heights or in locations that make that impractical.
Finally, there is a third kind of structure folded into the image plane, which is the projection assumption that defines the artist's view of things. The convention here is simply that the "artist's view" (or camera view) at the time the image was created explains the appearance of the world in the image. The projection assumption governs the interchangeable use of "we" or "the artist" in art critical narratives ("in this painting, we are looking down into Niagra Falls" or "in this painting, the artist is/was looking down into Niagra Falls"). We expect, for example, that if the horizon line is parallel to the top and bottom of the image plane, then the artist's pupil line was parallel to the horizon, even though the artist may have been leaning or crouching while working. We experience the book reproductions of Michaelangelo's Sistine Chapel paintings as vertical and flat, even when they are located on curved walls or over the viewer's head — and in execution required the painter to lean backward or lie on his back.
The crux is that the display convention, viewing convention and projection assumption fuse the artist's view, the painting image and viewer's stance within a common, conceptual visual framework. The "right view" of a visual image and our interpretation of it is anchored in spatial orientation: we cannot recognize faces, or correctly judge the relationships among objects, when they are "turned the wrong way" (images, right). The "right orientation" is embedded in our head axes, and these must align with the image contents and its format borders to produce an acceptable image display.
These conventions are so powerful, and so basic to visual experience, that we enforce them even for paintings by Jackson Pollock or Bridget Riley, where they mean nothing to the visual texture of the work; or in the "conceptual" wall drawings of Sol Lewitt, where echoes of the display or viewing conventions belie the claim that the drawing instructions only respond to the limitations of the drawing site.
Paintings gain visual drama or impact when there is an obvious difference between the projection assumption and viewing convention — for example, when the artist's direction of view was downward or upward in relation to the ground plane. These elevation differences are acceptable because they still imply a shared upright stance ("balance") in both the artist and viewer. In contrast, we are usually intolerant of image tilt in which the artist's pupil line or horizontal camera frame are not parallel to the ground plane (as if the artist's head was tilted toward one shoulder, or the camera was askew when the picture was taken).
Object Orientation to the Direction of View. Dramatic changes in the image occur by changing the angle between the direction of view (or camera sightline) and the surfaces of a primary form. That is, image perspective changes with the direction of view, even when the viewpoint stays the same.
Two photographs (below) show a Roman arch in two separate views from exactly the same viewpoint, made with a pinhole camera — a camera that focuses light through a tiny hole instead of a lens. This exactly reproduces on film the perspective optics from a single center of projection.
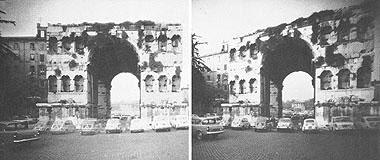
effect of changing only the direction of view
the viewpoint is fixed and the direction of view remains parallel to the ground plane; from M.H. Pirenne, Optics, Photography and Painting (1970)
The only difference between the two photographs is in the direction of view, and therefore in the orientation of the image plane in relation to the frontal planes of the arch — the pinhole was kept in exactly the same location. The image at left shows a direction of view perpendicular to the face of the arch; the horizontals appear parallel to each other and to the horizon line. When the direction of view is shifted 25° to the left, the horizontals now appear to converge, and only those at the horizon are parallel to the horizon. That is, simply by changing the direction of view, we've transformed a central perspective view into a two point perspective view.
If the camera were instead rotated up or down, so that the direction of view was no longer parallel to the ground plane, the image would morph into a two point perspective image with the vanishing points on the median line; if it were rotated both horizontally and vertically, the image would shift into the even more complicated three point perspective view. Linear perspective is not just about a viewpoint or about a direction of view: it is defined by a specific viewpoint and a specific direction of view.
The crux is that the design of a perspective image does not consist simply in the choice of viewpoint onto a primary form such as a building, but the direction of view (location of the principal point) as well. The guidelines for adjusting or choosing the viewpoint and direction of view are somewhat subjective, and depend heavily on the intended impact of the image, but some suggestions are provided in the section on drawing from blueprints or plans.
Horizon Line and Viewpoint. An important and useful fact of perspective is that all objects at the same height as the viewpoint are intersected by the true horizon line. This rule holds regardless of how far above level ground the viewpoint may be, and even when the direction of view is not parallel to the ground plane.
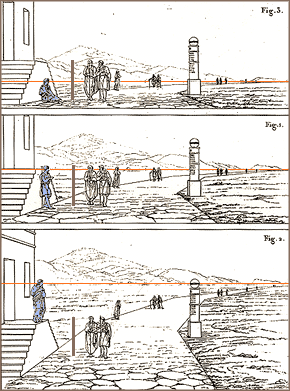
horizon line and viewpoint in landscape perspective
from J.T. Thibault, "Application of Linear Perspective in the Graphic Arts" (c.1860)
The French artist J.T. Thibault created a compact illustration (above). The top, middle and bottom views correspond to the sitting, standing or elevated standing viewpoint of the blue figure at left, who represents the viewing height of the artist in each image. (Blue man's standing height is indicated by the brown line fixed in front of the stairs.)
All the perspective relationships between other figures or objects in the image and the true horizon line (the orange line, not the apparent horizon line defined by the hills) change with the viewing height. When the viewer is sitting, the horizon line passes through his head and therefore appears to cross the waist of standing figures around him. When he is standing on level ground, the horizon line passes through his head and through the heads of all standing figures as tall as he is — no matter how near or far they are from the viewer. When the viewpoint is from a raised platform, all figures on the ground below appear below the horizon line. (Note also the changing location of the horizon line against the roadside pillar.)
This fact arises from rule 12: all parallel planes converge to the same vanishing line. In this case, the first plane is the ground plane, whose vanishing line is the horizon. The viewing height, extended in all directions, creates a second plane parallel to the ground plane, like the surface of a large lake up to the height of the viewpoint. This surface will also converge to the horizon line. Regardless of the direction of view, all objects lower than this plane will be "under water" and therefore below the horizon line. All objects above it will be "above water" and above the horizon line.
In the photo of train tracks above, the horizon line intersects the bottom edge of the red passenger car, just above the wheels. This is somewhat lower than the standing height of a man, so we can infer that the photographer was crouching or sitting (or the camera was on a low tripod) when the picture was taken.
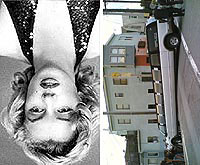
images are uninterpretable in the "wrong" orientation
Many visual illusions of size depend on the position of the object relative to the visible or presumed horizon line, even when other perspective cues are removed. The famous and delightful Ames room (right), contrived by Aldebert Ames Jr. in the 1940's, is a large trapezoidal enclosure that appears perfectly square and level when viewed through a peephole near one corner. Figures appear to grow or shrink in opposite corners of the room because the "short" corner on the left is substantially lower and farther away than the "tall" corner on the right, reducing both the apparent size of the figure and her relative position to the "horizon line" defined by the windows and floor.
perspective distortions
The standard demonstration of linear perspective — drawing on a sheet of glass the view from a fixed location as seen through one eye — shows that the geometry of linear perspective really works: what you see is what you get!
Viewing Distortions. However, a perfect perspective drawing or optically flat photograph reproduces three dimensional space on the viewer's retina only when we view it with a single eye, located at the center of projection and looking along the correct direction of view implied by the perspective geometry.
And there's the catch. Even if the perspective drawing accurately represents a specific viewpoint, we typically don't look at the perspective drawing from the "correct" center of projection. The drawing may be done at a scale that conveniently fits the space available within the picture format, but creates a center of projection that is too close to or too far from the picture surface; the painting or fresco may be positioned too far above the floor; or the painting may be viewed from different distances or angles as it is hung in a room or gallery; and, of course, we always look at it with two eyes.
What happens if we look at a perspective drawing from a different location? The following diagram illustrates the crux of the problem.
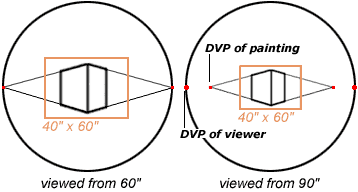
perspective geometry and viewing distortion
We start by viewing from a distance of 5 feet (60") a very large (40" x 60") painting of a rectangular office building, conveniently drawn so that its vanishing lines are at 45° to our direction of view. This places the diagonal vanishing points of the drawing exactly at the diagonal vanishing points of our 90° circle of view, and the drawing perfectly recreates the illusion of three dimensional space.
But this is a large painting, so we decide to step back a few feet (to 90") and look at it again. Now the drawing vanishing points no longer correspond to our visual vanishing points as defined by our 90° circle of view. As a result, the edges and angles of the building seem to place the vanishing points too close together, and the building appears exaggerated in perspective proportions — the front angle of the building seems more like 70° than 90°.
Of course, linear perspective can produce compelling illusions, but not easily — the image must be in exact perspective, the edges of the image must be hidden, and the image must be viewed with a single eye from the center of projection, in what is called a "peep show" or peephole arrangement. Binocular photography and a special binocular apparatus that presents each image to a separate eye can create very vivid depth illusions, but even slight changes in the point of view will destroy the effect.
Foreshortening Distortions. There is a second problem caused by oblique (sideways, upwards or downwards) angles of projection onto the image plane. This is related to the perspective fact of foreshortening, but a distinction between two kinds of foreshortening is necessary to understand what is going on.
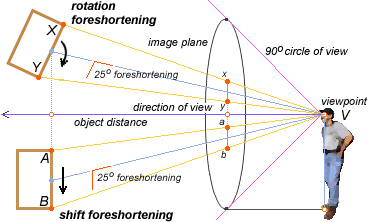
foreshortening and the triangular proportions
(top) rotation foreshortening causes the object surface XY to become oblique to the image plane; (bottom) shift foreshortening causes the object surface AB to remain parallel to the image plane; both examples are an equal distance from the direction of view and appear identically foreshortened (by 25°) at the viewpoint
In shift foreshortening, a two dimensional surface is shifted away from the direction of view (the principal point) but remains parallel to the image plane; the actual surface always appears foreshortened because it is at an oblique angle to the viewpoint.
In rotation foreshortening, the surface is rotated so that it is no longer parallel to the image plane; the actual surface may or may not appear foreshortened, depending on whether it is at an oblique or perpendicular angle to the viewpoint.
These different types of foreshortening have different perspective effects.
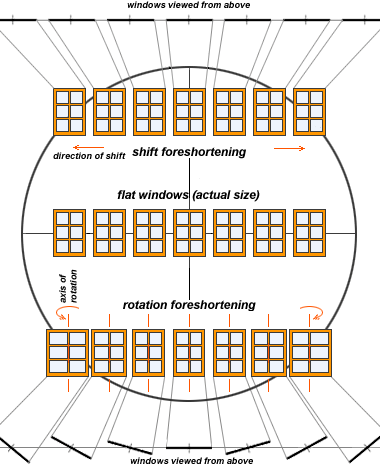
perspective image of flat forms
shift foreshortening has no effect on the perspective image of a two dimensional surface parallel to the image plane
The figure above shows the correct perspective projection of an identical row of windows (center). In the top row, the windows are kept parallel to the image plane but become increasingly oblique to the direction of view (shift foreshortening); in the bottom row, the windows are rotated in place to remain perpendicular to the viewpoint, which puts them at an oblique angle to the image plane (rotation foreshortening).
Surprisingly, even though it produces a foreshortened view of the actual two dimensional object, shift foreshortening has no effect on a perspective image. A window shifted 45° to one side is exactly the same size on the image plane as a window centered on the direction of view. This occurs because, at the location of the perspective image of the window, the image plane is also foreshortened by the same oblique angle of view, and this "secondary" foreshortening matches the foreshortening seen in the surface.
In contrast, rotation foreshortening always alters the perspective image. The image becomes "distorted" in the direction perpendicular to the axis of rotation, regardless of whether the object is central or peripheral in the circle of view and even when the rotation eliminates any foreshortening in the actual object! Remember: rotation foreshortening is still a completely correct perspective view of the rotated object, when viewed from the center of projection; it just looks wrong when we view the image from farther away.
The distorting effects of rotation are caused by the recession that creates vanishing points. As explained in the discussion of the orthogonals, an equal physical displacement of the object from the direction of view produces a smaller and smaller perspective displacement from principal point as the object is farther from the viewpoint. Rotation pushes one half of the surface farther away from the image plane, the other half closer to the image plane, which makes the recession shift unequal on the two sides.
The objectionable perspective distortions occur in the oblique view of a three dimensional object that has only been shift foreshortened on the image plane. In these cases, what "rotates" is not the plane surface of a two dimensional object but our view of a plane cross section through its three dimensional form.
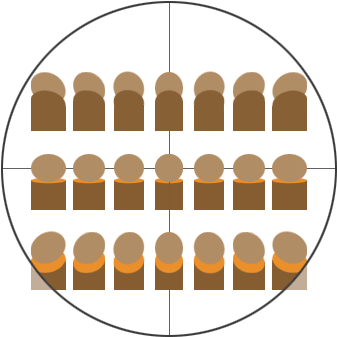
perspective image of rounded forms
in a 90° circle of view; from M.H. Pirenne, Optics, Painting and Photography (1970)
The diagram (above) shows a perfectly correct perspective image of a regular row of cylindrical columns with flat top surfaces supporting regular spheres. If you could use one eye to examine this figure from the true center of projection (directly in front of the central sphere, at a distance equal to the radius of the circle of view, roughly 5cm or 2" from your computer screen), you would discover that all the forms really are in perfect perspective.
But because we view the drawing from much farther away (and with both eyes), the spheres and columns appear grossly distorted. The columns give the illusion of being viewed head on, when in fact those near the circle of view are seen from one side, so that the front and back of the forms define their cross section. These are not the same distance from the image plane, so they display unequal recession toward the principal point, which elongates the form.
These distortions have distinctive features worth memorizing:
• Radial thickening. The spheres and columns displaced from the direction of view appear thicker than those at the center of view; this thickening is along a line from the object to the principal point.
• Displacement exaggeration. The amount of thickening or distortion depends on the displacement of the object from the principal point (the visual angle between the object and the direction of view); the distortion becomes more extreme toward the 90° circle of view.
• Diagonal exaggeration. The distortions appear most extreme in the diagonal directions, because these combine the effects of the height and width displacements.
• Radial tilting. Horizontal surfaces, such as the orange flat tops of the columns, appear tilted along the radial line of thickening rather than downward or upward in relation to the viewer.
• Peripheral crowding. Equal intervals between three dimensional objects (such as the spaces between columns) close together as displacement increases; eventually the spaces between the columns disappear and the columns seem to overlap.
Cures for Perspective Distortions. If we keep in mind that these rotation "distortions" are in fact accurate perspective images when viewed from the center of projection, then it is clear that the reason they appear as distortions is because the image is viewed from somewhere else. Managing the distortions is therefore a concession to the uncertain viewing geometry that governs image display.
The traditional diagnosis for perspective distortions is that the width of the drawing is too large in relation to the 90° circle of view. This is equivalently expressed as "the vanishing points are too close together", or "the distance points are too close to the principal point", or "the viewing distance is too close to the image plane." In effect, the viewing distortions are more obtrusive when a painting encompasses a large circle of view.
If the image vanishing points were much farther apart (that is, if the image were enclosed by a smaller circle of view), then the drawing would represent objects as they appear from a viewpoint much farther away, and changes in the the viewing geometry would cause smaller proportional changes in the image circle of view.
In effect, the viewing distance to the image is a smaller proportion of the apparent distance to the objects in the image, so the drawing can be acceptably viewed from a wider range of viewing distances. In addition, the rotation distortions and crowding of serial forms that become exaggerated toward the 90° circle of view are cropped out of the image entirely.
The practical limit for an acceptable visual cone has historically been a 60° circle of view — a suggestion first made by Piero della Francesca in c.1470 and repeated often since then. In fact, depending on the geometry of the principal form and the location of the vanishing points, a 40° circle of view or less is much more typical.
Leonardo da Vinci devoted many pages in his notebooks (c.1490) to the analysis of perspective distortions, and he especially disliked the exaggerated apparent size of the perspective grid as it reached the ground line of the image plane (for example, as in the ground squares of this image). He recommended painting an object as it appears from a distance of 3 to 10 times its actual dimensions (e.g., a standing figure 1.75 meters tall should be viewed from 5 to 18 meters). This is equivalent to placing the figure within a 19° to 6° circle of view. In fact, modern vision research has found that most people say an object "fills their field of view" once it occupies approximately a 20° circle of view; the classical French rule has been to contain the image within a 30° circle of view. I use a 25° circle of view as a rule of thumb when designing or analyzing an image, which corresponds to a viewing distance to a finished painting of about 2.5 times its height, width or diagonal. (These issues are explored further in the section on display geometry & image impact.)
So the restricted circle of view "cure" for perspective distortions was well known to artists from the beginning of perspective practice (even if the necessary "dosage" was ambiguous). But these artists also realized that some distortions are more intrusive than others to a casual viewer. Apparent distortions in rectangular forms are more objectionable than distortions in curved forms; distortions in the horizontal direction are more obtrusive than distortions in the vertical direction (in part because the format is usually wider than it is high); distortions in unfamiliar objects are more acceptable than distortions in familiar objects; distortions in the apparent location of vanishing points are more acceptable than distortions in the outline of forms; distortions in a mixed perspective drawing are more objectionable than those in a rigorous perspective drawing; and so on.
As a result, if artists were working with a large fresco or canvas format, or wanted a panoramic effect, they adopted a radical practice guided by the context of the painting: they would simply "correct" or disguise perspective distortions wherever they appeared objectionable. This was almost always done for figures, rounded forms, the spacing between columns of a facade, and so on. Often several kinds of "corrections" were used at the same time.
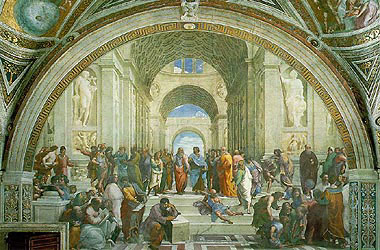
raphael's school of athens (1511) from an elevated viewpoint
A fine example is Raphael's large fresco The School of Athens which fills an almost 30 foot wide section of Vatican wall. This huge format clearly imposes a panoramic context on the image design, which Raphael utilized in novel ways. He framed the perspective construction within a relatively restricted 40° circle of view, which crops extreme distortions from the image — although as a result the correct perspective viewing point is not even in the room.
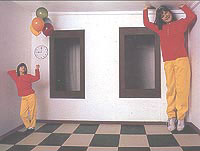
an ames room
The perspective distortions are disguised through numerous clever omissions from the picture space. The vanishing point of the enormous central passageway is hidden by the two approaching figures. Most of the picture space is filled by walls parallel to the picture plane. The pair of square columns on each side are cropped at the top and hidden at the bottom by standing figures, eliminating the repeated sideways intervals or diagonal corners that would accent perspective distortions. The semicircular front arch of the barrel vault is cropped at the top, because it would otherwise appear to be elongated vertically. The floor tiles on either side of the foreground are hidden by groups of figures. The foreground stairs help to separate the figures vertically and interrupt the perspective continuity of the tile floor.
Most important, all figures are drawn as if centered on the direction of view — that is, with no perspective distortion. This is easiest to see in the two astronomers shown holding celestial globes (at right). Both figures are located at the righthand edge of the fresco, beyond the 30° circle of view. Rather than draw the spheres with the correct but elliptical perspective projections, Raphael simply drew them perfectly round.
Thus, the architecture enclosing the figures is cropped and oriented as a carefully edited and arranged perspective speace, while each of the figures is drawn in its own, "head on" perspective space. Yet this hodgepodge of perspectives appears coherent and harmonious.
The last piece of the puzzle is that the fresco is normally viewed from a vantage too close to the image plane and several feet below the center of projection, which causes a distinct upward convergence in the image verticals (image, below). Yet in context the convergence lends a soaring grandeur to the image, and by means of this esthetic impact the overall perspective space appears harmonious and convincing.
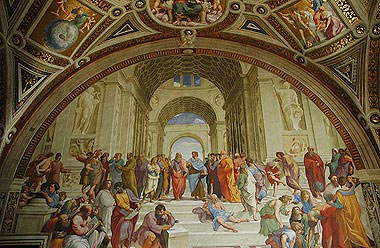
raphael's school of athens from a human viewpoint
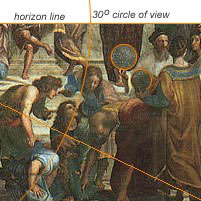
correction of perspective "distortions" in Raphael's School of Athens (1511)
Expressive Uses of Distortion. As painters developed dozens of similar tricks to exclude, hide or counteract perspective distortions, thus minimizing the effect of viewing a painting from "incorrect" locations, they discovered that perspective distortions could be used for expressive effect or to counteract unfavorable display conditions.
The earliest examples are image manipulations necessary to produce the desired visual effect in fresco images viewed from various locations on the floor of a large building. Michelangelo's famous Last Judgment demonstrates a dual compensation: the "celestial" figures high on the wall are almost 50% larger than the "damned" figures at its base (photos, right). The sacred figures carry clearly even to the back of the chapel; but viewed from the altar, the higher figures are 50% farther from the viewer than those at the base of the wall, so that the visual differences combine as a balanced overall composition.
The most extreme examples are anamorphic images — especially popular in the 16th and 17th centuries — which appear as unrecognizable smears or blurs unless viewed from an extreme angle or with a corrective mirror. These strange paintings suggest how far artists were willing to play with the geometrical implications of perspective in search of new artistic resources.
In general, rendering a single three dimensional form within a circle of view greater than 40° (that is, as the form would appear to the naked eye from a close distance) has four important effects on its visual impact:
• principal forms become more dynamic — buildings or figures seem to loom, surge and expand
• perspective space is enhanced — the convergence among vanishing lines is more emphatic, creating a vertiginous depth of space
• the front surfaces of the form dominate — the sides of the form may disappear from view, or appear smaller or highly foreshortened, and the side surface textures are viewed at a more grazing angle
• vertical dimensions dominate — in particular, the extreme corners of the form may appear to jut or loom out of proportion with the rest of the figure.
Renaissance and Baroque artists who experimented with these effects understood that perspective paintings are effective even when they are not viewed from the center of projection. This is sometimes called Zeeman's paradox, but the paradox is purely conceptual: it assumes we view a perspective representation as a retinal simulation, when in fact we view it as a two dimensional painting. In other words, perspective constructions create visual symbols, not visual illusions. The key is that paintings lack the depth of field cues created by binocular vision; we are always aware a painting is flat rather than deep. And that is how our mind interprets it, adjusting our understanding of the painting to compensate for our position.
Some famous problems are simply cases of incorrect analysis. For example, artists from Leonardo down to Flocon & Barre have been vexed by the paradox that long parallel edges (such as the top and bottom of a straight wall or the sides of a cylindrical tower) appear to taper away from the viewer; yet they are drawn (in central perspective) as parallel straight lines. This is because the same triangular proportions that foreshorten the parallel edges of the wall or column also foreshorten the parallel lines in the image. Perspective changes the apparent dimensions of the wall and the apparent dimensions of the drawing of the wall: no "curvilinear correction" is necessary.
As the illusionistic use of perspective was never a serious goal in painting, artists were free to ignore "exact" perspective projections and instead exploit perspective for its representational, expressive effects — mixing correct perspective buildings with "incorrect" perspective figures, obeying perspective recession but "bending" long foreground lines, and always adjusting the circle of view and center of projection to suit the subject, format, and installation of the work.
The perspective foundations in ironclad geometry and intricate drawing disguise how much exploration, improvisation and creativity artists historically allowed themselves when using perspective methods. Raphael's figures and celestial spheres do not need to be in correct perspective because they combine so well as icons within an elegantly designed symbolization of space. The rules of linear perspective only help us to create the symbols, not combine them into works of art.
N E X T : Central Perspective
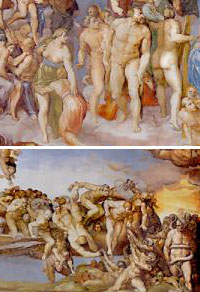
relative scale of figures high and low in Michelangelo's "Last Judgment"