two point perspective
Two point perspective or 2PP is the most commonly used construction method in artistic and architectural work, and it builds entirely on the perspective techniques already introduced.
The presentation of two dimensions of recession, and the freedom we have to represent the primary form from countless points of view, makes this framework suitable for nearly all landscape, portrait and architectural situations. The three vanishing points of 3PP perspective are usually necessary only for downward or upward looking landscape views, or hovering views of buildings or still life objects.
The unifying theme of this page is the correct proportioning of objects in perspective through methods for rotating vanishing points to a specific angle of view and locating the measure points to project in depth the dimensions of a measure bar established to a specific image scale on the image plane.
Working with two vanishing points creates some practical problems when the points are spaced very far apart. I discuss some approaches to solving the problem.
The problem must be solved rather than ignored, because vanishing point spacing is critical to the correct appearance of objects in space. The final sections explain why, and describe methods to identify the center of projection — the optimal location for viewing the image — and the original circle of view, using only clues within the image itself. This can be done for any 1PP, 2PP or even 3PP image where we can reconstruct diagonals or vanishing points from the forms in the image.
two point perspective
Central or one point perspective represents a static and symmetrical view of space and the objects within it, with an emphasis on central recession in space — the recession of perspective gradients and the edges of forms exactly coincide.
Two point perspective represents a turning or moving aside, a glance to the left or right, an approach to the primary form that is more informal, idiosyncratic and complex, composed as it is of two adjacent sides of every object woven into a single perspective view.
This view is usually associated with the orientation of the objects, which are simply turned at an angle to the image plane. But we have already seen that 2PP arises from a direction of view — a sideways view — that is no longer perpendicular to the primary form. These sideways, intimate or idiosyncratic views greatly expand the range of pictorial effects and emotional associations a perspective image can create.
Defining Features of Two Point Perspective. The diagram shows the simplest 2PP situation, in which a cube is centered in view but rotated 45° to the image plane.
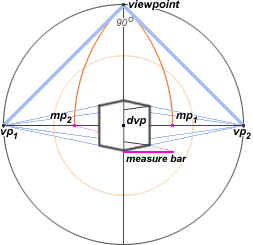
two point perspective (2PP): the basic geometry
In 2PP there are two vanishing points for the object (vp1 and vp2) which form a right or 90° angle. Each vanishing point also has its own angle to the direction of view, shown in the diagram as the angle between the thick blue lines at the top of the circle of view and the median line (direction of view in the visual ray setup). If one of these angles is x°, then the other angle must be 90°–x° — the two angles together must equal the 90° angle. All edges and lines parallel to the horizontal edges of the cube converge on one of these vanishing points.
There is no third vanishing point for the vertical edges and lines parallel to them, because these are parallel to the image plane. This is rarely a disadvantage in the 2PP drawings of architectural verticals, such as the walls of interior rooms or exterior facades viewed from ground level. In these limited situations the distortion in vertical proportions is usually insignificant.
Now the perspective gradients created by recession along the direction of view form one characterization of physical depth, while the object's recession toward the two vanishing points creates another. This creates a palpable contrast between the viewer and the object, highlighting the accidental or arbitrary viewpoint of the viewer, or the distinctive physical presence of the object. In traditional architectural renderings, standard angles between the object and the direction of view to the object — either 45°/45° or 30°/60° — have been used to control this contrast.
technique |
|
inclined lines & inclined planes |
When the cube is turned at a 45° to the direction of view, one of the diagonal vanishing points (dvp) is now coincident with the principal point (dvp = dv) and the other diagonal vanishing point disappears, as its visual rays are parallel to the image plane, and the contrast between viewer and object recession is minimized or balanced.
No matter what orientation the object vanishing points make take, the dv still defines the recession in depth (changes in apparent size and textures) produced by the viewer's central recession, and the dv is still still used to project a unit dimension in depth away from the viewer along the ground plane and planes parallel to it.
However recession along the lines defined by the object — changes with distance in the spacing of object features, or in the spacing of a unit dimension away from the object along the street plan or geometrical grid defined by the object itself — now create a separate system of recession in space. Depth in this system is controlled by two measure points (mp1 and mp2) which are used to project a measure bar or unit dimension into the recession created by each vanishing point.
rotating the vanishing points
In 2PP, the cube can be rotated around its vertical axis to any position, as long as the vertical edges remain parallel to the image plane. The side planes of the cube, and all their horizontal edges, are no longer parallel to the image plane. The first perspective construction problem is to locate the two vanishing points for these edges.
To review, in the visual ray method of perspective construction, the radius of the circle of view is equal to the distance of the viewer from the image plane. So the geometry of the vanishing points is solved by placing the viewpoint at the top of the circle of view. In this position, we are looking down on the viewing geometry. The vertical radius of the 90° circle of view represents the distance from the viewpoint to the image plane; the horizon line represents the image plane viewed "edge on" from above, so it shows the location on the image plane of all vanishing points perceived from the viewpoint; and the median line represents the direction of view.
In this setup, we locate the left and right vanishing points through the angle of rotation between the front face of the primary form and the image plane, which is equal to the angle between a side face of the primary form and the direction of view. The "primary form" is simply the cubic or rectangular solid that defines most of the perspective edges in the drawing. For a room interior, it is the floor plan that defines the visible floor and walls. For an external architectural view, it is the visible sides of the largest building in view.
With the viewpoint placed at the top of the circle of view, we find the angle of rotation by drawing the plan (floor plan or aerial view) of the primary form within the top half of the circle of view, with the corner nearest to the viewer placed on the location of the viewpoint on the image plane. Then the two vanishing points are found by extending the two front sides of the primary form from the viewpoint to the image plane or horizon line (diagram, below).
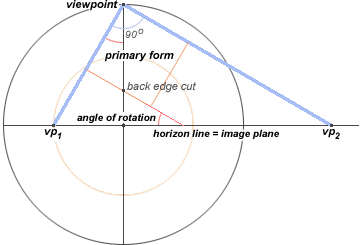
object geometry added to the circle of view
primary form in the orientation for two point perspective
This angle of rotation can be established exactly (by using a protractor, or architect's triangles with their standard 30°, 45° or 60° corner angles), or approximately, by eye or feel. A useful way to identify this angle from a photograph or physical viewpoint is to mark on the plan of the primary form the point where the front corner seems to cut the back side of the form, creating the back edge cut.
Alternately, if the view is from a sufficiently far distance, you can estimate the visual proportions between the two front sides of the form (e.g., the left side is visually 3 times wider than the right side), then rotate the plan around the viewpoint until the distance between the side corners and the median line are in matching proportions.
If the circle of view is very large, the rotation can be worked out on a reduced scale. With a compass, draw a circle of view with a 7.5cm radius (15cm or 6" wide), and mark the compass pinhole as dv. Scribe the vertical median line over the pinhole, and locate the viewpoint at the top. Then draw the horizon line perpendicular to the median line and extending beyond the circle of view on both sides. Next, lay a sheet of paper over this circle with one corner at the viewpoint, and rotate the sheet around this corner until you have the approximate orientation of the two sides you want. Make sure the corner is exactly aligned with the viewpoint, then mark the two places where the paper edges cross the horizon line. Measure the distance (in centimeters) from these two points to dv, and multiply by 20. You now have the measurements of the two vanishing points from dv in a 3 meter (~10 foot) circle of view.
Alternately, you can use a protractor centered at the viewpoint on the circle of view to mark off the exact angles of the two sides — just be sure the two angles are exactly 90° apart. Extend these angles as lines from the viewpoint to the horizon line, measure and multiply by 20, as before.
The simplest (though nontraditional) method is to derive the vanishing point locations as proportions of the length of the circle of view radius at whatever size you construct it. Any pocket calculator will deliver these trigonometric ratios directly, as the tangent of the angle of any side in relation to the direction of view. Landmark values are tabulated below for reference.
|
|||||||||||||||||||||||||||||||||||||||||||||||||||||||||
In the example rotation diagram (above), the lefthand face of the cube is at a 30° angle to the direction of view, so vp1 is located 0.58 radius lengths on the lefthand side of the horizon line, measured from the direction of view dv. The righthand face of the cube must be at a 90°–x° (90°–30°) or 60° angle, which means vp2 is located 1.73 radius lengths along the right side of the horizon line from the direction of view.
The tangent derivation is very handy as it applies to any surface or edge at any angle to the direction of view — for example, the five sides of the USA's Pentagon. All that is necessary is the angle of any side to the direction of view; the angles of all other sides can be derived by addition or subtraction, and the tangent of these angles locates the vanishing points as fractions of the circle of view radius along the horizon line.
locating the measure points
The next problem is: how do we determine the spacing along vanishing lines as objects recede from view? In central perspective the single vanishing point (the principal point) defines recession in space along the orthogonals (vanishing lines to the principal point), and the diagonal vanishing points project units of measurement from the image plane onto the orthogonals.
In 2PP, the principal point still defines the viewer's central recession and the perspective gradients that the direction of view creates on the ground plane and all planes parallel to the direction of view. But the object vanishing points define their own recession (vanishing lines) in two directions, and the task is to establish units of measurement along these vanishing lines.
We can still transfer a unit of depth established along the vanishing lines toward one vanishing point onto the vanishing lines toward the other vanishing point, by means of the object's diagonal vanishing point located within the 90° circle of view.
However we need a separate method for transferring units of measurement from the image plane onto the vanishing lines defined by either vanishing point. This transfer is done with measure points, as first explained by Brook Taylor in his New Principles of Linear Perspective (1719).
Geometry of Measure Points. In the context of the visual ray method of perspective construction, the problem is to project a distance scale or unit dimension, defined along the ground line, into perpspective space along a vanishing line to one of the object vanishing points.
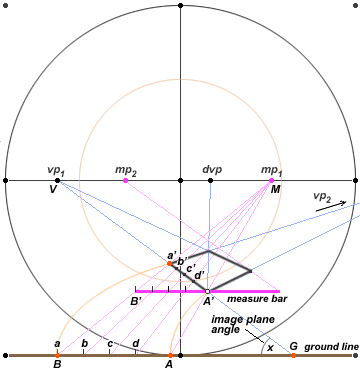
the geometry of a measure bar
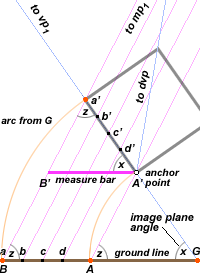
image triangles Gaa' and GAA' are isosceles triangles in physical space: the physical angles at a, a', A and A' are equal and lines parallel to aa' or AA' divide the physical sides aG and a'G into line segments of equal length
Every vanishing line ends in two points: its vanishing point and its intersection with the image plane (perspective rule 4). Thus the vanishing line VG (diagram, above) must define an interior angle VGA at its intersection with the image plane. This is the image plane angle (x), and it is the apex of the isosceles triangle we want to construct.
To find the base of the triangle, we construct an arc in physical space from G with radius GA', the distance along the vanishing line from the ground line intersection to the front corner of the primary form or line segment we want to measure in perspective space (diagram, right). This arc intersects the ground line at A. Then GA' = GA, the interior angles (z) at A and A' are equal, and the triangle A'GA is an isosceles triangle. Then the line segment A'A, extended to the horizon line, defines the measure point mp1 of the vanishing point vp1.
The purpose of this construction is that all lines parallel to A'A define equal line segments in both the ground line and in the vanishing line. Thus, the lines aa' and bb', both parallel to AA', define a line segment ab in the ground line that is exactly equal in length to the line segment a'b' in physical space.
Equivalently, the unit dimension BA in the ground line is shifted into physical space as the measure bar B'A', which represents dimensions along the ground line as seen in perspective space at any distance we require.
Because all parallel lines intersect the same vanishing point (perspective rule 6), any pair of lines through mp1 project a unit of measurement, defined in the image plane, into perspective space along the vanishing line VG. So we first find the measure point, then draw a line from mp through the anchor point A', align a measure bar with A', then rule off the dimensions we require by connecting the measure bar back to mp. Where these measure lines cross the vanishing line, we have the measurements in correct perspective along the vanishing line.
Locating the Measure Points. So how do we locate the measure points? We cannot draw an arc around G, as this is foreshortened into an ellipse on the image plane. Instead, in the visual ray setup, draw an arc from each vanishing point, from the viewpoint to the horizon line (image plane) to find the measure points, as shown below. This simply defines the required isosceles triangle in the plan view of the area between the viewpoint and the image plane.
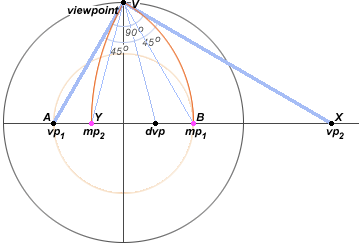
two point perspective: locating the measure points
Thus, the arc from vp1 intersects the image plane at B; the triangle VAB is an isosceles triangle in the ground plan between the viewpoint and the image plane (when folded along the horizon line into the 90° circle of view), and its base VB is the visual ray that intersects the image plane at measure point mp1. The arc from vp2 intersects the image plane at Y; the triangle VXY is an isosceles triangle and its base VY is the visual ray that intersects the image plane at measure point mp2.
A little more care is necessary now when using a measure bar than was needed in central perspective: it matters which side of the figure the bar is placed on, and which measure point you use, because we have separate points for each side of the figure.
The guiding rule is that you are projecting measurements onto vanishing lines, and the vanishing lines recede to a vanishing point. So you use the measure point defined by an arc from the vanishing point. This is the measure point opposite the vanishing point that controls the vanishing line you want to measure.
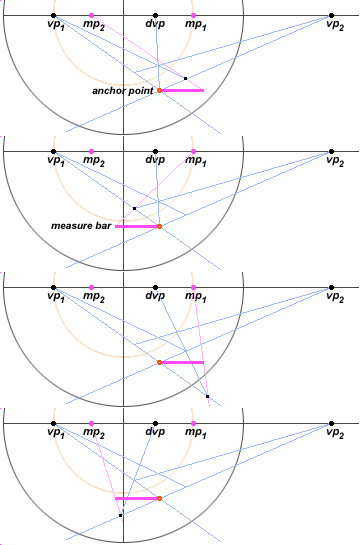
two point perspective: projecting forward or backward from a measure bar
The diagram (above) shows the four possible combinations (in 2PP) for projecting from a measure bar located on either side of the anchor point. In all cases the correct measure point is the one that was defined by an arc from the vanishing point that controls the line that must be measured (as indicated by the black dot). The measure point you use is not determined by whether the measure bar is left or right of the anchor point. Note also that a point can be projected both backward and forward from a measure bar; a visual ray from the dvp verifies these forward projections.
As shown above, it is also always useful to identify the diagonal vanishing point dvp (alias the principal point in central perspective) when rotating the vanishing points. This point can be used to project unit dimensions in depth, for example to tesselate a plane along the vanishing lines it bisects. The location of the dvp also provides an informal measure of the perspective emphasis in the image. Perspective appears more dramatic if the dvp is outside the 60° circle of view, and more classicizing if the dvp is close to the direction of view.
If you are using a protractor centered on the viewpoint, in order to define the rotation of the vanishing points precisely, then the image plane angle is the angle between the vanishing point and a horizontal line drawn through the viewpoint (labeled x, below).
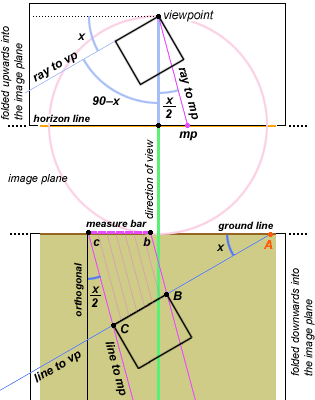
visual ray location of a measure point
any object side BC whose vanishing line intersects the ground line at A defines the image plane angle x at the ground line; then the vanishing point is at angle 90–x from the direction of view and the corresponding measure point is at angle x/2 from the direction of view on the opposite side
Then the vanishing point for the object edge or side (vp1) will be located 90-x degrees from the direction of view (dv), and the measure point will be located x/2 degrees from the dv, on the opposite side. In the example, the front face of object BC (shown in plan) is rotated 30° to the image plane; therefore x is equal to 30°. This means vp1 will be rotated 60° away from the dv on one side, and its measure point will be located mp1 or 15° to the right. These relationships hold, no matter what orientation the object has to the image plane.
plan view of geometry of measure bar
For example, here is the geometry for central perspective (diagram, right), in which a cube's faces are either parallel or perpendicular to the image plane. This means the angle of the faces at the ground line is either x = 0° (there is no intercept and therefore no angle) or x = 90° (edges or faces are perpendicular to the image plane).
• For faces parallel to the image plane (x = 0°), the angle of the vanishing point to the direction of view is 90°–x = 90° (the vanishing point is in the image plane, because the direction of view is perpendicular to the image plane), and the measure point is x/2 = 0° (the measure point is 0° from the direction of view, and is therefore the principal point).
• For faces perpendicular to the image plane (x = 90°), the angle of the vanishing point to the direction of view is 90°–x = 0° (the vanishing point is the principal point), and the measure point is x/2 = 45° (the measure point is the diagonal vanishing point).
The only finesse here is to distinguish between the measure bar on the image plane and the measure bar in perspective space. This is the difference between a ruler we lay on the paper we draw on, and the drawing we make of the ruler laid next to the object in space. It is always more convenient to use the ruler in perspective, because then we can align it with the object by placing one end against the anchor point. But this means we need to scale the length of the ruler to match the scale of the object in space. No problem: just apply the drawing scale of the object to the ruler length, and use this scaled length (measured from the image of the anchor point on the paper) as your measure bar.
constructing a 2PP cube
Once you have located the two vanishing points and two measure points, constructing a cube or rectangular solid in 2PP follows the same steps as in 1PP, except that a measure bar is necessary to define the two front sides.
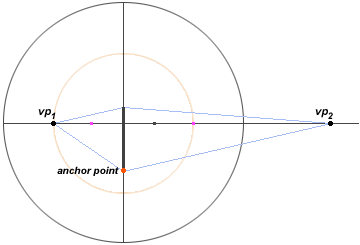
two point perspective: locating the anchor line
As always, the first step is locating the anchor point and its anchor line. This can be the back corner of a room, the front corner of a building, or the nearest tree on a leafy walk. This vertical defines the scale and view of the whole drawing. If you're not sure where to put it, work out the image composition with a few perspective sketches.
Connect the top and bottom ends of the anchor line to each of the vanishing points (blue lines). Define the measure bars for the front sides of the primary form, using the drawing scale methods. The measure bar will be equal to the vertical anchor line if the form is cubic, and different if it is rectangular. Remember, there is no perspective foreshortening of the anchor line, so you can use it as your unit of measurement by rotating it into the correct orientation (as shown by the arc, below).
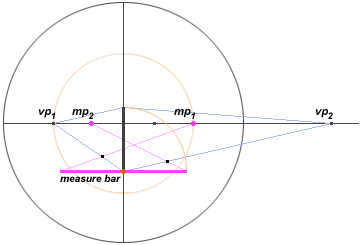
two point perspective: using the measure bar
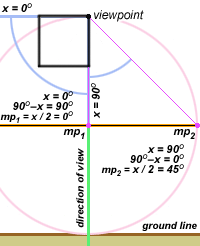
geometry of vanishing and measure points in central perspective
Now place one end of the measure bar at the anchor point, and a draw line from the other end of the measure bar to its corresponding measure point. The measure bar is shown (diagram, above) in two locations, to define the lengths on the two sets of vanishing lines. In each case the line from the measure bar is to the mp that was defined by the controlling vanishing point.
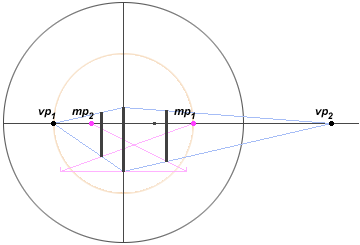
two point perspective: drawing the side verticals
Construct the two side verticals, from the intersection of the measure lines with the two bottom vanishing lines to the vanishing lines above. The vanishing lines define recession on each side of the anchor line; the side edges of the primary form are shorter than the front edge (anchor line).
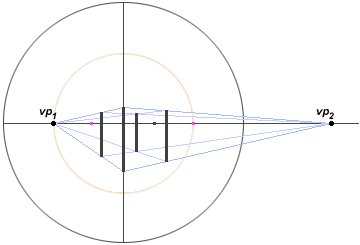
two point perspective: drawing the fourth vertical
Draw vanishing lines from the ends of each side edge to the vanishing point opposite it. These new lines intersect at the top and bottom ends of the fourth vertical edge. Construct it.
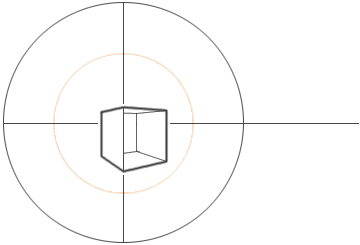
two point perspective: the finished drawing
Connect the ends of the verticals with horizontal lines, showing only those lines that are visible from the viewpoint. (The figure shows an open cube, to reveal more of the perspective drawing.) When finished, erase the vanishing lines, the vanishing and measure points, and any other guide marks.
There are often many other forms in the drawing besides the primary form. In that case, locate the front and side verticals first. Locate any forms or perspective details such as sidewalks, trees or streets that are in front of or at either side of the primary form. Finish these in outline, then go back and finish the primary form. Last, fill in any background forms or structures that are not occluded by the objects already in view.
inclined lines & inclined planes
In most architectural and landscape applications of perspective, inclined lines and planes are critical components of the primary form. It is essential to understand the geometry of inclined vanishing points and vanishing lines, and to be able to construct them in specific situations.
I use the 2PP framework as this is still the routine basis for architectural purposes, but the underlying geometry applies to 1PP and 3PP drawings as well.
For our purposes an inclined line is any line that is not parallel or perpendicular to the ground plane. The vanishing point of the line will therefore not be in the horizon line, but displaced some distance above or below it.
This vanishing point will be contained in a plane, and this plane will have a vanishing line. There isn't a unique vanishing line for a single inclined line, because a line can be contained in an infinite number of planes (all of them rotated around the line as an axis). However two or more inclined lines that recede to the same vanishing point do define a unique plane that contains them both, and this plane has a unique vanishing line.
Any inclined line defines a plan image in the ground plane. The plane that contains both the inclined line and its plan image will be perpendicular to the ground plane, and its image line will be perpendicular to the horizon line (perspective rule 16). In addition, the plan line recedes to a vanishing point already established for horizontals (either vp1 or vp1), and this vanishing point will also lie on the vanishing line for the plane that contains the inclined line and its plan (perspective rule 14). Therefore the vanishing line for the plane that contains the inclined vanishing point (ivp) can be constructed as the vertical line through a horizontal vanishing point (diagram below).
This vertical plane is convenient because it represents any vertical structure that contains or defines the inclined line — the wall edge of a roof or pediment, the side wall of a stairway, the embankment or wall of a traffic ramp, a sloping architrave above a vertical window, the slope of a hillside, and so on.
Vanishing Point by Construction. The traditional methods for locating the vanishing point for an inclined line all construct the image of the inclined line as the first step, then extend the image line to the vanishing line of its plane. The methods only vary in how the image line is constructed.
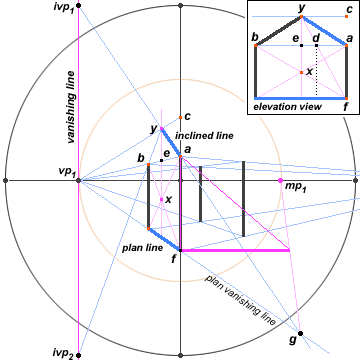
two point perspective: projected vanishing points for inclined lines
The example (above) illustrates three different methods:
• The upper end point of the inclined line (y), if it is the peak of a gabled roof, is usually located on the midline of the wall underneath; the midline passes through the bisection point at the intersection of the wall diagonals (x). Then the vertical distance ca is projected to the horizontal vanishing point vp1 from a vertical measure bar to locate c; y is at the intersection of the vertical midline with the vanishing line from c. Then extend ay to the vertical vanishing line (through vp1) to find the inclined vanishing point ivp1.
• If the upper end point (y) of the inclined line is not on the midline of the wall or vertical support (as, for example, the side of a stairway), then it is more convenient to project the horizontal (plan) location of its upper end point (e) with a horizontal measure bar to the appropriate measure point, along with a second horizontal point (d, shown in elevation) that locates the intersection of the diagonal fy with the horizontal ab. Once these points are located on ab, y is found at the intersection of the vertical ex and the diagonal df, and the line ay is constructed and extended as above.
• If the inclined line is extended, or lacks specific end points, then it can be found from its pitch or slope (as a slope horizontal/vertical ratio or an angle in degrees) as follows. Draw an elevation (cross section) of the slope as a right triangle, whose altitude is equal to the image height of the lower end of the inclined line above an anchor point in the ground plane (e.g., the distance af). Align this plan along the vertical af, and project its horizontal width forward from the appropriate measure point to intersect the plan vanishing line from the vanishing point, at g. Then the line ga is the vanishing line for the inclined line ay, and this also intersects the vanishing point ivp1. The vertical that defines y must still be defined using diagonal bisection or a horizontal or vertical measure bar, as before.
In many cases, especially roof construction, what goes up must come down. The vanishing point ivp2 for the inclined line on the far side of the roof will the same distance below the horizon line that ivp1 is above it; this can be found by an arc drawn from vp1 through ivp1 to the vanishing line opposite. Or it can be located by extending the line yb to the vertical vanishing line.
Inclined Lines Parallel to Image Plane. It can happen that the inclined lines are parallel to the image plane — for example, the front gables of row houses viewed from the street.
In central perspective, the image of the front face of a cube remains square no matter where it is locate on the image plane; an inclined line drawn inside the square (e.g., its diagonal) would therefore have a constant angle on the image plane as well. So there is no perspective adjustment for inclined lines parallel to the image plane in central perspective.
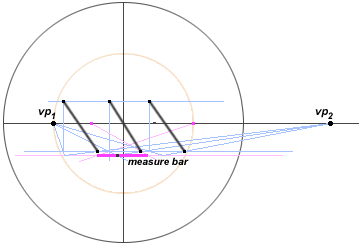
two point perspective: inclined lines parallel to image plane
In 2PP an inclined line parallel to the image plane is essentially an oblique diagonal inside a rectangular solid that is oblique to the image plane; this solid is constructed using the normal 2PP vanishing points, and the inclined line then drawn within its envelope (diagram, above).
It should be no surprise that, despite the changing angle of view onto the rectangular armature and the changing shape of its outline in 2PP projection, the interior diagonal remains constant. We've defined it as parallel to the image plane, and the shift foreshortening of a two dimensional figure parallel to the image plane does not alter the size or shape of its perspective image.
Vanishing Point by Rotation. The alternate, analytical method starts by identifying the inclined vanishing point and constructs all lines from there. This is done by creating an auxiliary viewpoint, a method that is explained in detail on the next page.
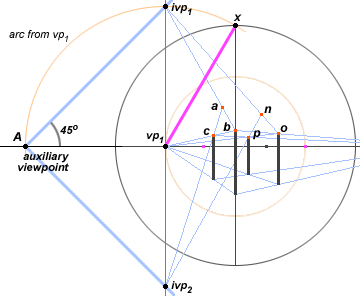
two point perspective: exact vanishing points for inclined lines
The rotation is performed in the following steps:
1. Identify the vanishing line of the plane that contains the inclined line(s). We have already established that this is the vertical vanishing line through vp1, the horizontal vanishing point.
2. Draw a line parallel to this vanishing line, through the principal point. This line already exists, as the median line.
3. Identify the intersection of this line with the 90° circle of view (point x).
4. From vp1, draw an arc through x, the vertical vanishing line, and the horizon line outside the 90° circle of view. The intersection of this arc with the horizon line identifies a new point A, the auxiliary viewpoint.
5. Rotate around A the visual rays that define the slope of the desired inclined lines. In the example, a slope of 45° is demonstrated. The intersection of these rotated visual rays with the vertical vanishing line defines the two inclined vanishing points, ivp1 and ivp2.
Vanishing lines from these vanishing points through the vertical end points b and c intersect at a, the peak of the roof; the vertical of the peak does not have to be located.
These vanishing points control all parallel inclined lines. Thus the edges of the roof at the opposite end of the structure recede to the matching vanishing points for the front edges: no to the same vanishing point as ab, and np to the same vanishing point as ac. In other words, triangle nop is parallel to triangle abc, and all parallel planes converge to the same vanishing line (perspective rule 14).
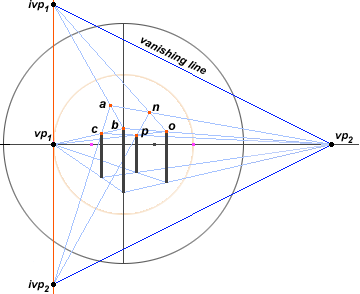
Vanishing Line for Inclined Plane. Two parallel or intersecting lines are necessary to define the surface of a plane (perspective rule 10). In most architectural problems, the second line is a horizontal or vertical element joining the inclined line. In the example (diagram, below), the second line is provided by the horizontals an and bo in the trapezoid abno, which intersect the parallel inclined lines ab and no.
two point perspective: vanishing line for inclined plane
These horizontal lines are controlled by the vanishing point vp2. Since the vanishing line of a plane contains the vanishing points of all lines in the plane (perspective rule 14), the vanishing line of plane abno is necessarily the line containing ivp1 and vp2; these two points define the vanishing line (perspective rule 3). Similarly, the vanishing line of the plane acnp is the line containing ivp2 and vp2.
The vanishing point vp2 is, of course, the vanishing point for all lines in the plane abno that are horizontal (parallel to the ground plane).
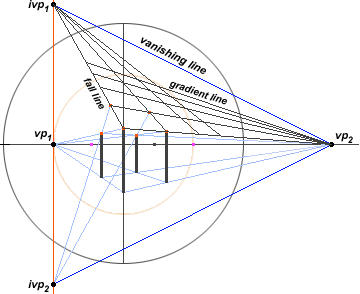
two point perspective: vanishing line for inclined plane
Lines to vp2 are gradient lines that indicate all points on the plane at an equal height above or below the ground plane. Lines to ivp1 are fall lines perpendicular to the gradient lines that represent the lines of steepest descent or the direction of gravitational pull across the plane — the direction in which water would flow or round objects would roll down a perfectly smooth, flat surface.
All 2PP lines perpendicular to any inclined plane will be perpendicular to the vanishing line of the plane, in the same way that 1PP or 2PP verticals (lines perpendicular to the ground plane) are perpendicular to the horizon line.
Finally, regardless of its orientation to the viewer, the vanishing line for a plane is always a line (perspective rule 9), not a curve as maintained by the theorists of curvilinear perspective.
Note the similarities and differences between the location of vanishing lines for planes that are slanting, sloping or inclined:
• The vanishing lines for slanting planes pass through the principal point, but are not parallel to the horizon line; they correspond to roll in airplane terminology, and are rotated by turning the horizon and median lines, with their diagonal vanishing points, around the principal point.
• The vanishing lines for sloping planes are parallel to the horizon line but do not pass through the principal point; they correspond to pitch in airplane terminology, and are located by rotating a visual ray from the left or right diagonal vanishing points.
• The inclined planes discussed here may combine roll, pitch and yaw or a left/right turning. These planes are found first by establishing the 2PP vanishing points; one vp is the horizontal vanishing point for the gradient of the plane, and the other is the vp for the vertical vanishing line that contains the vanishing point for the fall line (the inclined line) in the plane.
The point is to understand the differences among the various oblique plane representations, and how to construct them in a perspective drawing.
distance point projection
Using the 90° circle of view to rotate vanishing points and locate measure points, either by construction or using the trigonometric ratios, is the most accurate method of creating a 2PP perspective space. However it requires a large working area, and can be cumbersome when objects that have a unique orientation to the image plane require separate vanishing point systems to be constructed.
Fortunately, the distance point projection method, devised in the 16th century, permits the construction of any 2PP object in any orientation using only the principal point (pp), a diagonal vanishing point (dvp), and a elevation and plan of the object. The image object itself is then used to find the vanishing points and measure points, and these can be used to construct incidental objects in the same recession.
As an example I will use a pentagon (plan in black, right), which requires five vanishing points for the five corners. Note that this is an irregular pentagon (the sides are not of equal length).
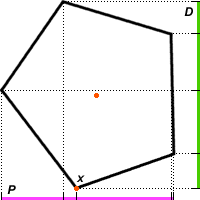
The plan is projected onto two measure bars, P (magenta) and D (green), aligned perpendicular to each other. Each bar locates all corners in the plan view that are necessary to define the form. The P bar represents the corners of the pentagon along a perspective transversal (perpendicular to the direction of view) and the D bar represents the corners along a perspective orthogonal (parallel to the direction of view); the vertical dashed lines to P represent parallel lines that converge to the principal point (the direction of view). The orientation of the pentagon (or any other figure) to these lines will determine the orientation of the figure in the ground plane. The closest part of the figure to the viewer is placed at the bottom of the plan; this is the corner marked x.
Divided Distance Scaling. The first steps are to determine the distance of the object from the viewer and the size of the object in the same units of measurement (we'll use meters).
If you are drawing a real scene, you must find out the actual dimensions and distance of the object; if you are composing an imaginary scene, the choice is arbitrary. Let's decide that this (imaginary) pentagon is 3 meters wide (the length of P is 3 meters) and the front corner (x) is at a distance of 11.5 meters from the viewer.
We can find the location of the anchor point using the methods described under scaling the drawing, but let me show you the traditional approach. It is based on the divided distance principle:
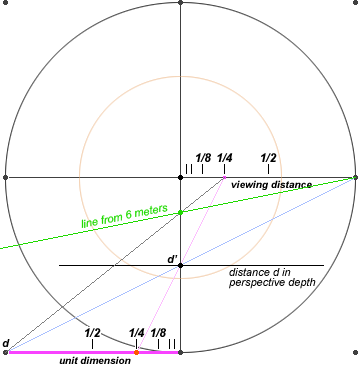
Given any arbitrary distance measured from the median line to a point d in the ground line, then a line from this point to the diagonal vanishing point dvd on the opposite side of the median line intersects the median line at a point d', which is the distance d from the ground line in perspective space.
This principle is again based on the triangular proportions. The unit distance can be any arbitrary length; the diagram (below) uses the viewing distance to the image plane (the radius of the 90° circle of view) as the unit distance in order to keep the diagram compact. Then the diagonal vanishing line projects this distance into perspective space as the point d' on the median line.
In the diagram, the diagonal vanishing line to d is the blue line connecting to the opposite dvp. This dvl intersects the median line at d', which is the image location of the unit distance (the viewing distance, 1.5 meters) projected into perspective depth — as measured from the ground line, not the viewpoint or station point.
divided distance method of projecting a unit dimension
However, the added benefit here is that if we divide the arbitrary unit distance by any proportion (one half, one quarter, etc.), then draw a line from this proportional point through d', the line intersects the horizon line at the same proportion, as shown by the magenta line from the 1/4 unit. In this way both the unit dimension and the horizon line can be divided into the same proportional units.
What happens if we connect the end of the unit dimension to one of the increments in the horizon line, for example from d to the point at 1/4 on the horizon (black line)? In that case we have projected the unit distance into perspective space by the reciprocal of the proportion in the horizon line. Given our unit dimension of 1.5 meters, and the reciprocal of 1/4 is 4, then the line from d to 1/4 intersects the median line at a perspective distance of (4*1.5) = 6 meters from the ground line into the image space.
We would find the same intersection with the principal point orthogonal, and the same proportional divisions on the horizon line, if we extended the unit dimension along the ground line to 6 meters and then drew a line from its end to the opposite dvp (green line). But we won't do that, because the whole point of divided distance scaling is to confine ourselves to a workable drafting area: we can project distances farther into perspective space than we can draw as unit dimensions along the ground line.
We would also find the divisions in the horizon line if we projected them from a much smaller unit dimension, for example one centimenter long. But we don't do that either, because it obviously makes the construction more difficult and more inaccurate; it's advisable to use the longest ground line dimension that is practicable.
Again, projecting distances into perspective space is more quickly (if less elegantly) done by calculation, as the reciprocal of the distance multiplied by the radius of the 90° circle of view — the distance measured from the principal point to the ground line — as explained in the section on perspective gradients. For example, if your assumed viewing distance is 1.5 meters, and you want to locate a transversal in image space that is 37 meters from the viewpoint, you first subtract the viewing distance from the object distance, then take the reciprocal of what's left: 37 - 1.5 = 35.5 and 1/35.5 = 0.028; finally you multiply this number by the length of the median line, and measure that distance from the principal point. If you are drawing with a circle of view of radius 30 cm, then this is 30 * 0.028 = 8.4 mm below the horizon line.
In the original problem, with an object distance of 11.5 meters, we first subtract the viewing distance (11.5 - 1.5 = 10), then take the ratio of this distance to our circle of view radius (1.5/10 = 0.15), then measure downward from the principal point a distance equal to 15% of the length of the median line.
Distance Point Projection. Having established the transversal in image space of an anchor point 11.5 meters from the viewpoint, we can project on the image plane the pentagon plan.
First we rescale the plan using formula 2. The object size Z (the object width, P) is 3 meters, the object distance (X) is 11.5 meters, and the viewing distance (x) is 1.5 meters, so the image size (the width of the object in the image) is 3*(1.5/11.5) = 0.391 meters (39.1 cm) or about 26% of the radius of the 90° circle of view.
Then we place the front corner x as the anchor point on the distance transversal. Notice that where we place the figure to the left or the right of the median line does not affect the length of 39 cm image dimension that we have just calculated, because of shift foreshortening. However, we have to invert the plan when we do this, so that x is at the top, otherwise the figure will appear in perspective space as the mirror image of the plan.
Next we want to locate the corner points of the plan in perspective space. This is done by relying on the distance point principle:
Any point in a plan diagram is located in perspective space along its anchor line orthogonal, at a perspective distance from the anchor line equal to the plan distance from the anchor line.
That is, we first construct orthogonals for all points, then measure the plan distance of each point from the anchor line, then project this distance into perspective depth using a diagonal vanishing line.
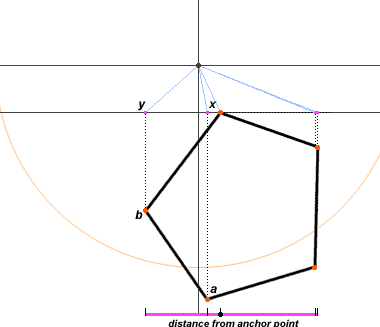
projecting the plan: plan orthogonals
shown within the 60° circle of view; note that the plan must be inverted, top to bottom, to project the correct image
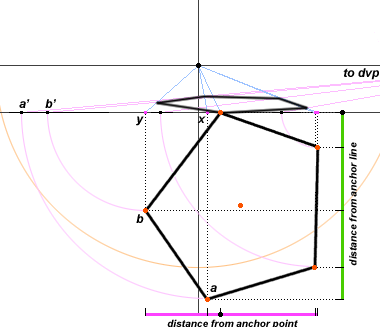
The first step in the distance point method is to carry all the important object points from P up to the anchor line with perpendicular lines. Recall that these are actually lines parallel to the direction of view, so once the point a defines the (new) point x and b defines point y on the anchor line, we construct the plan orthogonals from these points back to the principal point, as shown above (blue lines).
projecting the plan: plan diagonal vanishing lines
shown within the 60° circle of view
The next step is, for each point, to carry its plan distance from the anchor line (green line, D) back to the anchor line with by an arc centered on its anchor line intersection (pink lines, above). This is the method of rabattement or plan rotation first attested in the 17th century.
Thus the distance ax is transferred to the anchor line by an arc centered on x, defining the point a' on the anchor line; similarly the distance by is transferred to the anchor line by an arc centered on y, defining the point b'; and so on for all the other points. The only restriction here is that all the arcs must be carried to the same side, either to the left or the right: in the diagram, they are all rotated to the left.
Finally, we project all these distances into perspective space, using vanishing lines drawn from these new anchor line points to the diagonal vanishing point on the opposite side from the arcs. In the diagram, the arcs are carried to the left, so the right side diagonal vanishing point is used to project them onto the orthogonals.
Each intersection between an orthogonal and its corresponding diagonal vanishing line locates the plan point in perspective space. Thus, the intersection of orthogonal y and diagonal vanishing line b' locates the point b in perspective space.
All that remains is to connect the points in the image plane. This traces the perspective image of the pentagon plan at an 11.5 meter distance — all without constructing any additional vanishing points, or using a work surface larger than the 90° circle of view radius.
the ground line framework
It will be useful to conclude the discussion of 2PP with a brief look at the perspective setup, standardized in the 19th century, that is most commonly taught in perspective tutorials: the ground line framework. For a fuller introduction and detailed instructions, see the references by Robert W. Gill or Michael E. Helms.
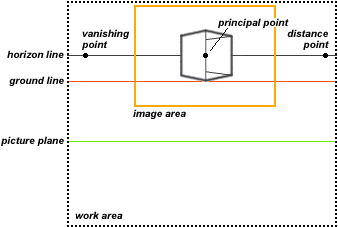
The ground line framework is economically defined by the principal point, the station point (distance point), and three horizontal lines (diagram, below).
the ground line framework
The utility of this framework is that the important attributes of the image can be adjusted directly, by the relative location of these two elements:
• The location of the ground line defines the level, adjacent to the primary form, at which the viewer is standing; it also defines the image plane on which all object dimensions are measured.
• The horizon line defines the viewing height as a proportion of the height of the primary form; it also defines the angle of view in relation to the true horizon.
plan view of a pentagon
Ground line drawings usually start with a blueprint or set of plans for the primary form (diagram, right). The plan image is critical for scaling the width and depth of the perspective image. The elevations are critical for exterior details and contrasting surface features of the front and side faces.
deriving measurements in the ground line method
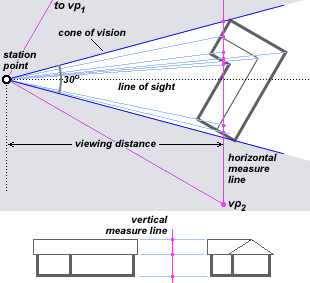
The first step is the projection of vanishing points and primary form measurements onto the horizontal and vertical measurement lines (diagram, above).
The station point is established in relation to a plan of the primary form, using the plan scale to determine the object distance. For example, if the scale of the plan is 1/4" = 1', and the form will be viewed from 50 feet, then the station point is located 12.5" from the near edge of the plan outline.
This object distance and orientation is usually judged by drafting a large isosceles triangle with an internal apex angle equal to the desired circle of view; the object is then moved toward the apex of this triangle until it just touches both sides, while turning the object so that the plan orientation gives the desired direction of view.
The horizontal measurement line is drawn perpendicular to the line of sight (center of the cone of vision), typically so that the measurement line passes through a front, prominent feature of the plan. Divergent sightlines are drawn from the station point through the principal features of the plan, and their intersections with the horizontal measurement line are marked and labeled, along with the location of the 2PP horizontal vanishing points and the line of sight (the "sight point").
The corresponding vertical measurement line is projected by parallel lines from the elevations of the primary form, including its intersection with the ground line.
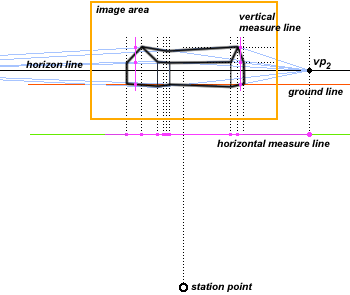
deriving measurements in the ground line method
Next, the horizon line and ground line are located in the image area to produce the desired image composition, specifically the height of the viewpoint to the primary form, its distance from the viewer, and the angle of view in relation to the ground plane (diagram, above).
The horizontal measure line is located below the image area, parallel to the horizon and ground lines, with the sight point vertically aligned with the center of the image area. Vertical lines are used to project the horizontal plan and vanishing point measurements onto the ground line.
The vertical measurement line is located on the ground line. Its measure points were not projected from the station point, therefore they must be projected from the horizontal vanishing points forward or backward from the ground line, and these projected measurements carried by horizontal lines into the image of the primary form. Note that the vertical measurement line can be freely shifted along the ground line, if convenient; the horizontal measurement line, because it was scaled to a specific location of the station point in relation to the primary form, must be exactly aligned with the sight point and cannot be moved.
There are many interesting methods of scaling and projection with the ground line method that I omit in this brief outline. To conclude, I mention four principal shortcomings to the ground line method:
• procedural geometry: The ground line framework is basically a scaffold built expressly to deploy specific procedures for the construction of an image; it has a weak connection to perceptual geometry. In particular, it is more difficult to deduce the construction principles for a new geometry, because important basic concepts (such as measure points or vanishing point rotation) are typically excluded. The better ground line tutorials discuss what to do if you discover that the perspective view is not optimally oriented, or is incorrectly scaled, after the drawing has been started; those kinds of problems result from the narrowly focused, piecemeal nature of the ground line method.
• errorful, inflexible scaling method: The ground line method of scaling an image, which requires the plan be oriented to scale and then projected by diverging lines onto a horizontal measure line, is only practicable for large objects seen from a relatively close vantage point; otherwise the method becomes inaccurate. It also requires greater precision, as drawing errors are magnified by the expanding lines. If the decision is made to change the angle of view on the primary form, the entire scaling operation must be repeated. In the 90° circle of view framework, scaling to measure points compresses measurement errors, and a new rotation of the vanishing points allows the same measure bar to be used from different perspective views.
• complex line construction: All the ground line demonstrations that I have seen require a large number of construction lines — at a minimum, the projection onto the measurement lines, the projection of the measurements across the image area, and the joining of vanishing lines.
• adapted to drafting tools: The ground line framework is adapted in various ways to technical drafting tools, and when used with those tools it is very efficient. But this means the framework is less effective as a general, artist oriented perspective model.
For these reasons, and in particular when linear perspective is taught to photographers and painters, I strongly prefer 90° circle of view method.
who has a 12 foot table?
Unfortunately it is fairly common to start with the primary form in an orientation that puts the two vp's inconveniently far apart. In the previous cube construction example, assuming a 10 foot circle of view, the cube is oriented so that the two vp's would about 11 feet apart — one 3.2 feet to the left of the dv, and the other 7.7 feet to the right. This isn't very convenient for a drafting table.
If you have a 12 foot table, push pins and lots of string (or the specialized drafting equipiment that rescales vanishing point locations within a small work area), you can work out the geometry of a cube at any size, no problem. If you're lacking the table, you can lay the support on any large bare surface, for example a clean kitchen floor or concrete patio, and work there — using tape instead of pins to hold the string.
If those alternatives don't appeal to you, then you can rescale the drawing. The basic geometry of the vp's works exactly the same no matter how big or small the circle of view is assumed to be. So just get a large sheet of paper, draw the 90° circle of view to a conveniently small size (20cm works well), work out the vp's and perspective drawing in that format, make a careful outline drawing in perspective, then transfer the drawing to the painting support, enlarging it as you make the transfer. You can control the enlargement by squaring the diagram or by using a surface projector, adjusted so that the size of the image matches the length and location of a reference vertical (front vertical edge) marked in the right place on the support.
When one or both vp's are really far from the drawing surface, it's possible to calculate the relative sizes of edges and angles in a drawing without ever anchoring the vp's with string or ruler: you just need to work out a few key measurements on a calculator, and you need to know the exact distance of the two vanishing points from the principal point (dv), which is found either with a careful rotation around the viewpoint, or by multiplying the radius of the 90° circle of view by the tangent of the vanishing point angle to the direction of view.
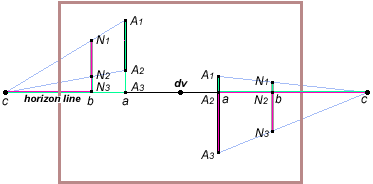
method for scaling new lines without vanishing points
The diagram shows all the points required for these calculations. The procedure is simple once you understand it: go through the instructions slowly and carefully, and you should have no trouble. (Caution: use a metric or engineering ruler for these tasks.)
There are two situations: the anchor line is either entirely above (or below) the horizon line, or it straddles the horizon line.
Start with the straddled line (right side of the diagram). The key measurements you must know in advance are: (1) the length from dv (the direction of view) to c (the vanishing point), (2) the length of the anchor line above (A1 to A2) and below (A2 to A3) the horizon line, and (3) the distance from the direction of view to the anchor line (d to a).
Once again, the triangular proportions provides the frame of reference. First, by subtracting the distance dv-a from the distance dv-c, you determine the distance ac from the anchor line to the vanishing point. (If the anchor line is on the opposite side of dv from the vanishing point, you add the two distances to get ac.) Now you want to insert a new line N1 to N3 which has the same height in depth as the anchor line.
First, determine how far to the left or right of the anchor line the new line should be placed: this defines ab, which gives bc when subtracted from ac. Then the ratio bc/ac tells you the length of the new line N2-N3 in relation to the length of line A2-A3, and the length of the new line N1-N2 in relation to the length of line A1-A2. For example, if bc/ac equals 0.80, and the upper part of the anchor line A1-A2 is 2cm long, then the upper part of the new line N1-N2 will be 0.80 * 2.0 = 1.6cm long. Repeat for the line segment below the horizon line (N2-N3).
If the new line is closer to the direction of view d than the anchor line, or on the opposite side of d from the anchor line, then you would add ba to ac. In that case the ratio bc/ac will be greater than 1.0, and the new line will be correspondingly larger.
If the line is entirely above (or below) the horizon line (left side of the diagram), then the ratio bc/ac is applied to the length A1-A3 to get the top end of the new line, and to the length A2-A3 to get the bottom.
How do you define the crucial distance dc (from the direction of view to a vanishing point) in the first place? The easiest method is to use my vanishing point calculator to get the measurements of the vp's and mp's, and adjust the viewing distance to the object and your angle of view until you get the proportions that seem desirable. Or, as described above, you can reduce the circle of view to a workable size, use the method for rotating the vanishing points to determine the locations of vp1 and vp2, measure the distance from these to dv on the diagram, then scale those distances back to life size.
Unfortunately this method, even after you get the hang of it, still forces you into a lot of poking of a pocket calculator, and is hopelessly tedious and prone to error if many lines must be inserted in your drawing. The ultimate solution is to generate a recession grid for the distant vanishing point, and use this grid to determine the perspective reduction for any verticals in the drawing.
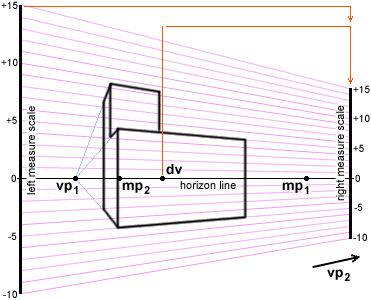
using a recession grid for distant vanishing points
First work out the angles and distances of your point of view within a reduced (20cm) circle of view drawn on a large sheet of paper. Carefully measure with a metric ruler the distances from dv to the two vanishing points vp, the diagonal vanishing point dvp and the two measure points mp, then multiply these by 15 to get them in the same scale as the 3 meter circle of view (the scale of the perspective drawing). Locate the horizon line, dv and the two measure points on your support.
Now draw a vertical line on the lefthand side of the drawing, anywhere that is convenient — the line should be farther to the left than any major form in the drawing area. Mark off increments on this line above and below the horizon line using any convenient interval of measurement.
Next, draw a similar line on the righthand side of the drawing, again putting it far enough to the right so that it won't obstruct any major forms in the drawing.
Now you want to find a reduced scale of measurement for this righthand line to represent perspective recession from the lefthand line toward the vanishing point. You already know how to do this: treat the lefthand line as the anchor line, figure out the distance from this line to the vanishing point (ac), then the distance from the righthand line to the vanishing point (bc), and finally the ratio bc/ac. This is the reduction in the scale of measurement required for the righthand line. For example, if the intervals on the lefthand line are in inches, and the ratio bc/ac is 0.80, then the intervals on the righthand line are in 0.80 inches.
When you have intervals marked on both vertical lines, connect the corresponding points to make a recession grid of converging lines (parallel lines in perspective). These lines show you the slope of any horizontal converging to the distant vanishing point. You can either draw the horizontals along an inscribed recession line (as in the base of the building in the diagram), or draw horizontals between and roughly parallel to any two lines (as in the top of the tower of the building in the diagram). This grid is especially convenient if you must work out the perspective recession for many repetitive or similar lines, for example the windows, columns, cornices and ledges on the front of a building.
vp spacing from an object drawing
Why not just say ... heck with it, I'll just draw the cube at whatever size fits the drawing, at whatever angles look good to me, and let the vanishing points fall where they may?
You can do this, especially in a freehand drawing of the object from life. In that situation the principles of linear perspective guide you to look at the edges and faces and proportional sizes of the parts, and to draw these elements more accurately in relation to their fixed vanishing points. This "imagined" perspective context is useful because you can introduce expressive distortions to the perspective facts, controlling by eye how obvious or subtle they appear.
However, if you are drawing an imaginary or remembered form from scratch, such as that cute little cottage you saw on yesterday's hike, then your placement of the vanishing points can go badly astray without the visual example in front of you. And once you have drawn the primary form, you still have to draw everything else to match its vanishing points, direction of view and horizon line.
The most common drawing fault is placing the vanishing points too close together. The informal recommendation is simply to put the vanishing points very far apart ... no, farther than that ... keep going ... — with the idea that inaccuracies in widely spaced vanishing points are harder to see.
Let's start with a perspective constant: the distance between 2PP vanishing points depends on the viewing distance to the object. The closer an object is to our view, the closer together its two perspective points will be in relation to the object size. This has a very powerful effect on the perspective view, as is apparent in these four cubes of exactly the same vertical size drawn as they would appear at increasing viewing distances.

2PP cube seen from four different distances
a cubic box 2 meters high seen from (left to right) 3 meters, 6 meters, 12 meters and 24 meters
The shape of the cube alone tells us a lot about its distance from us. The flattening in the "far" cube (24 meters, at right) is what we'd expect to see in binoculars or a telescopic lens, while the bulging in the "near" cube (3 meters, at left) mimics a wide angle lens. This "near" cube resembles many badly done perspective drawings, because the cube is too large relative to the vp's.
So the perspective problem is to find a vanishing point separation that matches the apparent distance to the object we want to represent. And this is a problem that the circle of view framework is designed to solve. Fortunately, if we start with an acceptable 2PP drawing of the front sides of the primary form, we can reconstruct the 90° circle of view from the object drawing using the semicircle of Thales construction. The circle of view then can be used to locate the vanishing points.
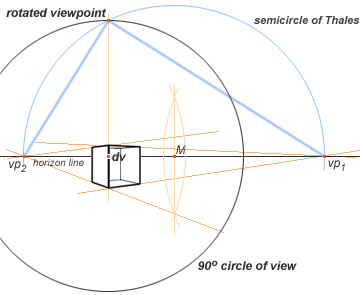
using a semicircle of Thales to find the 90° circle of view
Let's take as our starting point a rough, freehand drawing of a cubic box 2 meters high viewed from about 6 meters. We made this drawing on the back of an envelope in the field, and now we want to build a more finished drawing upon it.
First, extend the front edges of the primary form on either side until they meet in two vanishing points, vp1 and vp2. Connect these points with a straight line, which is the vanishing line for the primary form; if the form is level and upright to the ground, such as a building, then this is also the horizon line.
This is the point to make any esthetic corrections. For example, if this is the horizon line, it should be level. If it is not, redraw it level and relocate the vanishing points on it by moving them vertically up or down. Then redraw the vanishing lines from these points back to the object drawing.
Next, find the midpoint M on the horizon line between the two vanishing points, using a ruler or the line bisection method. Then draw a semicircle around the midpoint M from one vanishing point to the other. This is the semicircle of Thales.
The useful geometrical fact is that the 90° angle of a right triangle must lie on a semicircle, if the diameter of the semicircle is also the hypoteneuse of the right triangle. This right angle corner is of course the viewpoint that we use to rotate the 2PP vanishing points. This viewpoint must lie on the semicircle of Thales.
But where? To find it, we have to locate the direction of view. This is a somewhat arbitrary decision, but usually the dv is located on the horizon line somewhere around the front edge or center of the form. From the dv, extend a line perpendicular to the horizon line up to the semicircle of Thales, which locates the folded viewpoint. The distance from dv to the rotated viewpoint is the radius of the 90° circle of view.
I claimed that the cube in this example was cube 2 meters high viewed from 6 meters. Let's check. The direction of view (dv) is located about 3/4ths up the front edge, so the viewing height is about 1.5 meters above the ground. As the horizon line is always at the same level as the viewpoint, this corresponds to our standing height on level ground when viewing the cube.
By definition, this 1.5 meters is also the radius of the 90° circle of view, and is also the implied viewing distance to the finished image.
In the drawing, the vertical of the cube is 16% of the diameter of the circle of view, or 48cm; this is the drawing size. So we have the viewing distance (150cm), drawing size (48cm) and object size (200cm). With formula 3, we find that the object distance from the viewpoint must be 3.2 times the object size, or 6.3 meters.
Thus, from a rough but accurate perspective drawing, we have reconstructed the location of the vanishing points and the circle of view. We now have the framework to insert accurately details of the primary object, and to add objects around it in the same perspective space. The spacing of the vanishing points in relation to the drawing size is not merely "good enough," but represents the spatial relationships we intend to portray.
where is the center of projection?
The methods just described can also be used to locate all the perspective elements implied by a finished painting. This is a problem of more interest to art historians than to artists, but I will describe the methods here for both 1PP and 2PP paintings.
Here again are the perspective elements that we need to identify in the approximate order we locate them:
• Median Line. This is parallel to the side edges of a rectangular image format, or perpendicular to the floor when the painting is correctly hung. The median line is nearly always through the center of the image format.
• Horizon Line. This is usually parallel to the bottom or top edge of a rectangular or square image format, or parallel to the floor when the painting is correctly hung, at the height of the eyes of standing figures (for a standing artist and viewer), or in similar proportion to windows, tables, walls between floors and ceilings, and so forth. The horizon line is rarely through the center of the image format.
• Direction of View. This is at the intersection of the horizon and median lines.
• Distance Points. In 1PP perspective these can be found as the diagonals of any square element receding to the dv, commonly the floor tiles of Renaissance paintings or frescos.
• Vanishing Points. In a 2PP painting these are located from the edges of any suitable rectalinear (right angled) object in the image, of convenient clarity and size.
• Circle of View. The radius of the circle of view is determined by the distance points in central perspective, or by the method of the semicircle of Thales in two point perspective.
• Center of Projection. The implied correct perspective location for viewing the painting (the perspective center of projection) is at a distance equal to the radius of the circle of view along a line perpendicular to the direction of view dv.
1PP Construction. A straightforward example is provided by Raphael's Philosophy, his first fresco decoration on a large wall of the Vatican chambers. The image I can provide is drastically small (the original is a 27 feet wide), but a large format reproduction is available in most Renaissance art textbooks.
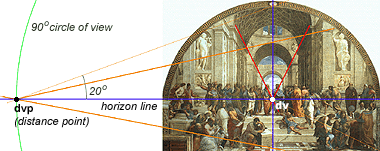
1PP reconstruction of the center of projection
By examination we conclude that the fresco is done in central perspective, which means we are looking for the direction of view (dv) and the distance points or diagonal vanishing points (dvp's). These give us the center and radius of the circle of view and the implied center of projection.
The orthogonals necessary to find dv are found in the receding barrel vaulted passageway at the center of the image. I chose the square edged capitals of the columns along both sides, which define two orthogonals (red lines) intersecting between the figures of Plato and Aristotle.
Since the composition is in central perspective I know the horizon line is level and the median line perpendicular to it, so I go ahead and draw these in (blue lines) from the dv, extending the horizon line far off the picture to one side.
The obvious place to prospect for diagonals is in the tiled floor at the foot of the fresco. However, the visual angle on these floor tiles is rather small, making them hard to see clearly; also, I may be wrong to think they are true squares. So I take a second diagonal from the diagonal corners of the capital of the front rectilinear column, which conventionally would be square in classical architecture. These diagonals (orange) intersect the horizon line in close agreement (thank you, Raphael!), so I conclude I really have found the diagonal vanishing point.
A circle with center at dv through the dvp defines the 90° circle of view, so the distance between dv and dvp is also the viewing distance to the painting. The width of the painting is 27 feet, so by calculation the center of projection should be about 31.5 feet directly in front of dv. I haven't been to the Vatican chamber where this fresco is located, but the photographs I have examined suggest the center of projection is not in a practicable viewing position. (It is approximately 10 feet above the floor and several feet on the other side of the opposite wall!)
The horizon line also lets me locate the implicit location of the painter in terms of the room represented in the fresco, which is roughly at the height of the white robed figure to the right of the dv (if the artist is assumed to be standing), or at the height of the central figures at the top level (if the artist is assumed to be sitting).
From the dvp I can also determine the circle of view of the painting. Drawing a straight line from dvp to the top of the fresco defines a 20° angle. So the barrel vault boundary of the fresco represents a 40° circle of view.
2PP Construction. In the case of two point perspective, the necessary elements are the same, except that you must start by finding a rectangular form or forms that will reveal at least two vanishing lines for each of the two vanishing points. This object does not have to be square, but it must contain a right angle at the intersection of two sides.
These vanishing points in turn determine all the other perspective elements. The intersection of each pair of lines defines a vanishing point, and the two vanishing points define the horizon line. Orthogonals, if visible, will point to the direction of view on the horizon line; if there are no orthogonals, then the median line of the format can be used to locate the dv.
The final step is to reconstruct the right triangle whose hypotenuse is the horizon line between the two vp's and whose right angle lies on the median line drawn from dv perpendicular to the horizon line. This is easiest to find simply by dragging the right angle of a drafting triangle, or the corner of a large sheet of paper, up the median line until both sides can be aligned over the two vanishing points: the right angle corner is then on the folded vanishing point on the circle of view. Or, we can use the semicircle of Thales method.
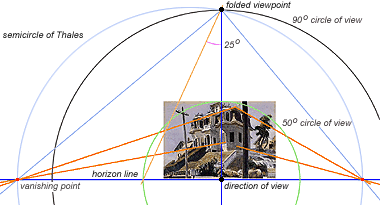
2PP reconstruction of the center of projection
In this painting by Edward Hopper, I ignore the suggestion of 3PP in the slightly upward flaring sides of the house and tilt of the telephone pole (we'll come back to this later).
The diagonals from the eaves and base trim of the windows (orange) are a little sloppy, but my best guess puts their intersections (and the horizon line) at the bottom of the picture. (This construction fundamentally determines everything else, so it should be done as carefully as possible, using as many vanishing lines as you can find.)
The median line and direction of view (dv) are arbitrarily located on the midline of the painting.
To find the folded viewpoint on the circle of view, move the right angle corner of a drafting triangle up the median line until the two edges lie on both vanishing points: the right corner is then on the circle of view; or use the semicircle of Thales method by bisecting the distance between the two vanishing points.
We discover several things from this construction:
• Hopper's eye level (the horizon line) is level with the sidewalk in front of the house, which implies that the house is at the top of a hill and the artist was downhill from the house when painting — how far downhill depends on whether he was seated or standing.
• The radius of the circle of view is approximately 1.8 times the width of this 50cm wide painting, which locates the center of projection (viewing distance) about 35 inches from the painting surface; for best effect the painting should also be hung slightly high, with the bottom edge at eye level of an average sized viewer.
• By taking the largest circle around dv to the edge of the image, then measuring the angle at the folded viewpoint (25°) defined by the radius of this circle, we determine that the image is enclosed by a 50° circle of view, which creates the slightly bulging appearance of the front angle of the building.
• However, the outward flaring in the sides of the building is directly contrary to the perspective geometry: viewed from below, a building's sides (and edges parallel to them, such as the telephone pole) should seem to converge toward a third vanishing point far above the horizon line, not below it. The fact that they flare outward as the rise above the viewer is a perspective distortion explicitly introduced for its dramatic effect, as it gives the old pile a characterful dynamism.
The Renaissance artist and his modernist colleague have kept their art well within the commonly recommended 60° circle of view but have allowed some perspective distortion for dramatic or esthetic impact. Creatively "adjusting" perspective distortion has been one of the subtleties of painting for almost six centuries.
3PP Construction. Finally, it is even possible to identify the center of projection and circle of view in a 3PP perspective drawing, provided that all three vanishing points can be established from edges or lines within the image. The method for doing this is complex, but is explained on the next page as the perspective sketch method of 3PP construction.
N E X T : Three Point Perspective
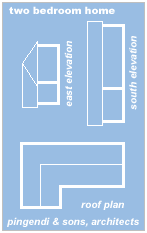
architectural blueprints