构建嵌入式Linux系统
流程综述
- 将系统磁盘挂载在 host 主机上,
- 使用主机对磁盘进行分区,
- 安装文件系统和 swap 到分区(格式化),
- 将 cross-compiling 得到的基本文件系统(包括:boot,dev,etc,kernel image,kernel modules,等)拷贝到磁盘的文件系统中,
- 将 bootloader 安装到磁盘 volume boot record 上
这样就构建了一个基本的嵌入式系统。
后面阶段(如,调试)便可以通过串口或网口连接主机和嵌入式系统的方式来完成,不用再移动嵌入式系统磁盘。
Storage device setup
1.Partition storage device.
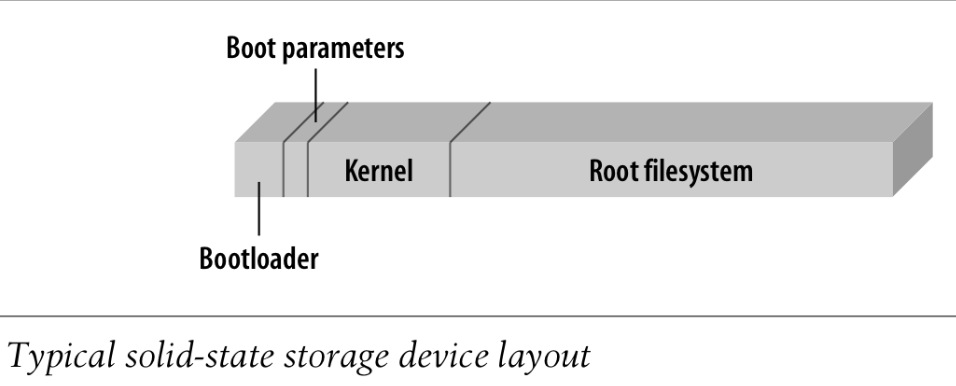
Bootloader, Boot parameters, Kernel, Root filesystem
2.Install bootloader, kernel and root filesystem.
3.Config bootloader to boot kernel.
Kernel compilation
Compiling the kernel involves a number of steps:
- building the kernel dependencies,
- building the kernel image,
- and building the kernel modules.
具体如下:
Compile the Kernel
- Config
$make menuconfig - Build
- Build kernel dependencies
$make clean dep - Build kernel image
$make zImage - Build kernel modules
$make modules - (Optional) clean up source( !backup .config first)
$make distclean
- Build kernel dependencies
- Install
- install kernel
- for bootloader which reads filesystem
$cp vmlinuz /boot - for bootloader which cant read filesystem
$dd if=vmlinux.img of=/dev/sda1
- for bootloader which reads filesystem
- install kernel modules
$make modules_install
- install kernel
C library compilation
- Extract archive
As with the previous packages, we start by extracting the C library from the archive we downloaded earlier:
$ cd ${PRJROOT}/build-tools
$ tar xvzf glibc-2.2.3.tar.gz
- configure
We can now proceed to preparing the build of the C library in the build-glibc directory:
$ cd build-glibc
$ CC=i386-linux-gcc ../glibc-2.2.3/configure --host=$TARGET \
> --prefix="/usr" --enable-add-ons \
> --with-headers=${TARGET_PREFIX}/include
- make
With the configuration script done, we can now compile glibc:
$ make
- install
Once the C library is built, we can now install it:
$ make install_root=${TARGET_PREFIX} prefix="" install
- one more thing
There is one last step we must carry out to finalize glibc’s installation: the configuration of the libc.so file.
This file is used during the linking of applications to the C library and is actually a link script. It contains references to the various libraries needed for the real linking. The installation carried out by our make install above assumes that the library is being installed on a root filesystem and hence uses absolute pathnames in the libc.so link script to reference the libraries. Since we have installed the C library in a nonstandard directory, we must modify the link script so that the linker will use the appropriate libraries.
Along with the other components of the C library, the link script has been installed in the ${TARGET_PREFIX}/lib directory.
In its original form, libc.so looks like this:
/* GNU ld script
 Use the shared library, but some functions are only in
 the static library, so try that secondarily. */
GROUP ( /lib/libc.so.6 /lib/libc_nonshared.a )
This is actually quite similar, if not identical, to the libc.so that has already been installed by your distribution for your native C library in /usr/lib/. Since you may need your target’s default script sometime, I suggest you make a copy before modifying it:
$ cd ${TARGET_PREFIX}/lib
$ cp ./libc.so ./libc.so.orig
设置 bootloader
设置 U-Boot
Introduction
构建 U-Boot 之前,你需要针对你的目标系统来设定它。该套件为相当多的开发板预先设定了一些配置,所以你的目标系统可能已经预先设定好的配置。对于每个受到支持的开发板,U-Boot 的 Makefile 通常都会包含一个相应的 boardname_config 构建目标,可用于替特定的开发板设定 U-Boot 的构建设置。
Configure & build U-Boot
$ make gta01_config
$ make ARCH=arm CROSS_COMPILE=arm-linux- u-boot.udfu
U-Boot 编译期间所产生的文件
- u-boot.map 符号对应
- u-boot U-Boot 可执行文件,采用 ELF 二进制格式
- u-boot.bin U-Boot 原始二进制映像,可以被写入引导存储设备
- u-boot.udfu U-Boot 映像,采用 OpenMoKo 设备所使用的特殊文件格式 U-Boot Device Firmware Upgrade( DFU)
Install U-Boot
现在可以使用适当的程序将 U-Boot 映像下载到你的目标系统的引导存储设备。如果你的目标系统上没有安装任何 bootloader,你需要使用一个硬件烧录设备,例如一个 Flash 编程器或一个 BDM/JTAG 调试器,将 U-Boot 复制到所设定的 Flash 地址。
Ptxdist configuration method
- Install dependencies:
libncurses-dev gawk texinfo gettext - Exact
ptxdist-version.tar.bz2 OELAS.toolchain-version.tar.bz2 - Install ptxdist in /install/path/
$ cd ptxdist-version; ./configure --prefix=/install/path/; make; make install; - Next step is to select configuration for your (embedded) project using ptxdist.
$ cd /project/path/
$# setup project search path and source directories.
$ ptxdist setup
$# select ptxdist configuration file
$ ptxdist select /path/to/OELAS.toolchain/ptxconfig/configuration-file.ptxconfig
$# configure project options, like product install path, ptxdist version, etc.
$ ptxdist menuconfig
- Build cross-tool
$ ptxdist go