Android编程笔记(七):ViewModel & LiveData + View Binding
- How to use ViewModel
- The lifecycle of a ViewModel
- ViewModel benefits
- LiveData overview
- Work with LiveData objects
- How to use LiveData
- View binding
- Referencces
How to use ViewModel
0. 安装ViewModel, LiveData和其他Lifecycle依赖
Note: To import Lifecycle (including ViewModel & LiveData) into your Android project, see the instructions for declaring dependencies in the Lifecycle release notes.
Add the dependencies for the artifacts you need in the build.gradle file for your app or module:
dependencies {
        val lifecycle_version = "2.9.1"
        val arch_version = "2.2.0"

        // ViewModel
        implementation("androidx.lifecycle:lifecycle-viewmodel-ktx:$lifecycle_version")
        // ViewModel utilities for Compose
        implementation("androidx.lifecycle:lifecycle-viewmodel-compose:$lifecycle_version")
        // LiveData
        implementation("androidx.lifecycle:lifecycle-livedata-ktx:$lifecycle_version")
        // Lifecycles only (without ViewModel or LiveData)
        implementation("androidx.lifecycle:lifecycle-runtime-ktx:$lifecycle_version")
        // Lifecycle utilities for Compose
        implementation("androidx.lifecycle:lifecycle-runtime-compose:$lifecycle_version")

        // Saved state module for ViewModel
        implementation("androidx.lifecycle:lifecycle-viewmodel-savedstate:$lifecycle_version")

        // ViewModel integration with Navigation3
        implementation("androidx.lifecycle:lifecycle-viewmodel-navigation3:1.0.0-alpha02")

        // Annotation processor
        kapt("androidx.lifecycle:lifecycle-compiler:$lifecycle_version")
        // alternately - if using Java8, use the following instead of lifecycle-compiler
        implementation("androidx.lifecycle:lifecycle-common-java8:$lifecycle_version")
1. How to create a view model
import androidx.lifecycle.ViewModel

class MyViewModel : ViewModel() {
    // Your ViewModel logic here
}
2. How to access a view model
To access a ViewModel, you use the viewModels() extension functions (for Fragments and Activities) provided by the androidx.activity library. This function retrieve a ViewModel instance scoped to the ViewModelStoreOwner (Activity, Fragment, or Navigation destination).
import androidx.activity.viewModels

class DiceRollActivity : AppCompatActivity() {

    override fun onCreate(savedInstanceState: Bundle?) {
        // Create a ViewModel the first time the system calls an activity's onCreate() method.
        // Re-created activities receive the same DiceRollViewModel instance created by the first activity.

        // Use the 'by viewModels()' Kotlin property delegate
        // from the activity-ktx artifact
        val myViewModel: MyViewModel by viewModels()
        // or use `ViewModelProvider` class's `get` method which provides ViewModels for the given scope.
        // val myViewModel = ViewModelProvider(this).get(MyViewModel::class.java)

        // Now you can access myViewModel
    }
}
Kotlin by keyword
The Kotlin soft keyword by can bee used to:
- delegates the implementation of an interface to another object.
- delegates the implementation of the accessors for a property to another object.
The lifecycle of a ViewModel
The lifecycle of a ViewModel is tied directly to its scope. A ViewModel remains in memory until the ViewModelStoreOwner to which it is scoped disappears. This may occur in the following contexts:
- In the case of an activity, when it finishes.
- In the case of a fragment, when it detaches.
- In the case of a Navigation entry, when it’s removed from the back stack.
This makes ViewModels a great solution for storing data that survives configuration changes.
Figure 1 illustrates the various lifecycle states of an activity as it undergoes a rotation and then is finished. The illustration also shows the lifetime of the ViewModel next to the associated activity lifecycle. This particular diagram illustrates the states of an activity. The same basic states apply to the lifecycle of a fragment.
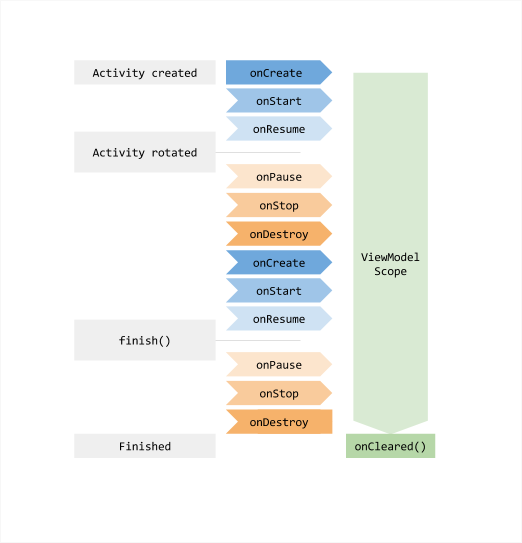
You usually request a ViewModel the first time the system calls an activity object’s onCreate() method. The system may call onCreate() several times throughout the existence of an activity, such as when a device screen is rotated. The ViewModel exists from when you first request a ViewModel until the activity is finished and destroyed.
ViewModel benefits
The key benefits of the ViewModel class are essentially two:
- It allows you to persist UI state.
- It provides access to business logic.
Persistence
ViewModel allows persistence through both the state that a ViewModel holds, and the operations that a ViewModel triggers. This caching means that you don’t have to fetch data again through common configuration changes, such as a screen rotation.
Scope
When you instantiate a ViewModel, you pass it an object that implements the ViewModelStoreOwner interface. This may be a Navigation destination, Navigation graph, activity, fragment, or any other type that implements the interface. Your ViewModel is then scoped to the Lifecycle of the ViewModelStoreOwner. It remains in memory until its ViewModelStoreOwner goes away permanently.
A range of classes are either direct or indirect subclasses of the ViewModelStoreOwner interface. The direct subclasses are ComponentActivity, Fragment, and NavBackStackEntry. For a full list of indirect subclasses, see the ViewModelStoreOwner reference.
When the fragment or activity to which the ViewModel is scoped is destroyed, asynchronous work continues in the ViewModel that is scoped to it. This is the key to persistence.
For more information, see the section below on ViewModel lifecycle.
SavedStateHandle
SavedStateHandle allows you to persist data not just through configuration changes, but across process recreation. That is, it enables you to keep the UI state intact even when the user closes the app and opens it at a later time.
Access to business logic
Even though the vast majority of business logic is present in the data layer, the UI layer can also contain business logic. This can be the case when combining data from multiple repositories to create the screen UI state, or when a particular type of data doesn’t require a data layer.
ViewModel is the right place to handle business logic in the UI layer. The ViewModel is also in charge of handling events and delegating them to other layers of the hierarchy when business logic needs to be applied to modify application data.
LiveData overview
LiveData is an observable data holder class. Unlike a regular observable, LiveData is lifecycle-aware, meaning it respects the lifecycle of other app components, such as activities, fragments, or services. This awareness ensures LiveData only updates app component observers that are in an active lifecycle state.
Note: To import LiveData components into your Android project, see Adding Components to your Project.
LiveData considers an observer, which is represented by the Observer class, to be in an active state if its lifecycle is in the STARTED or RESUMED state. LiveData only notifies active observers about updates. Inactive observers registered to watch LiveData objects aren’t notified about changes.
You can register an observer paired with an object that implements the LifecycleOwner interface. This relationship allows the observer to be removed when the state of the corresponding Lifecycle object changes to DESTROYED. This is especially useful for activities and fragments because they can safely observe LiveData objects and not worry about leaks—activities and fragments are instantly unsubscribed when their lifecycles are destroyed.
For more information about how to use LiveData, see Work with LiveData objects.
The advantages of using LiveData
Using LiveData provides the following advantages:
- Ensures your UI matches your data state
- No memory leaks
- No crashes due to stopped activities
- No more manual lifecycle handling
- Always up to date data
- Proper configuration changes
- Sharing resources
Work with LiveData objects
Follow these steps to work with LiveData objects:
- Create an instance of
LiveDatato hold a certain type of data. This is usually done within yourViewModelclass. - Create an
Observerobject that defines theonChanged()method, which controls what happens when theLiveDataobject’s held data changes. You usually create anObserverobject in a UI controller, such as an activity or fragment. - Attach the
Observerobject to theLiveDataobject using theobserve()method. Theobserve()method takes aLifecycleOwnerobject. This subscribes theObserverobject to theLiveDataobject so that it is notified of changes. You usually attach theObserverobject in a UI controller, such as an activity or fragment.
When you update the value stored in the LiveData object, it triggers all registered observers as long as the attached LifecycleOwner is in the active state.
LiveData allows UI controller observers to subscribe to updates. When the data held by the LiveData object changes, the UI automatically updates in response.
How to use LiveData
1. Create LiveData objects
LiveData is a wrapper that can be used with any data, including objects that implement Collections, such as List. A LiveData object is usually stored within a ViewModel object and is accessed via a getter method, as demonstrated in the following example:
class UserViewModel : ViewModel() {

    // Create a LiveData with a String
    val currentUser = MutableLiveData<User>()

    // Rest of the ViewModel...
}
Initially, the data in a LiveData object is not set.
2. Observe LiveData objects
In most cases, an app component’s onCreate() method is the right place to begin observing a LiveData object
class UserActivity : AppCompatActivity() {

    // Use the 'by viewModels()' Kotlin property delegate
    // from the activity-ktx artifact
    private val userViewmodel: UserViewModel by viewModels()

    override fun onCreate(savedInstanceState: Bundle?) {
        super.onCreate(savedInstanceState)

        // Other code to setup the activity...

        // Create the observer which updates the UI.
        val userObserver = Observer<User> { newUser ->
            // Update the UI, in this case, a TextView.
            userNameView.text = newUser.name
        }

        // Observe the LiveData, passing in this activity as the LifecycleOwner and the observer.
        userViewmodel.currentUser.observe(this, userObserver)
    }
}
4. Update LiveData:
LiveData class has no publicly available methods to update the stored data. The MutableLiveData class extends LiveData with publicly exposed setValue(T) and postValue(T) methods. You must use these if you need to edit the value stored in a LiveData object. Usually MutableLiveData is used in the ViewModel and then the ViewModel only exposes immutable LiveData objects to the observers.
button.setOnClickListener {
    val anotherUser = User(name:"John Doe")
    userViewmodel.currentUser.setValue(anotherUser)  // On main thread
}
Note: You must call the setValue(T) method to update the LiveData object from the main thread. If the code is executed in a worker thread, you can use the postValue(T) method instead to update the LiveData object.
Use LiveData with Room
The Room persistence library supports observable queries, which return LiveData objects. Observable queries are written as part of a Database Access Object (DAO).
Room generates all the necessary code to update the LiveData object when a database is updated. The generated code runs the query asynchronously on a background thread when needed. This pattern is useful for keeping the data displayed in a UI in sync with the data stored in a database. You can read more about Room and DAOs in the Room persistent library guide.
Use coroutines with LiveData
LiveData includes support for Kotlin coroutines. For more information, see Use Kotlin coroutines with Android Architecture Components.
View binding
View binding is a feature that makes it easier to write code that interacts with views. Once view binding is enabled in a module, it generates a binding class for each XML layout file present in that module. An instance of a binding class contains direct references to all views that have an ID in the corresponding layout.
In most cases, view binding replaces findViewById.
Setup
View binding is enabled on a module-by-module basis. To enable view binding in a module, set the viewBinding build option to true in the module-level build.gradle file, as shown in the following example:
android {
    ...
    buildFeatures {
        viewBinding = true
    }
}
How to use view binding
If view binding is enabled for a module, a binding class is generated for each XML layout file that the module contains. Each binding class contains references to the root view and all views that have an ID. The name of the binding class is generated by converting the name of the XML file to Pascal case and adding the word “Binding” to the end.
For example, consider a layout file called result_profile.xml that contains the following:
<LinearLayout ... >
    <TextView android:id="@+id/name" />
    <ImageView android:cropToPadding="true" />
    <Button android:id="@+id/button"
        android:background="@drawable/rounded_button" />
</LinearLayout>
The generated binding class is called ResultProfileBinding. This class has two fields: a TextView called name and a Button called button. The ImageView in the layout has no ID, so there is no reference to it in the binding class.
Every binding class also includes a getRoot() method, providing a direct reference for the root view of the corresponding layout file. In this example, the getRoot() method in the ResultProfileBinding class returns the LinearLayout root view.
The following sections demonstrate the use of generated binding classes in activities and fragments.
Use view binding in activities
To set up an instance of the binding class for use with an activity, perform the following steps in the activity’s onCreate() method:
- Call the static
inflate()method included in the generated binding class. This creates an instance of the binding class for the activity to use. - Get a reference to the root view by either calling the
getRoot()method or using Kotlin property syntax. - Pass the root view to
setContentView()to make it the active view on the screen.
These steps are shown in the following example:
private lateinit var binding: ResultProfileBinding

override fun onCreate(savedInstanceState: Bundle?) {
    super.onCreate(savedInstanceState)
    binding = ResultProfileBinding.inflate(layoutInflater)
    val view = binding.root
    setContentView(view)
}
You can now use the instance of the binding class to reference any of the views:
binding.name.text = viewModel.name
binding.button.setOnClickListener { viewModel.userClicked() }
Use view binding in fragments
To set up an instance of the binding class for use with a fragment, perform the following steps in the fragment’s onCreateView() method:
- Call the static
inflate()method included in the generated binding class. This creates an instance of the binding class for the fragment to use. - Get a reference to the root view by either calling the
getRoot()method or using Kotlin property syntax. - Return the root view from the
onCreateView()method to make it the active view on the screen.
Note: The inflate() method requires you to pass in a layout inflater. If the layout is already inflated, you can instead call the binding class’s static bind() method.
private var _binding: ResultProfileBinding? = null
// This property is only valid between onCreateView and
// onDestroyView.
private val binding get() = _binding!!

override fun onCreateView(
    inflater: LayoutInflater,
    container: ViewGroup?,
    savedInstanceState: Bundle?
): View? {
    _binding = ResultProfileBinding.inflate(inflater, container, false)
    val view = binding.root
    return view
}

override fun onDestroyView() {
    super.onDestroyView()
    _binding = null
}
You can now use the instance of the binding class to reference any of the views:
binding.name.text = viewModel.name
binding.button.setOnClickListener { viewModel.userClicked() }
Note: Fragments outlive their views. Make sure you clean up any references to the binding class instance in the fragment’s onDestroyView() method.
Referencces
- https://developer.android.com/topic/libraries/architecture/viewmodel
- https://developer.android.com/jetpack/androidx/releases/lifecycle#declaring_dependencies
- https://developer.android.com/topic/libraries/architecture/livedata
- https://developer.android.com/topic/libraries/view-binding