Jellyfin & ErsatzTV在J4125小主机的Ubuntu系统上实现硬件加速转码
- 在J4125小主机的Ubuntu系统上运行Jellyfin并实现硬件加速转码的步骤:
- 1 按照Jellyfin官方文档在Ubuntu上安装Jellyfin
- 2 按照Jellyfin官方文档在Ubuntu上完成QSV / VA-API codecs硬件解码器相关设置并验证硬件是否正常工作
- 2.1 Add the jellyfin repository to your apt source list
- 2.2 Install the jellyfin-ffmpeg7 package
- 2.3 Make sure at least one renderD* device exists in /dev/dri. Otherwise upgrade your kernel or enable the iGPU in the BIOS.
- 2.4 Add the jellyfin user to the render group, then restart jellyfin service:
- 2.5 Check the version of intel-opencl-icd that the Linux distro provides:
- 2.6 If the version is newer than 22.xx.xxxxx just install it.
- 2.7 Check the supported QSV / VA-API codecs:
- 2.8 Check the OpenCL runtime status
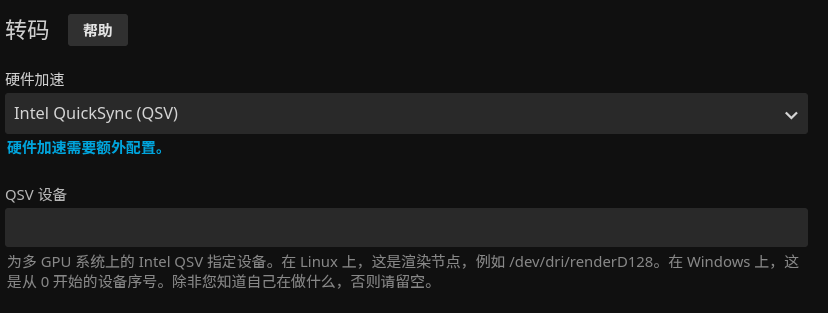
- 3 在Jellyfin中开启硬件加速转码,选择QSV选项
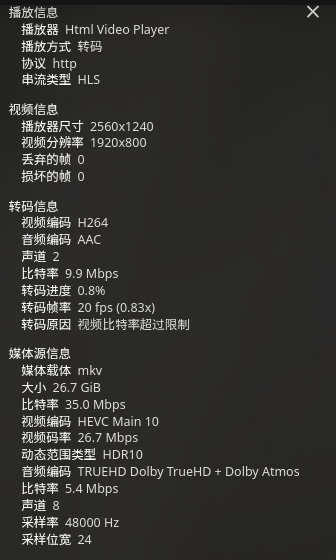
- 4 验证Jellyfin能成功通过QSV完成硬件加速转码
- 在J4125小主机上通过Docker运行Jellyfin并实现硬件加速转码的步骤:
- 在J4125小主机的Ubuntu系统上运行ErsatzTV并实现硬件加速转码的步骤:
在J4125小主机的Ubuntu系统上运行Jellyfin并实现硬件加速转码的步骤:
1 按照Jellyfin官方文档在Ubuntu上安装Jellyfin
curl https://repo.jellyfin.org/install-debuntu.sh | sudo bash
2 按照Jellyfin官方文档在Ubuntu上完成QSV / VA-API codecs硬件解码器相关设置并验证硬件是否正常工作
2.1 Add the jellyfin repository to your apt source list
官方文档的Jellyfin安装过程中会自动将jellyfin repository添加到apt source list,如果已经完成了Jellyfin的安装,可以直接跳过这一步。
2.2 Install the jellyfin-ffmpeg7 package
官方文档的Jellyfin安装过程中会同时安装jellyfin-ffmpeg7,如果已经完成了Jellyfin的安装,可以直接跳过这一步。
sudo apt update && sudo apt install -y jellyfin-ffmpeg7
2.3 Make sure at least one renderD* device exists in /dev/dri. Otherwise upgrade your kernel or enable the iGPU in the BIOS.
$ ls -l /dev/dri

total 0
drwxr-xr-x  2 root root        120 Mar  5 05:15 by-path
crw-rw----+ 1 root video  226,   0 Mar  5 05:15 card0
crw-rw----+ 1 root video  226,   1 Mar  5 05:15 card1
crw-rw----+ 1 root render 226, 128 Mar  5 05:15 renderD128
crw-rw----+ 1 root render 226, 129 Mar  5 05:15 renderD129
2.4 Add the jellyfin user to the render group, then restart jellyfin service:
sudo usermod -aG render jellyfin
sudo systemctl restart jellyfin
2.5 Check the version of intel-opencl-icd that the Linux distro provides:
$ apt policy intel-opencl-icd

intel-opencl-icd:
  Installed: (none)
  Candidate: 22.14.22890-1
...
2.6 If the version is newer than 22.xx.xxxxx just install it.
sudo apt install -y intel-opencl-icd
2.7 Check the supported QSV / VA-API codecs:
sudo /usr/lib/jellyfin-ffmpeg/vainfo --display drm --device /dev/dri/renderD128

Trying display: drm
libva info: VA-API version 1.22.0
libva info: Trying to open /usr/lib/jellyfin-ffmpeg/lib/dri/iHD_drv_video.so
libva info: Found init function __vaDriverInit_1_22
libva info: va_openDriver() returns 0
vainfo: VA-API version: 1.22 (libva 2.22.0)
vainfo: Driver version: Intel iHD driver for Intel(R) Gen Graphics - 25.2.6 (c6ab0c9)
vainfo: Supported profile and entrypoints
      VAProfileNone                   :	VAEntrypointVideoProc
      VAProfileNone                   :	VAEntrypointStats
      VAProfileMPEG2Simple            :	VAEntrypointVLD
      VAProfileMPEG2Main              :	VAEntrypointVLD
      VAProfileH264Main               :	VAEntrypointVLD
      VAProfileH264Main               :	VAEntrypointEncSlice
      VAProfileH264Main               :	VAEntrypointFEI
      VAProfileH264Main               :	VAEntrypointEncSliceLP
      VAProfileH264High               :	VAEntrypointVLD
      VAProfileH264High               :	VAEntrypointEncSlice
      VAProfileH264High               :	VAEntrypointFEI
      VAProfileH264High               :	VAEntrypointEncSliceLP
      VAProfileVC1Simple              :	VAEntrypointVLD
      VAProfileVC1Main                :	VAEntrypointVLD
      VAProfileVC1Advanced            :	VAEntrypointVLD
      VAProfileJPEGBaseline           :	VAEntrypointVLD
      VAProfileJPEGBaseline           :	VAEntrypointEncPicture
      VAProfileH264ConstrainedBaseline:	VAEntrypointVLD
      VAProfileH264ConstrainedBaseline:	VAEntrypointEncSlice
      VAProfileH264ConstrainedBaseline:	VAEntrypointFEI
      VAProfileH264ConstrainedBaseline:	VAEntrypointEncSliceLP
      VAProfileVP8Version0_3          :	VAEntrypointVLD
      VAProfileVP8Version0_3          :	VAEntrypointEncSlice
      VAProfileHEVCMain               :	VAEntrypointVLD
      VAProfileHEVCMain               :	VAEntrypointEncSlice
      VAProfileHEVCMain               :	VAEntrypointFEI
      VAProfileHEVCMain10             :	VAEntrypointVLD
      VAProfileHEVCMain10             :	VAEntrypointEncSlice
      VAProfileVP9Profile0            :	VAEntrypointVLD
      VAProfileVP9Profile2            :	VAEntrypointVLD
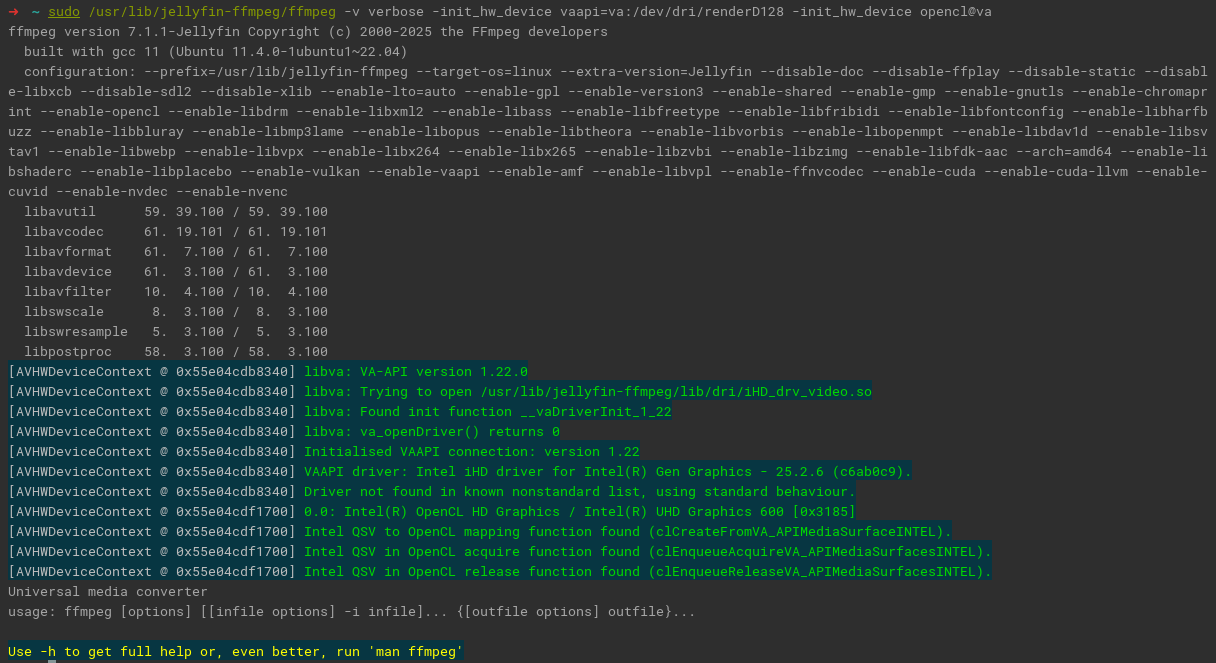
2.8 Check the OpenCL runtime status
sudo /usr/lib/jellyfin-ffmpeg/ffmpeg -v verbose -init_hw_device vaapi=va:/dev/dri/renderD128 -init_hw_device opencl@va

ffmpeg version 7.1.1-Jellyfin Copyright (c) 2000-2025 the FFmpeg developers
  built with gcc 11 (Ubuntu 11.4.0-1ubuntu1~22.04)
  configuration: --prefix=/usr/lib/jellyfin-ffmpeg --target-os=linux --extra-version=Jellyfin --disable-doc --disable-ffplay --disable-static --disable-libxcb --disable-sdl2 --disable-xlib --enable-lto=auto --enable-gpl --enable-version3 --enable-shared --enable-gmp --enable-gnutls --enable-chromaprint --enable-opencl --enable-libdrm --enable-libxml2 --enable-libass --enable-libfreetype --enable-libfribidi --enable-libfontconfig --enable-libharfbuzz --enable-libbluray --enable-libmp3lame --enable-libopus --enable-libtheora --enable-libvorbis --enable-libopenmpt --enable-libdav1d --enable-libsvtav1 --enable-libwebp --enable-libvpx --enable-libx264 --enable-libx265 --enable-libzvbi --enable-libzimg --enable-libfdk-aac --arch=amd64 --enable-libshaderc --enable-libplacebo --enable-vulkan --enable-vaapi --enable-amf --enable-libvpl --enable-ffnvcodec --enable-cuda --enable-cuda-llvm --enable-cuvid --enable-nvdec --enable-nvenc
  libavutil      59. 39.100 / 59. 39.100
  libavcodec     61. 19.101 / 61. 19.101
  libavformat    61.  7.100 / 61.  7.100
  libavdevice    61.  3.100 / 61.  3.100
  libavfilter    10.  4.100 / 10.  4.100
  libswscale      8.  3.100 /  8.  3.100
  libswresample   5.  3.100 /  5.  3.100
  libpostproc    58.  3.100 / 58.  3.100
[AVHWDeviceContext @ 0x5b98ad31fe80] libva: VA-API version 1.22.0
[AVHWDeviceContext @ 0x5b98ad31fe80] libva: Trying to open /usr/lib/jellyfin-ffmpeg/lib/dri/iHD_drv_video.so
[AVHWDeviceContext @ 0x5b98ad31fe80] libva: Found init function __vaDriverInit_1_22
[AVHWDeviceContext @ 0x5b98ad31fe80] libva: va_openDriver() returns 0
[AVHWDeviceContext @ 0x5b98ad31fe80] Initialised VAAPI connection: version 1.22
[AVHWDeviceContext @ 0x5b98ad31fe80] VAAPI driver: Intel iHD driver for Intel(R) Gen Graphics - 25.2.6 (c6ab0c9).
[AVHWDeviceContext @ 0x5b98ad31fe80] Driver not found in known nonstandard list, using standard behaviour.
[AVHWDeviceContext @ 0x5b98ad359240] 0.0: Intel(R) OpenCL HD Graphics / Intel(R) UHD Graphics 600 [0x3185]
[AVHWDeviceContext @ 0x5b98ad359240] Intel QSV to OpenCL mapping function found (clCreateFromVA_APIMediaSurfaceINTEL).
[AVHWDeviceContext @ 0x5b98ad359240] Intel QSV in OpenCL acquire function found (clEnqueueAcquireVA_APIMediaSurfacesINTEL).
[AVHWDeviceContext @ 0x5b98ad359240] Intel QSV in OpenCL release function found (clEnqueueReleaseVA_APIMediaSurfacesINTEL).
Universal media converter
usage: ffmpeg [options] [[infile options] -i infile]... {[outfile options] outfile}...

Use -h to get full help or, even better, run 'man ffmpeg'
3 在Jellyfin中开启硬件加速转码,选择QSV选项
4 验证Jellyfin能成功通过QSV完成硬件加速转码
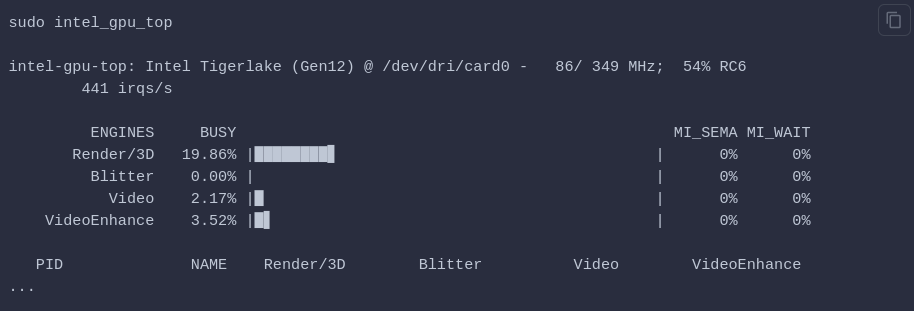
4.1 Install the intel-gpu-tools package on the host system
On Debian & Ubuntu:
sudo apt update && sudo apt install -y intel-gpu-tools
4.2 Play a video in Jellyfin web client and trigger a video transcoding by setting a lower resolution or bitrate.
4.3 Use intel_gpu_top command to check the occupancy of the engines as follows:
本地系统配置好并验证Jellyfin能成功通过QSV完成硬件加速转码后,可以考虑进一步配置Docker版Jellyfin的硬件解码,以后可以考虑只通过Docker运行Jellfyin,方便管理。当然硬件转码最简单的方法还是直接本地运行Jellyfin,因为本地版本的设置步骤更加简单,调试也更加方便直接,可能出现的问题更少。
在J4125小主机上通过Docker运行Jellyfin并实现硬件加速转码的步骤:
1 根据Jellyfin官方文档在Docker上安装Jellyfin
2 Query the id of the render group on the host system
getent group render | cut -d: -f3
3. Use render group in the Docker CLI or docker-compose file
Example docker-compose configuration file written in YAML:
services:
  jellyfin:
    image: jellyfin/jellyfin
    user: 1000:1000
    group_add:
      - '122' # Change this to match your "render" host group id and remove this comment
    network_mode: 'host'
    volumes:
      - /path/to/config:/config
      - /path/to/cache:/cache
      - /path/to/media:/media
    devices:
      - /dev/dri/renderD128:/dev/dri/renderD128
4 Check the QSV and VA-API codecs in container
docker exec -it jellyfin /usr/lib/jellyfin-ffmpeg/vainfo
5 Check the OpenCL runtime status in container
docker exec -it jellyfin /usr/lib/jellyfin-ffmpeg/ffmpeg -v verbose -init_hw_device vaapi=va -init_hw_device opencl@va
6 Enable QSV or VA-API in Jellyfin
参考:Jellyfin官方文档
注意:区分Linuxserver.io版本的Jellyfin Docker镜像与Jellyfin官方版本,两者的Jellyfin config和data文件的路径配置有所不同。
在J4125小主机的Ubuntu系统上运行ErsatzTV并实现硬件加速转码的步骤:
1 按照ErsatzTV官方文档在Ubuntu上安装ErsatzTV
2 进入Settings,将ffpmeg和ffprobe路径改为jellyfin-ffmpeg7的安装路径
- ffmpeg path:
/usr/lib/jellyfin-ffmpeg/ffmpeg - ffprobe path:
/usr/lib/jellyfin-ffmpeg/ffprobe
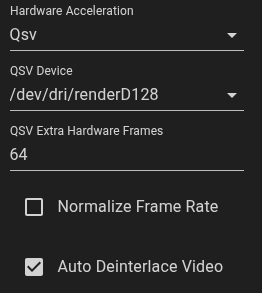
3 编辑FFmpeg Profile,开启硬件加速转码,选择QSV选项
4 进入Troubleshooting,展开QSV Capabilities,检查输出结果
检查输出中jellyfin-ffmpeg7是否被正确使用以及结果中是否存在任何报错(比如, “Error creating a MFX session: -9”, “No VA display found for device /dev/dri/renderD128”等)。如果Exit Code不为0或者输出最后出现“Conversion Failed”字样,即表示硬件转码不成功;反之,如果输出中Exit Code为0并且输出最后没有出现“Conversion Failed”字样,即表示硬件转码成功。
ErsatzTV - Troubleshooting - QSV Capabilities 硬件转码成功的输出样例:
Checking device /dev/dri/renderD128
Exit Code: 0

ffmpeg version 7.1.1-Jellyfin Copyright (c) 2000-2025 the FFmpeg developers
  built with gcc 11 (Ubuntu 11.4.0-1ubuntu1~22.04)
  configuration: --prefix=/usr/lib/jellyfin-ffmpeg --target-os=linux --extra-version=Jellyfin --disable-doc --disable-ffplay --disable-static --disable-libxcb --disable-sdl2 --disable-xlib --enable-lto=auto --enable-gpl --enable-version3 --enable-shared --enable-gmp --enable-gnutls --enable-chromaprint --enable-opencl --enable-libdrm --enable-libxml2 --enable-libass --enable-libfreetype --enable-libfribidi --enable-libfontconfig --enable-libharfbuzz --enable-libbluray --enable-libmp3lame --enable-libopus --enable-libtheora --enable-libvorbis --enable-libopenmpt --enable-libdav1d --enable-libsvtav1 --enable-libwebp --enable-libvpx --enable-libx264 --enable-libx265 --enable-libzvbi --enable-libzimg --enable-libfdk-aac --arch=amd64 --enable-libshaderc --enable-libplacebo --enable-vulkan --enable-vaapi --enable-amf --enable-libvpl --enable-ffnvcodec --enable-cuda --enable-cuda-llvm --enable-cuvid --enable-nvdec --enable-nvenc
  libavutil      59. 39.100 / 59. 39.100
  libavcodec     61. 19.101 / 61. 19.101
  libavformat    61.  7.100 / 61.  7.100
  libavdevice    61.  3.100 / 61.  3.100
  libavfilter    10.  4.100 / 10.  4.100
  libswscale      8.  3.100 /  8.  3.100
  libswresample   5.  3.100 /  5.  3.100
  libpostproc    58.  3.100 / 58.  3.100
libva info: VA-API version 1.22.0
libva info: Trying to open /usr/lib/jellyfin-ffmpeg/lib/dri/iHD_drv_video.so
libva info: Found init function __vaDriverInit_1_22
libva info: va_openDriver() returns 0
libva info: VA-API version 1.22.0
libva info: Trying to open /usr/lib/jellyfin-ffmpeg/lib/dri/iHD_drv_video.so
libva info: Found init function __vaDriverInit_1_22
libva info: va_openDriver() returns 0
Input #0, lavfi, from 'nullsrc':
  Duration: N/A, start: 0.000000, bitrate: N/A
  Stream #0:0: Video: wrapped_avframe, yuv420p, 320x240 [SAR 1:1 DAR 4:3], 25 fps, 25 tbr, 25 tbn
Stream mapping:
  Stream #0:0 -> #0:0 (wrapped_avframe (native) -> h264 (h264_qsv))
Press [q] to stop, [?] for help
libva info: VA-API version 1.22.0
libva info: Trying to open /usr/lib/jellyfin-ffmpeg/lib/dri/iHD_drv_video.so
libva info: Found init function __vaDriverInit_1_22
libva info: va_openDriver() returns 0
[h264_qsv @ 0x5863317fbfc0] Using the constant quantization parameter (CQP) by default. Please use the global_quality option and other options for a quality-based mode or the b option and other options for a bitrate-based mode if the default is not the desired choice.
Output #0, null, to 'pipe:':
  Metadata:
    encoder         : Lavf61.7.100
  Stream #0:0: Video: h264, nv12(tv, progressive), 320x240 [SAR 1:1 DAR 4:3], q=2-31, 25 fps, 25 tbn
      Metadata:
        encoder         : Lavc61.19.101 h264_qsv
      Side data:
        cpb: bitrate max/min/avg: 0/0/0 buffer size: 0 vbv_delay: N/A
[out#0/null @ 0x5863311d9600] video:1KiB audio:0KiB subtitle:0KiB other streams:0KiB global headers:0KiB muxing overhead: unknown
frame=   25 fps=0.0 q=35.0 Lsize=N/A time=00:00:00.88 bitrate=N/A speed=9.19x


Checking device /dev/dri/card0
Exit Code: 0

ffmpeg version 7.1.1-Jellyfin Copyright (c) 2000-2025 the FFmpeg developers
  built with gcc 11 (Ubuntu 11.4.0-1ubuntu1~22.04)
  configuration: --prefix=/usr/lib/jellyfin-ffmpeg --target-os=linux --extra-version=Jellyfin --disable-doc --disable-ffplay --disable-static --disable-libxcb --disable-sdl2 --disable-xlib --enable-lto=auto --enable-gpl --enable-version3 --enable-shared --enable-gmp --enable-gnutls --enable-chromaprint --enable-opencl --enable-libdrm --enable-libxml2 --enable-libass --enable-libfreetype --enable-libfribidi --enable-libfontconfig --enable-libharfbuzz --enable-libbluray --enable-libmp3lame --enable-libopus --enable-libtheora --enable-libvorbis --enable-libopenmpt --enable-libdav1d --enable-libsvtav1 --enable-libwebp --enable-libvpx --enable-libx264 --enable-libx265 --enable-libzvbi --enable-libzimg --enable-libfdk-aac --arch=amd64 --enable-libshaderc --enable-libplacebo --enable-vulkan --enable-vaapi --enable-amf --enable-libvpl --enable-ffnvcodec --enable-cuda --enable-cuda-llvm --enable-cuvid --enable-nvdec --enable-nvenc
  libavutil      59. 39.100 / 59. 39.100
  libavcodec     61. 19.101 / 61. 19.101
  libavformat    61.  7.100 / 61.  7.100
  libavdevice    61.  3.100 / 61.  3.100
  libavfilter    10.  4.100 / 10.  4.100
  libswscale      8.  3.100 /  8.  3.100
  libswresample   5.  3.100 /  5.  3.100
  libpostproc    58.  3.100 / 58.  3.100
[AVHWDeviceContext @ 0x64e36a2e9600] libva: vaGetDriverNames() failed with operation failed
libva info: VA-API version 1.22.0
libva info: Trying to open /usr/lib/jellyfin-ffmpeg/lib/dri/iHD_drv_video.so
libva info: Found init function __vaDriverInit_1_22
libva info: va_openDriver() returns 0
libva info: VA-API version 1.22.0
libva info: Trying to open /usr/lib/jellyfin-ffmpeg/lib/dri/iHD_drv_video.so
libva info: Found init function __vaDriverInit_1_22
libva info: va_openDriver() returns 0
Input #0, lavfi, from 'nullsrc':
  Duration: N/A, start: 0.000000, bitrate: N/A
  Stream #0:0: Video: wrapped_avframe, yuv420p, 320x240 [SAR 1:1 DAR 4:3], 25 fps, 25 tbr, 25 tbn
Stream mapping:
  Stream #0:0 -> #0:0 (wrapped_avframe (native) -> h264 (h264_qsv))
Press [q] to stop, [?] for help
libva info: VA-API version 1.22.0
libva info: Trying to open /usr/lib/jellyfin-ffmpeg/lib/dri/iHD_drv_video.so
libva info: Found init function __vaDriverInit_1_22
libva info: va_openDriver() returns 0
[h264_qsv @ 0x64e36a442a40] Using the constant quantization parameter (CQP) by default. Please use the global_quality option and other options for a quality-based mode or the b option and other options for a bitrate-based mode if the default is not the desired choice.
Output #0, null, to 'pipe:':
  Metadata:
    encoder         : Lavf61.7.100
  Stream #0:0: Video: h264, nv12(tv, progressive), 320x240 [SAR 1:1 DAR 4:3], q=2-31, 25 fps, 25 tbn
      Metadata:
        encoder         : Lavc61.19.101 h264_qsv
      Side data:
        cpb: bitrate max/min/avg: 0/0/0 buffer size: 0 vbv_delay: N/A
[out#0/null @ 0x64e36a378740] video:1KiB audio:0KiB subtitle:0KiB other streams:0KiB global headers:0KiB muxing overhead: unknown
frame=   25 fps=0.0 q=35.0 Lsize=N/A time=00:00:00.88 bitrate=N/A speed=6.12x
ErsatzTV - Troubleshooting - QSV Capabilities 硬件转码失败的输出样例:
Checking device /dev/dri/renderD128
Exit Code: 171

ffmpeg version n7.1.1-56-gc2184b65d2-20250716 Copyright (c) 2000-2025 the FFmpeg developers
  built with gcc 15.1.0 (crosstool-NG 1.27.0.42_35c1e72)
  configuration: --prefix=/ffbuild/prefix --pkg-config-flags=--static --pkg-config=pkg-config --cross-prefix=x86_64-ffbuild-linux-gnu- --arch=x86_64 --target-os=linux --enable-gpl --enable-version3 --disable-debug --enable-iconv --enable-zlib --enable-libfribidi --enable-gmp --enable-libxml2 --enable-openssl --enable-lzma --enable-fontconfig --enable-libharfbuzz --enable-libfreetype --enable-libvorbis --enable-opencl --enable-libpulse --enable-libvmaf --enable-libxcb --enable-xlib --enable-amf --enable-libaom --enable-libaribb24 --enable-avisynth --enable-chromaprint --enable-libdav1d --enable-libdavs2 --enable-libdvdread --enable-libdvdnav --disable-libfdk-aac --enable-ffnvcodec --enable-cuda-llvm --enable-frei0r --enable-libgme --enable-libkvazaar --enable-libaribcaption --enable-libass --enable-libbluray --enable-libjxl --enable-libmp3lame --enable-libopus --enable-librist --enable-libssh --enable-libtheora --enable-libvpx --enable-libwebp --enable-libzmq --enable-lv2 --enable-libvpl --enable-openal --enable-libopencore-amrnb --enable-libopencore-amrwb --enable-libopenh264 --enable-libopenjpeg --enable-libopenmpt --enable-librav1e --enable-librubberband --disable-schannel --enable-sdl2 --enable-libsnappy --enable-libsoxr --enable-libsrt --enable-libsvtav1 --enable-libtwolame --enable-libuavs3d --enable-libdrm --enable-vaapi --enable-libvidstab --enable-vulkan --enable-libshaderc --enable-libplacebo --enable-libvvenc --enable-libx264 --enable-libx265 --enable-libxavs2 --enable-libxvid --enable-libzimg --enable-libzvbi --extra-cflags=-DLIBTWOLAME_STATIC --extra-cxxflags= --extra-libs='-ldl -lgomp' --extra-ldflags=-pthread --extra-ldexeflags=-pie --cc=x86_64-ffbuild-linux-gnu-gcc --cxx=x86_64-ffbuild-linux-gnu-g++ --ar=x86_64-ffbuild-linux-gnu-gcc-ar --ranlib=x86_64-ffbuild-linux-gnu-gcc-ranlib --nm=x86_64-ffbuild-linux-gnu-gcc-nm --extra-version=20250716
  libavutil      59. 39.100 / 59. 39.100
  libavcodec     61. 19.101 / 61. 19.101
  libavformat    61.  7.100 / 61.  7.100
  libavdevice    61.  3.100 / 61.  3.100
  libavfilter    10.  4.100 / 10.  4.100
  libswscale      8.  3.100 /  8.  3.100
  libswresample   5.  3.100 /  5.  3.100
  libpostproc    58.  3.100 / 58.  3.100
[AVHWDeviceContext @ 0x57ee44e15780] libva: Failed to get device id from the driver. Please consider to upgrade the driver to support VA-API 1.15.0
Device creation failed: -1313558101.
Failed to set value '/dev/dri/renderD128' for option 'qsv_device': Unknown error occurred
Error parsing global options: Unknown error occurred


Checking device /dev/dri/card0
Exit Code: 171

ffmpeg version n7.1.1-56-gc2184b65d2-20250716 Copyright (c) 2000-2025 the FFmpeg developers
  built with gcc 15.1.0 (crosstool-NG 1.27.0.42_35c1e72)
  configuration: --prefix=/ffbuild/prefix --pkg-config-flags=--static --pkg-config=pkg-config --cross-prefix=x86_64-ffbuild-linux-gnu- --arch=x86_64 --target-os=linux --enable-gpl --enable-version3 --disable-debug --enable-iconv --enable-zlib --enable-libfribidi --enable-gmp --enable-libxml2 --enable-openssl --enable-lzma --enable-fontconfig --enable-libharfbuzz --enable-libfreetype --enable-libvorbis --enable-opencl --enable-libpulse --enable-libvmaf --enable-libxcb --enable-xlib --enable-amf --enable-libaom --enable-libaribb24 --enable-avisynth --enable-chromaprint --enable-libdav1d --enable-libdavs2 --enable-libdvdread --enable-libdvdnav --disable-libfdk-aac --enable-ffnvcodec --enable-cuda-llvm --enable-frei0r --enable-libgme --enable-libkvazaar --enable-libaribcaption --enable-libass --enable-libbluray --enable-libjxl --enable-libmp3lame --enable-libopus --enable-librist --enable-libssh --enable-libtheora --enable-libvpx --enable-libwebp --enable-libzmq --enable-lv2 --enable-libvpl --enable-openal --enable-libopencore-amrnb --enable-libopencore-amrwb --enable-libopenh264 --enable-libopenjpeg --enable-libopenmpt --enable-librav1e --enable-librubberband --disable-schannel --enable-sdl2 --enable-libsnappy --enable-libsoxr --enable-libsrt --enable-libsvtav1 --enable-libtwolame --enable-libuavs3d --enable-libdrm --enable-vaapi --enable-libvidstab --enable-vulkan --enable-libshaderc --enable-libplacebo --enable-libvvenc --enable-libx264 --enable-libx265 --enable-libxavs2 --enable-libxvid --enable-libzimg --enable-libzvbi --extra-cflags=-DLIBTWOLAME_STATIC --extra-cxxflags= --extra-libs='-ldl -lgomp' --extra-ldflags=-pthread --extra-ldexeflags=-pie --cc=x86_64-ffbuild-linux-gnu-gcc --cxx=x86_64-ffbuild-linux-gnu-g++ --ar=x86_64-ffbuild-linux-gnu-gcc-ar --ranlib=x86_64-ffbuild-linux-gnu-gcc-ranlib --nm=x86_64-ffbuild-linux-gnu-gcc-nm --extra-version=20250716
  libavutil      59. 39.100 / 59. 39.100
  libavcodec     61. 19.101 / 61. 19.101
  libavformat    61.  7.100 / 61.  7.100
  libavdevice    61.  3.100 / 61.  3.100
  libavfilter    10.  4.100 / 10.  4.100
  libswscale      8.  3.100 /  8.  3.100
  libswresample   5.  3.100 /  5.  3.100
  libpostproc    58.  3.100 / 58.  3.100
[AVHWDeviceContext @ 0x56747aacf7c0] libva: Failed to get device id from the driver. Please consider to upgrade the driver to support VA-API 1.15.0
Device creation failed: -1313558101.
Failed to set value '/dev/dri/card0' for option 'qsv_device': Unknown error occurred
Error parsing global options: Unknown error occurred
5 Auto start ersatztv as a systemd service
创建一个如下的ersatztv.service文件:
# /etc/systemd/system/ersatztv.service

[Unit]
Description=ErsatzTV Service

[Service]
ExecStart=/home/greg/Applications/ersatztv/ErsatzTV-v25.2.0-linux-x64/ErsatzTV
Restart=on-abort
User=root
WorkingDirectory=/home/greg/Applications/ersatztv/ErsatzTV-v25.2.0-linux-x64

[Install]
WantedBy=multi-user.target
Enable the service to start on boot:
sudo systemctl daemon-reload
sudo systemctl enable ersatztv.service